
Looking Forward Jan 3 2010
Following up on my 2009 retrospective post, I think I’ll follow the trend and jot down a few goals and thoughts for 2010.
This coming year I want to continue to get even more productive and organised. Managing a lot of different projects presents unique challenges, and I worked hard this last year to settle on a good workflow, but I think I can probably get more organised still in terms of planning my workload. I’ve come to accept that I’m more of a night owl than a morning person, and embracing that has already meant that I have a routine that better suits me, and that lets me get more done. The next step I think is trying to plan my individual days better, and trying to limit how unexpected events can disrupt that plan.
I’d also like to continue to look at ways of embracing Agile more in how I work with clients, as I feel this will be key to my target of improving productivity and organisation. In December I started doing the one man equivalent of a daily standup each morning, just to spend some time getting straight what I had achieved the day before, and what I had planned that day, as well as potential blockers. I’d like to try and leverage burndowns and retrospectives more this year to give me a better insight into solid project management.
I’m looking forward to working on some interesting projects this coming year, and I’m excited by the potential for new clients, as well as continuing to work with some great existing clients. I definitely want to make time for a few of my own ideas however, and I have a few things I’ve been kicking around that I’d like to get time to flesh out and see where they go. I want to try to set aside a small portion of time each week to focus on this, so that I can progress at least one solid idea and get it launched this year.
I’ve already started on this one, but I want to learn at least one new programming language this year. Usually I’m pretty good about picking stuff up and challenging myself with something new, but in 2009 starting a business and figuring out the best workflow for my freelance work meant that I wasn’t able to spend any time focusing on something as big as a brand new language. I’ve now started learning Clojure however, and so I want to keep chipping away at that and working with it, and get to the point where I feel comfortable writing useful code with it.
I also want to continue to blog more. I was keeping to a post a day for a little while before the holidays, and I’m hoping to keep to around a post every other day throughout this year. I find writing very relaxing and I’m hopeful that what I write will prove useful to others, as well as help me to engage with other interesting people out there.
I’m enjoying studying on my current business course, and once that’s wrapped up in March, I’m going to look at taking on another more in depth course over the Summer. Studying something other than programming is proving to be very rewarding, and it’s a nice occasional break from my other work. By the end of the year I hope to be a good chunk of the way towards my business degree, and should also be part way through another course by then too.
While I want to continue to work hard at all times, I do think that I need to set aside blocks of time for relaxing, and catching up on the other things I love - reading books and comics, playing videogames, watching movies, golfing and spending more time with my wife and puppy. I think being even more organised will help me to complete the work things I need to get done, with spare time left over for other interests. I started this the last few weeks of 2009, taking one night out a week to go to the movies with my wife, and really enjoyed it.
In the spirit of Crush It! though, I want to look at ways I can turn some of my passions into things that I can work on, so that I can devote more time to them and still have them contribute to the growth of my business and brand in some way. I have a few top secret ideas that I’m going to look at, provided I meet my earlier target of finding time to set aside for my own things!
Lastly, I want to do more DIY work around the house - there are quite a few things that have been on hold for almost a year since I’ve been so busy with the business, but tying into the above idea of making time but staying productive, I want to set aside some time for knocking over a few of the jobs that could do with looking at too.
That’s just about it for me I think. I didn’t go with the bullet point list of set targets as I know that a lot of things can happen in a year that might change my priorities, or might direct my interests in other areas. I’m instead hoping that these thoughts will guide my early progress in 2010, and we’ll see what the year holds from then on out.
I hope everyone else has a productive, fun and prosperous 2010!
CommentsLooking Back Jan 2 2010
I’ve been relaxing over the holidays so have only just found time to write a 2009 year end post, but thought I should definitely do it as 2009 has been very exciting!
2009 was the year that I went freelance, and started my own business, mainly focusing on Ruby on Rails work. For the most part there has been plenty of work to keep me busy, and even though it was way back in March that I quit my day job to go full-time freelancer, the rest of the year has flown by incredibly quickly!
Also, I launched my website at the beginning of the year, but as the year drew to a close I was able to find time to rebuild it and rebrand. I think the new design is a lot more professional and represents my brand a lot better, so I’m very pleased I was able to get that done. My initial target was to get it done by the beginning of 2010, but in the end I was able to put it together much more quickly by using Tumblr, and so launched in November!
Working from home definitely suits me, I’m working a lot more hours than I ever was in a day job, but I’m a lot more relaxed, and I really am enjoying what I do. I also get to spend a lot more time with my incredible wife, who is the driving force behind all of my successes. And towards the end of the year I really found my groove for productivity. I was able to get plenty done from day one when I went full-time, but a few months ago I made a conscious effort to improve my productivity and organisation, and it has now allowed me to get a lot more done, and so I’m feeling incredibly positive about the possibilities for this coming year now.
Aside from the business, back in May, two exciting things happened. Firstly, we took a trip to Vegas for RailsConf, and turned it into a bit of a vacation. It was great to finally meet my long time associate and buddy Michael Leung, and the conference itself was decent. My wife and I got married in Vegas in 2007, so it’s always special for us to go back too, and we got chance to hire a Mustang and drive out to the Hoover Dam as well, which was really awesome.
When we got back from our trip, we picked up our gorgeous Dalmatian puppy, Rocky. He’s been absolutely brilliant fun since the very first day we picked him up at the end of May, and he still loves to play like a puppy, even though he’s almost fully grown now! It’s been a lot of fun taking care and looking after him, and he keeps us healthy with daily walks. Hard to believe he’s gone from this, to this, in just 8 months!
In November, I started an openings course with the Open University, a taster course on the long road to getting a business degree. I took on this course to see if I could fit in studying alongside my other commitments, and with some hard work, I can. So far the course is going great, and I’ll be wrapping that up over the next couple of months. I then hope to tackle a bigger course over the Summer!
Overall this year has been fantastic - one of real change and progress. I’m now doing what I love from home and at the hours that suit me, and with a greater variety of projects and code to write. I’m also studying something that’s both of interest to me, and that will also be really useful for running my business. I definitely have a few things I want to tweak though, that relate to my goals for 2010, to keep progressing and bettering myself, so I’m going to do a follow up post focusing on a few of these things next!
I hope everyone else had a productive 2009, and a belated Happy New Year to all!
CommentsAnnouncing Appsta 1.1.0 Dec 21 2009
Worked a bit on tidying Appsta up this evening, and made a few decisions that will hopefully make it a bit more useful, and also hopefully get a few more people interested in using and contributing to it!
Appsta is at its core a library of helper methods for use in Rails templates, to help you build useful Rails app creation scripts that can cut down the amount of time it takes for you to get a new Rails app up and running with your standard setup. Everyone makes some initial modifications every time they break out the “rails” command, and by encapsulating this in a Rails template, you can save some time. Appsta added helper methods for setting up projects on GitHub, and setting up hosting environments on Heroku, amongst other things.
Appsta 1.0.0 also included a command line tool that you could use instead of the “rails” command, and used Appsta and a standard template to do some common things, namely setup staging and production Heroku environments, push the code to GitHub, setup some common gems, and use jQuery instead of Prototype/Scriptaculous. However, I realised over time that although that was a great default script for me, the whole point of Rails templates and advanced customization means that it probably wasn’t as useful for everyone else, as we all have slightly different preferences.
I decided therefore to do away with the command line “appsta” command and default template, so that Appsta is concentrated on simply being a library of useful setup helper methods for throwing into your own custom Rails templates.
It makes sense for developers to have their own customized Rails template with their own personal preferences for Rails application configuration (or perhaps per-company templates) - however it doesn’t make much sense for us all to have mammoth scripts that duplicates basic functionality within the template itself. The idea with Appsta is that over time we can accrue quite a large library of a variety of methods, and then building a customized template is just a case of picking and choosing the bits you want.
So Appsta 1.1.0 does just that, and tonight as well as tidying it up to remove the command line app, I also added in a shortcut for doing a git push, and helpers for removing some default and often unnecessary default files (README, public/index.html, public/favicon.ico), and also for removing the default JS libraries and using jQuery instead. An example template using all of the current available helper methods is on the wiki for the project on GitHub, but in short…
To install Appsta:
sudo gem install appstaAnd to load Appsta in your Rails template, add in:
# Load Appsta
require "appsta"
Appsta.load
To remove default files:
# Remove the default README, public/index.html, and public/favicon.ico
remove_default_files
To setup jQuery:
# Remove the default JS libs and use jQuery
use_jquery("1.3.2")
And to push to Git remote(s):
# This performs a push of master to the specified remote(s)
git_push(:origin, :staging)
That covers the new bits, you can check out the Heroku and GitHub integration and the existing helper methods on the wiki page. I’m hoping that with the command line and default template clutter out of the way, Appsta can now be focused on reusable, useful chunks of helper code for your Rails templates. If you want to discuss this further with me, or have any comments or questions, please let me know. And if you want to contribute, don’t hesitate to fork the code, make your changes and send me a pull request!
CommentsGetting started with Rails 2.3.5 Dec 19 2009
This is a tutorial guided towards those who are new to Rails, or those who have not used it since v1.x and who might want a newbie-style refresher. I’ll be working my way through to some more advanced and interesting topics soon, so for those of you who know all of this already, please stay tuned!
I’ve now been using Ruby on Rails for almost four years, and have seen it progress from version to version. In doing so, I’ve kept up with the changes between each version, and the new features that updates have brought to the table.
For newcomers though, the scene is a little different. Much of the information out there pertains to older versions, from really out of date stuff related to Rails 1.2, to things that may or may not still work as expected when talking about Rails 2.0 features.
I figured that even though it will one day be outdated as well, some Rails newbies might well find it useful to have a straightforward, simple up to date getting started guide for Rails 2.3.5. I’m going to do just that, and a few other articles on the Rails basics, before getting into some more advanced stuff. This article will start specifically dealing with setting up an app, before building our first REST resource using scaffolding.
UPDATE: Jeff points out in the comments below that some users may need to install the sqlite3-ruby gem if they haven’t already (assuming this is your first time with Ruby/Rails/rubygems then that might be quite likely!). As Jeff says, to install the gem, run:
sudo gem install sqlite3-ruby
To begin with, let’s install Rails. I’m assuming you have Ruby and RubyGems installed, but if you have issues with the base setup on Mac OS X, then there is an excellent tutorial here. Once you’re all setup, install Rails as follows:
sudo gem install railsThis will install the latest version of Rails, which at the time of writing is 2.3.5. To specifically install version 2.3.5, for example if 2.3.5 is no longer the most recent version, use this instead:
sudo gem install rails -v 2.3.5If you don’t want to install local ri and RDoc documentation (i.e. you’ll be looking up API docs online, for example), then you can save a little disk space and a bit of time on installation by doing:
sudo gem install rails -v 2.3.5 --no-ri --no-rdocThat works for any gem installation.
Once it’s installed Rails 2.3.5 and it’s dependencies, it should leave you with the “rails” command available from the terminal. If you already had a previous version installed, you can make sure that you’ve got the right version at your fingertips by running:
rails -vThat should print “Rails 2.3.5” to the console.
Now on to the exciting part; to create an application, it’s as easy as running:
rails <appname>So for example:
rails my_new_test_appI’ll be going over a new feature, Rails templates, and how they can speed up your typical Rails application creation process, in a future post. For now, the default application skeleton created by that command will do.
Let’s go ahead and test our new application. Change into the directory for the new app, and fire it up.
cd my_new_test_app

ruby script/server
This will fire up a development server on port 3000 by default, and by visiting
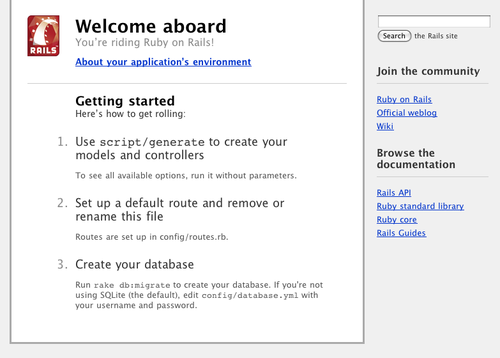
http://localhost:3000in a browser, you’ll be able to see the app running. You should be greeted with the default Ruby on Rails page.
Let’s do something a little more exciting, and build something interactive. Rails uses some sensible configuration decisions out of the box, and also provides a fair few generators to get you going with some code. We’ll use one of these generators to provide what’s called a “scaffold”, an automatically built representation of an entire resource, giving you everything you need to get something going quickly. In time, the scaffolding will become less useful as you get used to building the resources yourself more quickly to suit your exact requirements - however to get up and running really quickly, it’s a great start.
We’re going to build a basic note resource, allowing the creation, retrieval, update and deletion of notes (these four actions are referred to as CRUD). To scaffold the resource, run:
ruby script/generate scaffold note body:textThis basically is creating a note model with accompanying controller and views, and we’ve also told it that it should have a single column - body, a text field. It will also be given some timestamp columns (created_at, updated_at) which are updated automatically and can be very useful.
Now let’s go ahead and run the command to bring the database up to date with our changes:
rake db:migrateThis will setup the notes table that was created as part of the scaffold. Now if we visit http://localhost:3000/notes, we can see our fully working notes resource in action!

You can play around with creating, updating and deleting notes and see that it all works straight off the bat.
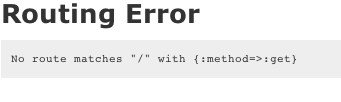
If we revisit http://localhost:3000 though, we still see the landing page. Let’s set it up so that the root of the site displays the notes index page. We need to do a couple of things to make this happen. Firstly, we need to remove that placeholder landing page, so run:
rm public/index.htmlHowever this still leaves you with the following error when accessing your app now:
We now need to tell the application to use the notes resource for the root of the site. Rails routing can be as complex or as simple as you need it. If you open up config/routes.rb, you’ll see that at the top there is the line:
map.resources :notesThis is the line that exposes your notes resource at http://localhost:3000/notes. So how do we hook up the root of the site to hit the index page for the notes resource? We just need to add a single line to the top of our config/routes.rb file. Right below this line:
ActionController::Routing::Routes.draw do |map|add in the following line:
map.root :controller => :notes, :action => :indexThis tells the app that the root URL (/) corresponds to the index action of the notes controller, which is the one responsible for displaying the list of all notes (the same as seen at http://localhost:3000/notes). Now if you reload http://localhost:3000, you’ll see that it shows the same content as http://localhost:3000/notes.
As before, you can play with the notes to see that it all works correctly - it doesn’t look too pretty, and is almost rarely exactly what you want out of the box, but when getting started with Rails it can provide an exciting and quick way to get new things up and running quickly, and to toy around with.
Now that we’ve got a basic, working application running on Rails 2.3.5, we’ll draw this article to a close. In future articles we’ll delve into more detail on some of the configuration choices you can make when setting up your application, some further detail on building out REST resources, testing your application, and some other more advanced stuff.
For a more in depth and lengthy look at getting up and running with Rails, check out the Rails guide for Getting Started with Rails.
As usual, if you have any comments, queries, suggestions or questions about the above, please get in touch!
CommentsDelicious irony, and MongoDB Dec 18 2009
So I guess it would stand to reason that a day after blogging about how awesome my new blog routine is, and how it helps me to post every day now, I get busy enough not to find time to really polish the draft I have going at the minute. Not wanting to lose my streak (just), I figured I’d at least try to post something useful today, even if it’s just a link to someone else.
This excellent article about MongoDB is well worth a read. I’d already used Mongo and MongoMapper a little bit on a pet project just to try it out - it powers a basic URL redirector, and runs on Heroku and the (so far excellent) MongoHQ. However after reading John’s article, I’m itching to build out something more substantial using Mongo, to take advantage of some of the really cool things that can be done using it, namely array/hash keys, and GridFS file storage.
Check out the article, then take a look at MongoDB if you haven’t already!
CommentsBlogging, and sticking to it Dec 17 2009
As some of you may have noticed - I’ve been blogging a lot more in the last few days. This is me attempting to start a New Years resolution early, and that’s to try and publish a new post everyday.
However, I always found writing a new post from scratch, checking it twice, proof reading it and publishing it all in one day very daunting. Two different things have helped me with this.
The first, is that while reading Gary Vaynerchuk’s book Crush It!, I took the tip he outlined and wrote down 50 blog post topics that I could think of straight off the bat to talk about. At first I thought 50 was a lot, but when I got going I realised there was a huge number of interesting things I could write about. In the end I wrote more than 50 topics down, and since then have been adding almost as many to the list as I have been crossing off. This means I always have a list of cool things to write about and put down in a post.
The second thing was that I’ve altered my workflow slightly. I used to sit down and try to write a post from start to finish and publish it. This too meant that it always seemed like a big task to try and write something up. However now, I try to simply write “half a post”, or rather, get my initial idea down in rough draft format, and then tidy it up, proof read it, and publish it the next day. Now this means that each day, I finish off one post by simply checking it over, making a few tweaks, and publishing it, and then put another idea down in draft format ready for the next day (if I have time, I might put a couple of drafts down).
Thanks to these two steps, it never seems like too much effort to get a post out each and every day. That, combined with how easy to use Tumblr is, means that I’m now back to writing content regularly, enjoying it, and hopefully some of you are finding it interesting too!
CommentsThe paradoxical web application hypothesis Dec 16 2009
It suddenly dawned on me that something interesting, and in some ways very paradoxical, is occurring with current application trends. Over the last few years, there has been a marked movement towards rich user experiences in web applications - more and more web apps are using Flash and/or AJAX as well as other modern concepts to really make web sites behave and feel truly like first class applications on your computer, with advanced and intricate user experiences. In many cases now web apps have been able to replace their desktop counterparts for a number of users.
Contrast and compare this with the state of mobile development. For years now, wide ranging and patchy HTML support has hampered mobile website development, but the iPhone brings a much more advanced and impressive web browser to the table, and other smartphones such as those running the Android OS now have very full featured browsers too. And yet there doesn’t seem to be much of a focus on advanced mobile web apps. Sure there are some good offerings on the web, and a fair few iPhone optimized sites - but none that as a user you’d lean on in the same way as you might on your computer. Instead, the focus is on native applications, built to service the platform directly - such as the iPhone, or devices running the Android OS, for example. Most platforms are now running app stores that let users search, browse and download apps too, increasing convenience for obtaining native applications.
So why the difference in approach between apps on your computer, and mobile apps? Why do many users now look to advanced web applications instead of native apps where possible on a computer, but when using their mobile, the focus is on native applications?
One of the biggest reasons is probably connectivity. On a desktop computer, many of us now have always-on connections, so we take for granted our web apps always being there. I myself run a fair few different web apps using Fluid, as their own “separate” applications (this includes Google Mail, Google Calendar, Google Reader, Pivotal Tracker and TVCatchup). I always expect them to work, and so I almost treat them like native applications running on my machine, and not on the web. On a mobile of course, while you usually have a connection of some sort (3G, perhaps degrading to Edge or GPRS in certain areas), there still isn’t that complacency when dealing with content you know is being accessed over the air. And in some areas, there is no signal at all, making it almost impossible for many people to completely rely on mobile web applications. Considering the vast majority of applications run fine offline (either they don’t need an online component, or are fine with a sync later approach), it’s easy to see the appeal of offline, native applications on the mobile platform, as opposed to optimized web application offerings.
Interesting though how these two very different viewpoints seem to have come about at almost the same time, and gone in opposite directions to suit user expectations on each platform.
What do you prefer to use on your desktop computer? And how about on your mobile? And where do you see it all going?
CommentsUnderstanding Management Dec 15 2009
I recently embarked on an openings course with the Open University, with a view to it being the first step for me on the way to a distance learning business degree. The openings course is mainly designed to get you into a studying frame of mind, and is perfect for someone like me who is returning to studying after six years. However, as the choices for the two openings courses on the way to a business degree seemed fairly dry (Understanding Management, or Understanding Society), I figured on the most interesting thing about the course simply being getting to grips with studying itself. I opted with Understanding Management.
As I’ve gotten through the first part of the course however, and with my first assignment submitted today, I’ve found that actually the course material has provided me with some rather interesting thoughts and concepts. The general idea that is presented throughout the first half of the course is that we are all managers. Management is made up of distinct, identifiable processes and roles, and we all implement a mixture of these processes and roles while managing tasks, however big or small they might be. We simply use a different set of these processes dependent upon the job at hand.
Instead of thinking about the stereotype of stuffy management and managers, it is important to understand what the concept actually is, and further to that, how it can be effectively applied, and become something useful for everyone who might happen to be “in charge” of something. And that really is anyone - whether it’s managing your finances, managing your workload, managing a party, or managing Christmas dinner. We’re all managers of something, and the sooner we can understand the processes that make up how we manage, the quicker we can improve them and become more efficient at it.
CommentsAgile and Scrum'd Dec 14 2009
I’ve been meaning to write this up for almost two weeks now, but there is no time like the present! A couple of weeks ago Robert Dempsey, CEO and founder of Atlantic Dominion Solutions took some time out of his busy schedule to speak to me about agile, and specifically agile from a freelancers point of view.
We had a great chat and covered a number of different things, but it was very cool to get his take on how much of the agile process a freelancer can really implement. From my own experiences so far, I felt that certain aspects still translate to a one man band scenario really well (client user stories, organising development into sprints and iterations), but there were other aspects such as daily standups and sprint retrospectives that I was struggling to identify where they might be able to fit in.
As I explained to Robert, effectively as a freelancer I am doing what amounts to a standup (what did I do yesterday, what am I doing today, what is blocking my objectives), only I’m doing it in bitesize chunks throughout the day. I’m managing my workflow, changing projects if something is blocking my progress, and checking off things as I get them done. The key difference for me is that my standup needs to account for my entire workload, which might encompass multiple projects for different clients in any given day.
After speaking with Robert, it became clear that while I don’t need to do a lonely one man standup in the strictest sense, there is still potentially some value in me attempting to take a set time period at the beginning of each day to accomplish the same thing as a standup - clear off what I achieved yesterday, plan what I’m working on today, and isolate/identify any blockers to my current and planned work for the day - in this way, I won’t need to waste time on those things throughout the day, where it potentially might be more distracting to my overall workflow. At the minute first thing I do each day is Inbox Zero, so it makes sense to follow that right up with a standup which is another potentially great productivity task that’ll help me to plan and organise my day.
Robert also mentioned that over at ADS they are building out some really great resources on agile, and coming at the topic from lots of different angles, so that people can understand how it might work for them, regardless of their situation or how they work. Specifically the up and coming Agile for Freelancers section looks to be very promising, and I’m looking forward to reading the resources that come out of this work, as well as giving them useful feedback from a freelancers perspective.
I really enjoyed the chat with Robert, and will definitely be speaking to him again in the future - hopefully I helped him a little in terms of getting more information on a freelancers perspective, and he definitely helped me out with some general advice on agile as a concept, and how it can be applied even in scenarios where it perhaps isn’t immediately obvious.
Lastly, he is currently running a very generous offer for the agile web application Scrum’d which ADS have built - a year free on their top of the range corporate product for any company still in its first year of business. He was able to hook me up, and I’m excited to start using it more extensively, and providing ADS with some feedback, as they seem very interested in turning user requests and feedback into reality, and are incredibly focused on crafting a tool that users really get the most out of. Thanks again for the free year of Scrum’d Robert!
I’m hoping to write up in more detail over the coming months my experiences of the bits of the agile process that work for me as a freelancer, and the bits that need tweaking or don’t fit so well. If any other freelancers have thoughts, questions or comments, I’d be delighted to hear from you!
CommentsAdvanced Tumblr Customization Dec 13 2009
As I hinted in my last post, I wanted to outline a few tips and tricks I used to customize this site pretty heavily when getting it up and running on Tumblr.
The documentation for building custom themes is pretty comprehensive, and covers the majority of things you’d want to do when building a customized site. I won’t rehash it here, needless to say it’s a relatively straightforward templating syntax that doesn’t take too long to get your head around.
One of the things that the current theme syntax does omit is to be able to identify when you are on a private post, or specifically, when you aren’t. Often you’ll want to drop in Disqus or another such script-based commenting system on all posts - except private posts, if like me you are using them as about or contact pages, you don’t really want to invite user comments for them!
The way I tackled this was to have the comments script embedded on all post pages, but to then hide it for specific pages. The easiest way to then choose to hide it on private pages, was to use the post IDs. If you wrap your comment code in a div similar to the below:
<div id="comments_{PostID}" class="comments">You’ll then end up with something like this on the actual post:
<div id="comments_252690956" class="comments">This then means that if you know the post IDs for the private posts (or any posts that you don’t want this to show on), then you can use CSS like the following to hide the comment form:
#comments_252690956 { display: none; }To find the post ID for a private post, you can look at the URL. It will look something like this (this is the URL for my portfolio page):
http://ejdraper.com/private/252690956/tumblr_kthwgddWRp1qap2vcIn this case, the post ID is 252690956.
This isn’t the most ideal solution, as the comments form is still on the page but just not shown, however given the lack of a way to separate private posts from public posts within the Tumblr template syntax, for now this will have to do.
Using the same technique, I accomplished the exact same results with the pagination which I wanted on each public post, but not on private posts:
{block:PreviousPost}
<a class="pagination pagination_{PostID}" href="{PreviousPost}">
« Previous post
</a>
{/block:PreviousPost}
.pagination_252690956 { display: none; }
I used a class here to identify the pagination div, as I actually have two, one for previous post, and one for next post, and so used the same class for both.
Another little trick I had to employ, was to do with my banner image that appears only on the homepage. The syntax for identifying the index page refers to any type of index page, which also runs to both search result pages, and tag result pages. So this means that placing my header image solely within a {block:IndexPage} means it’d also show on both search and tag pages too, which I didn’t want. Seeing as how there is syntax for identifying a search page ({block:SearchPage}) and a tag page ({block:TagPage}), we can use these to specify a class that will cause the banner to be hidden in those circumstances, leaving it showing on the other remaining type of index page, the homepage. The code looks a little something like this:
{block:IndexPage}
  <div id="index"
    {block:SearchPage}class="hidden"{/block:SearchPage}
    {block:TagPage}class="hidden"{/block:TagPage}>
    <a href="/">
      <h1 id="logo">Elliott J Draper, Freelance Developer</h1>
    </a>
    <div id="headings">
      <div id="web">Web and mobile development</div>
      <div id="rails">Ruby on Rails specialist</div>
      <div id="deliver">I always deliver</div>
      <div id="bank">And I won't break the bank</div>
    </div>
    <div class="clear"></div>
  </div>
{/block:IndexPage}
And the CSS is real straightforward:
.hidden { display: none; }Besides those couple of little tricks to get around some minor limitations in the theme templates, other customization is made relatively simple by the rest of the fairly powerful theme syntax. The only other thing to mention is custom text and images. To enable you to quickly edit certain bits of the theme, such as links or header text, or to upload images, you can use a special bit of syntax. For text:
{text:MyCustomText}and for images (this puts the URL path to the image into the HTML):
{image:MyCustomImage}If you then declare these in the head of your document as follows:
<meta name="text:MyCustomText" content="">
<meta name="image:MyCustomImage" content="">
then you’ll see these options now in the “Appearance” tab of the Customize Tumblr view. For images, there will be an upload option to specify the image, and for text you can simply enter the value you want to use. In this way, you can store headings and external links as text, so that you can easily change them, and you can store all images you need for your custom design as custom images which you upload.
Hopefully some of these tips and tweaks will be useful to others customizing sites on Tumblr - I find that on the whole the theming on Tumblr is very straightforward, and a lot of fun. With a bit of thought and planning, it’s simple to create a decent customized site and get it up and running on Tumblr.
CommentsPage 8 of 31 | Next page | Previous page