
Articles tagged 'rails'
Frontend Fun with Rails 5.1 and Webpacker Jan 8 2018
Client side frameworks for more responsive web apps are en vogue, and have been for a number of years now. The frameworks themselves change in popularity - to begin with it was Backbone, then Ember and Angular - more recently, frameworks like Vue and React have become the most popular choices.
Let it never be said that Rails doesn’t move with the times though, as Rails 5.1 introduced the Webpacker gem, providing a smarter interface to allow you to use Webpack config for bundling JavaScript packages on the client side of your Rails web app. This means easier access to stable versions of client side frameworks, and easier maintainability for those dependencies going forward. It’s a separate gem too, allowing you to also use it in Rails 4.2+ apps if needed.
Let’s take a look at just how easy it is in Rails 5.1 now to setup Vue.js and React. Make sure you have the latest version of Rails installed, and then we’ll setup a new empty app:
rails new frontend-fun
You can also specify to use webpack as part of this command and skip the next couple of steps:
rails new frontend-fun --webpack
However, if you’re looking to add this to an existing Rails app, these next two steps will allow you to add Webpacker ready to use.
Within the app, add the webpacker gem to Gemfile:
gem "webpacker"
Then run bundle from a terminal in the root directory of the project to install the gem:
bundle install
At this point, we’ll now have some additional commands available to us courtesy of the webpacker gem, to install frontend packages. We’ll get things rolling with the initial command to prep our webpacker config:
bin/rails webpacker:install
With that done, we should probably setup a basic page for testing, so create a new controller app/controllers/site_controller.rb, with the following Ruby code in it:
class SiteController < ApplicationController
end
Then we’ll create a template for our content, at app/views/site/index.html.erb:
<h1>FrontendFun</h1>
Finally, in our config/routes.rb file, we’ll add a reference for the root of our app to the new controller and action:
Rails.application.routes.draw do
  root "site#index"
end
If you test our app now, you’ll see the FrontendFun header. Last thing we now need to do is hook in our webpacker JS, with a reference from our layout template. In app/views/layouts/application.html.erb, below the javascript_include_tag reference in the <head>, add:
<%= javascript_pack_tag 'application' %>
Now if you reload the page, and look in the JavaScript console, you should see:
Hello World from Webpacker
Webpacker - it’s alive!
Vue.js
To install Vue.js, run the following commands:
bin/rails webpacker:install:vue
bin/yarn install
This will install the Vue.js packages. We’ll then hook up the Hello Vue pack that is setup by default, by modifying our javascript_pack_tag line in app/views/layouts/application.html.erb:
<%= javascript_pack_tag 'application', 'hello_vue' %>
Reload our page, and you’ll now see Hello Vue! in our page body, which is coming directly from Vue.js!
React
Now, in a production application, you’re unlikely to want to use more than one frontend framework, unless you were transitioning from one to another. But, this is FrontendFun, so we’re going to add React too!
By now, this should be fairly straightforward, we run:
bin/rails webpacker:install:react
bin/yarn install
This will install the React packages now, and setup a base HelloReact component similar to our HelloVue. So we’ll just need to modify our javascript_pack_tag one more time to reference our React pack:
<%= javascript_pack_tag 'application', 'hello_vue', 'hello_react %>
Once more, reload our page, and behold - Hello Vue! and Hello React!.
Two frontend frameworks, setup very easily, co-existing in the same HTML page in our Rails app. The possibilities are practically endless!
Next steps
From here, you can edit either app/javascripts/packs/hello_vue.js and app/javascripts/app.vue if you want to use Vue.js, or app/javascripts/hello_react.jsx for React, adding new components and interactions to build out your frontend, and integrate it with whatever backend functionality your Rails app might offer. You can check out the simple demo Rails app that we’ve just built up here.
Getting started with Ruby 2.0 and Rails 4.0.0 beta 1 Feb 26 2013
It’s an exciting time to be a Rubyist as we get lots of new versions of things to play with. Ruby 2.0 is finally out, and with it a raft of updates across the board for various Ruby related software, including the first beta of Rails 4!
To get up and running quickly with Ruby 2 and Rails 4 (using RVM), it’s pretty easy:
rvm get stable

rvm install 2.0.0-p0

rvm use 2.0.0-p0

rvm gemset use rails4 --create

gem install bundler

gem install rails --pre
If that last command doesn’t work, try:
gem install rails -v 4.0.0.beta1And then when the gems are installed, you can create a new app using Rails 4 beta 1:
rails new new_rails4_appIf you have SSL cert issues with Bundler under Ruby 2.0 (it’ll error on the Rails app creation as it runs bundle install by default), then you might find that the following helps:
brew install openssl

rvm get head

rvm reinstall 2.0.0-p0
The latest RVM builds against packages found in Homebrew by default, so it’ll use the Homebrew OpenSSL. You’ll then most likely need something like these commands to sync the Homebrew OpenSSL CA certs with the system keychain, or indeed this tool will add a crontab entry that regularly keeps those certs in sync, useful if any certs change in future.
The other alternative is to skip bundling when creating the Rails app:
rails new new_rails4_app --skip-bundleAnd then switch from HTTPS to HTTP in the Gemfile for the newly created app, although I wouldn’t recommend it and it’d be better if you can use the above instructions to get it working over SSL.
Once that’s all installed, you can get to grips with the latest changes in Ruby 2.0 and Rails 4.0.0, so have at it! I’ll be posting more about the features these new versions introduce shortly, so follow me on Twitter!
Commentsautotest Jan 13 2010
I’ve just recently started using autotest again, and it’s making development so much easier, and more enjoyable. If you do any TDD (test driven development) with Ruby, you need autotest running, as it really improves the experience massively.
With autotest, and growl, you can plod away writing failing tests, implementing code so that they pass, and then rinse and repeat - all the way getting messages flash up telling you when tests are broken, and when tests are passing again. It’s a great way to iterate through writing code to meet user requirements, and incredibly satisfying as you turn failing tests into passing ones, with working code.
So what do you need to do to get it setup? You’ll need to install ZenTest, which contains autotest amongst some other tools:
sudo gem install ZenTestYou can then install the following gems too if you don’t have them already:
sudo gem install autotest-growl
sudo gem install autotest-rails
Finally, you’ll need to setup a small config file, called .autotest in your home directory (~/.autotest):
require "autotest/growl"That’s all you need in that file, now just hop into a Rails project directory, and run autotest:
cd /path/to/project
autotest
You’ll then get output from the initial test run, and from now on while autotest is running, when you edit a file, it will re-run any tests it deems to have been impacted by a change to that file. It will pop up test failures and test successes as growl notifications too. To force it to re-run the entire test suite, press ctrl+c once. To end autotest completely, use ctrl+c twice in quick succession. Bear in mind for things like database schema changes, you’ll need to do the following to get the test database schema up to date and inline with the development database, otherwise your tests when being run under autotest will fail:
rake db:test:prepareNow get cracking with those user stories, get those tests written, and then turn them from red to green!
CommentsRuby on Rails Tutorial Jan 9 2010
Not a great start to my yearly goals - right after posting about how I want to blog every other day, I manage to go six days without a post! Time to try again, starting from today…
I was planning my next article as a follow-up to the Getting started with Rails 2.3.5 article I did in December, when I stumbled across this rather brilliant work in progress online tutorial book, Ruby on Rails Tutorial, by Michael Hartl (author of the great Railsspace book). Rather than write some more beginner articles that are probably covered by that material (or soon will be), I figured I’d point my readers in the direction of that resource, as it is certainly shaping up to be a great read for anyone just getting started with Rails.
So going forward I’m going to concentrate on some more advanced topics, and a few more interesting things perhaps for those who are already up to speed with the Rails basics. I’m going to be covering some of the alternative datastores popping up under the NoSQL umbrella - CouchDB and MongoDB on the document database side, and Redis on the key-value store side of things. I’m also going to have a play with the very latest Rails 3 code, so look for a few articles both on building a new app with Rails 3, as well as migrating existing apps.
And if anyone has any requests for intermediate or advanced topics they’d like to see me cover, then let me know. In the meantime, even if you’re an expert Rails developer, it’s still worth checking out the Ruby on Rails Tutorial book and helping Michael out with any feedback you might have.
CommentsAnnouncing Appsta 1.1.0 Dec 21 2009
Worked a bit on tidying Appsta up this evening, and made a few decisions that will hopefully make it a bit more useful, and also hopefully get a few more people interested in using and contributing to it!
Appsta is at its core a library of helper methods for use in Rails templates, to help you build useful Rails app creation scripts that can cut down the amount of time it takes for you to get a new Rails app up and running with your standard setup. Everyone makes some initial modifications every time they break out the “rails” command, and by encapsulating this in a Rails template, you can save some time. Appsta added helper methods for setting up projects on GitHub, and setting up hosting environments on Heroku, amongst other things.
Appsta 1.0.0 also included a command line tool that you could use instead of the “rails” command, and used Appsta and a standard template to do some common things, namely setup staging and production Heroku environments, push the code to GitHub, setup some common gems, and use jQuery instead of Prototype/Scriptaculous. However, I realised over time that although that was a great default script for me, the whole point of Rails templates and advanced customization means that it probably wasn’t as useful for everyone else, as we all have slightly different preferences.
I decided therefore to do away with the command line “appsta” command and default template, so that Appsta is concentrated on simply being a library of useful setup helper methods for throwing into your own custom Rails templates.
It makes sense for developers to have their own customized Rails template with their own personal preferences for Rails application configuration (or perhaps per-company templates) - however it doesn’t make much sense for us all to have mammoth scripts that duplicates basic functionality within the template itself. The idea with Appsta is that over time we can accrue quite a large library of a variety of methods, and then building a customized template is just a case of picking and choosing the bits you want.
So Appsta 1.1.0 does just that, and tonight as well as tidying it up to remove the command line app, I also added in a shortcut for doing a git push, and helpers for removing some default and often unnecessary default files (README, public/index.html, public/favicon.ico), and also for removing the default JS libraries and using jQuery instead. An example template using all of the current available helper methods is on the wiki for the project on GitHub, but in short…
To install Appsta:
sudo gem install appstaAnd to load Appsta in your Rails template, add in:
# Load Appsta
require "appsta"
Appsta.load
To remove default files:
# Remove the default README, public/index.html, and public/favicon.ico
remove_default_files
To setup jQuery:
# Remove the default JS libs and use jQuery
use_jquery("1.3.2")
And to push to Git remote(s):
# This performs a push of master to the specified remote(s)
git_push(:origin, :staging)
That covers the new bits, you can check out the Heroku and GitHub integration and the existing helper methods on the wiki page. I’m hoping that with the command line and default template clutter out of the way, Appsta can now be focused on reusable, useful chunks of helper code for your Rails templates. If you want to discuss this further with me, or have any comments or questions, please let me know. And if you want to contribute, don’t hesitate to fork the code, make your changes and send me a pull request!
CommentsGetting started with Rails 2.3.5 Dec 19 2009
This is a tutorial guided towards those who are new to Rails, or those who have not used it since v1.x and who might want a newbie-style refresher. I’ll be working my way through to some more advanced and interesting topics soon, so for those of you who know all of this already, please stay tuned!
I’ve now been using Ruby on Rails for almost four years, and have seen it progress from version to version. In doing so, I’ve kept up with the changes between each version, and the new features that updates have brought to the table.
For newcomers though, the scene is a little different. Much of the information out there pertains to older versions, from really out of date stuff related to Rails 1.2, to things that may or may not still work as expected when talking about Rails 2.0 features.
I figured that even though it will one day be outdated as well, some Rails newbies might well find it useful to have a straightforward, simple up to date getting started guide for Rails 2.3.5. I’m going to do just that, and a few other articles on the Rails basics, before getting into some more advanced stuff. This article will start specifically dealing with setting up an app, before building our first REST resource using scaffolding.
UPDATE: Jeff points out in the comments below that some users may need to install the sqlite3-ruby gem if they haven’t already (assuming this is your first time with Ruby/Rails/rubygems then that might be quite likely!). As Jeff says, to install the gem, run:
sudo gem install sqlite3-ruby
To begin with, let’s install Rails. I’m assuming you have Ruby and RubyGems installed, but if you have issues with the base setup on Mac OS X, then there is an excellent tutorial here. Once you’re all setup, install Rails as follows:
sudo gem install railsThis will install the latest version of Rails, which at the time of writing is 2.3.5. To specifically install version 2.3.5, for example if 2.3.5 is no longer the most recent version, use this instead:
sudo gem install rails -v 2.3.5If you don’t want to install local ri and RDoc documentation (i.e. you’ll be looking up API docs online, for example), then you can save a little disk space and a bit of time on installation by doing:
sudo gem install rails -v 2.3.5 --no-ri --no-rdocThat works for any gem installation.
Once it’s installed Rails 2.3.5 and it’s dependencies, it should leave you with the “rails” command available from the terminal. If you already had a previous version installed, you can make sure that you’ve got the right version at your fingertips by running:
rails -vThat should print “Rails 2.3.5” to the console.
Now on to the exciting part; to create an application, it’s as easy as running:
rails <appname>So for example:
rails my_new_test_appI’ll be going over a new feature, Rails templates, and how they can speed up your typical Rails application creation process, in a future post. For now, the default application skeleton created by that command will do.
Let’s go ahead and test our new application. Change into the directory for the new app, and fire it up.
cd my_new_test_app

ruby script/server
This will fire up a development server on port 3000 by default, and by visiting
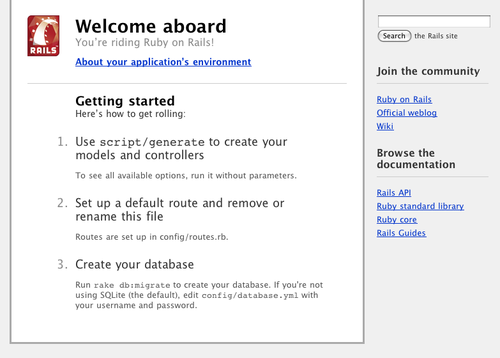
http://localhost:3000in a browser, you’ll be able to see the app running. You should be greeted with the default Ruby on Rails page.
Let’s do something a little more exciting, and build something interactive. Rails uses some sensible configuration decisions out of the box, and also provides a fair few generators to get you going with some code. We’ll use one of these generators to provide what’s called a “scaffold”, an automatically built representation of an entire resource, giving you everything you need to get something going quickly. In time, the scaffolding will become less useful as you get used to building the resources yourself more quickly to suit your exact requirements - however to get up and running really quickly, it’s a great start.
We’re going to build a basic note resource, allowing the creation, retrieval, update and deletion of notes (these four actions are referred to as CRUD). To scaffold the resource, run:
ruby script/generate scaffold note body:textThis basically is creating a note model with accompanying controller and views, and we’ve also told it that it should have a single column - body, a text field. It will also be given some timestamp columns (created_at, updated_at) which are updated automatically and can be very useful.
Now let’s go ahead and run the command to bring the database up to date with our changes:
rake db:migrateThis will setup the notes table that was created as part of the scaffold. Now if we visit http://localhost:3000/notes, we can see our fully working notes resource in action!

You can play around with creating, updating and deleting notes and see that it all works straight off the bat.
If we revisit http://localhost:3000 though, we still see the landing page. Let’s set it up so that the root of the site displays the notes index page. We need to do a couple of things to make this happen. Firstly, we need to remove that placeholder landing page, so run:
rm public/index.htmlHowever this still leaves you with the following error when accessing your app now:
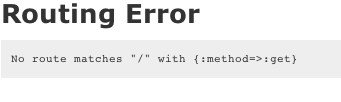
We now need to tell the application to use the notes resource for the root of the site. Rails routing can be as complex or as simple as you need it. If you open up config/routes.rb, you’ll see that at the top there is the line:
map.resources :notesThis is the line that exposes your notes resource at http://localhost:3000/notes. So how do we hook up the root of the site to hit the index page for the notes resource? We just need to add a single line to the top of our config/routes.rb file. Right below this line:
ActionController::Routing::Routes.draw do |map|add in the following line:
map.root :controller => :notes, :action => :indexThis tells the app that the root URL (/) corresponds to the index action of the notes controller, which is the one responsible for displaying the list of all notes (the same as seen at http://localhost:3000/notes). Now if you reload http://localhost:3000, you’ll see that it shows the same content as http://localhost:3000/notes.
As before, you can play with the notes to see that it all works correctly - it doesn’t look too pretty, and is almost rarely exactly what you want out of the box, but when getting started with Rails it can provide an exciting and quick way to get new things up and running quickly, and to toy around with.
Now that we’ve got a basic, working application running on Rails 2.3.5, we’ll draw this article to a close. In future articles we’ll delve into more detail on some of the configuration choices you can make when setting up your application, some further detail on building out REST resources, testing your application, and some other more advanced stuff.
For a more in depth and lengthy look at getting up and running with Rails, check out the Rails guide for Getting Started with Rails.
As usual, if you have any comments, queries, suggestions or questions about the above, please get in touch!
CommentsReady to Rumble Oct 20 2008
Wow, so what a 48 hours it was doing the Rails Rumble! Really great to get something up and running in two days. Me and my boy Mike really got it hooked up and came up with something pretty cool we think.
Likis is a language wiki designed to encourage collaboration and contribution to build an extensive language resource, to help people learn languages. It allows wiki-style editing of language pages, phrases and words, and it also includes audio pronunciations, so you can upload a recording of a specific foreign language word or phrase to help others!
Check it out, and let us know what you think! Now I need to get some sleep…
CommentsLight as a Feather Apr 7 2008
My boy Mike is back blogging his ass off again, and this time, he’s doing it on some decent software! Last few weeks me and Mike have been working on an ultra-cool blogging platform written using the Merb framework, and it’s now in production use for Mike’s blog. This very blog will follow suit shortly as I migrate over, and within a few weeks we are hoping to have the codebase in a good enough state to be able to open up the source, and start to invite contributions from anyone that feels the need to help out. The idea behind Feather is the same as Merb - lightweight core framework, extended heavily by plugins, allowing you to choose the pieces of functionality you need, and leave out the guff that you don’t. Keep it dialed in here for further updates on Feather over the next few weeks, and keep a keen eye on Mike’s blog too for more great posts. In fact, he’s already in the thick of it with this great post on why Ruby does it for him (and why .Net doesn’t).
Adventures in Merb Mar 17 2008
I decided to give Merb a go, and after doing a fair bit of reading up on it, I took the plunge. It’s a little rough around the edges, but that’s probably to be expected given it’s youth - however there are a number of cool features and benefits to using it, and it’s getting better and better as it’s being refactored. I did however come across a few interesting issues getting up and running, so I thought I’d share these to try and make the process easier for others.
I installed the gems from http://merbivore.com, by doing the following:
sudo gem install merb
  --source=http://merbivore.com --include-dependencies
This gave me the merb-core gem, along with merb-more. However, to get up and running with a database, we really need a database plugin - let’s try DataMapper.
sudo gem install datamapper
  --source=http://merbivore.com --include-dependencies
sudo gem install merb_datamapper
  --source=http://merbivore.com --include-dependencies
Now you’d think that a dependency for merb_datamapper would be datamapper itself, however it doesn’t get included, and so you need to download that as a gem, and then download merb_datamapper. We then need a few other gems, including one specific to the database you’ll be connecting to:
sudo gem install data_objects
  --source=http://merbivore.com
sudo gem install do_sqlite3
  --source=http://merbivore.com
As you can see, I chose to install do_sqlite3 for accessing a sqlite3 database. However you could install “do_mysql”, or “do_postgres” to access MySql or PostgreSql databases respectively, and I’m sure there are others. Sqlite users using Mac OS X 10.4 (Tiger) should bear in mind an issue I came across, whereby a strange error is received when attempting to do any database related activity with the do_sqlite3 gem and the default native sqlite3 version that comes with the operating system. This manifested itself as a couple of different strange errors (including a “DataMapper constant not found” error when starting Merb), however the solution was simply to grab the latest sqlite source from www.sqlite.org, build it, and install it. Then try re-installing the do_sqlite3 gem as above, and you should find that they play together much better!
We can now proceed with creating a Merb app to play with:
merb-gen testapp
Looking in the “testapp” folder now shows us the initial structure Merb uses, which is fairly similar to how Rails applications are structured. The main differences that you’ll need to know straight away are that routes are defined in the “router.rb” file within the “config” directory, and that the main settings and application initialization stuff is within “init.rb” in the “config” folder. Let’s setup our app to use DataMapper by changing the “init.rb” file. Find the following lines:
### Uncomment for DataMapper ORM
# use_orm :datamapper

### Uncomment for ActiveRecord ORM
# use_orm :activerecord

### Uncomment for Sequel ORM
# use_orm :sequel
and uncomment the datamapper line, like this
### Uncomment for DataMapper ORM
use_orm :datamapper

### Uncomment for ActiveRecord ORM
# use_orm :activerecord

### Uncomment for Sequel ORM
# use_orm :sequel
This then tells our application to use and load the DataMapper database plugin. Further down in that file you’ll see something similar for testing, and you can choose whether to use rspec, or test_unit. Using rspec is the default. After we change the database settings, we run:
merb-gen
to get it to generate database config. This will create the file “database.sample.yml” in the “config” folder, which we can rename to “database.yml”, and configure correctly. Here is a sample development configuration set to use sqlite3:
:development: &defaults
  :adapter: sqlite3
  :database: db/testapp_development.sqlite3
Remember to create the “db” directory. Now to finish off our test application, we can create a dummy controller and views, to see our application in action.
merb-gen resource person
  first_name:string last_name:string date_of_birth:date
Now we need to migrate the data to take into account the new model. Note there are no migration files like in Rails, however there is a Rake task to migrate the data based on the DataMapper definitions with the model classes:
rake dm:db:automigrate
That should now create the database file (“db/testapp_development.sqlite3”), and we should now be able to play around with the model within our application. First, let’s run the application via the console, and inspect the new model:
merb -i
>> Person.count
This will display a count of 0, as there are no people in the database yet. Let’s create one:
>> Person.create({:first_name => "test", :last_name => "dude",
  :date_of_birth => Time.now})
Only this returns an error!
DataObject::QueryError: Your query failed.
table people has no column named date_of_birth
For some reason, the migrations within DataMapper tend to be a bit erratic - there is a console command you can run however that will often fix issues and sync the model definitions to the database more accurately:
>> DataMapper::Persistence::auto_migrate!
Running our create command from before should now work as expected, with a Person object returned and saved with an ID of 1. You can check to ensure that there is a Person object:
>> Person.count
=> 1
>> Person.all
=> [#Person]
>> Person.first
=> #Person
>> Person[1]
=> #Person
The above queries show how to retrieve all Person instances within the database, just the first, or a specific Person by ID. In this case, the same (and only) Person instance is returned (it’s returned as an array with a single element in the “Person.all” query). But now let’s check out the real deal, and see the web interface - fire it up by just running:
merb
This will start the server, and you can now browse to http://localhost:4000 to see the application. This will show a Merb error page, saying that no route matches the request “/”. This is because while we have a single resource within the application, it’s setup to be exposed by default at http://localhost:4000/people. Browse to that url, and you’ll see the default Merb generated view. Let’s hook this up to the root of the application so it’s accessible at the easier to remember url http://localhost:4000. Within the “router.rb” file in the “config” folder, look for the following lines:
# Change this for your home page to be available at /
# r.match('/').to(:controller => 'whatever', :action =>'index')
and change the second line to read the following (uncommenting it, and changing the controller to our “people” controller):
r.match('/').to(:controller => 'people', :action =>'index')
Now browsing to http://localhost:4000 will show you the same default view for the “people” index as it would if you were browsing http://localhost:4000/people. You can now customize these views to display and interact the models, in a similar fashion as you would do in Rails!
One other thing to bear in mind is that Merb apps default to port 4000 - however running different apps on that default port at differing times will cause issues because of the way the secret session key is managed. This will most likely be fixed in due course, but at the minute running a second app on the same port at a later date will often result in a secret key error - you can run each app on a different port, or simply find the cookie that represents the “lock” on that port by a specific application, and remove it; then a different application won’t have issues using that port. You may well find that re-using a Merb app port with a Rails app also causes an issue, again removing the cookie should fix this.
So that’s pretty much it - a very basic Merb app, some potential pitfalls found and sidestepped, and a powerful, lightweight web application framework at your fingertips. While it’s obvious Merb is a work in progress, it’s also obvious just how useful this framework might become, especially for those looking to create more streamlined, better performing applications. Comments
Ruby link round-up Feb 24 2008
I’ve seen a number of great Ruby articles, tutorials and discussions recently (and not so recently), as well as some interesting projects, so I thought I’d write a quick round-up of links to some of the most interesting stuff. It’s split by category, with a miscellaneous list for stuff that didn’t seem to fit anywhere else.
- Merb
- Amazon EC2 + S3
- iPhone
- Books
- Another post from Ezra, who happens to be one of the authors of ‘Deploying Rails Applications’. This post says that the book is now at the final beta stage, and includes some more advanced content such as Apache/Nginx scaling, and Xen setups. I’ve just ordered up the beta PDF, and will be receiving the paperback too when it ships in May. Hoping to do an initial review once I give the beta a read, looks very interesting though.
- Tools and projects
- Heroku, online Rails application creation and hosting. Very cool tool for creating or collaborating on a hosted Rails application, all through your browser.
- Rush, a Ruby based shell, from one of the guys behind Heroku. Interesting concept, along the same sort of lines as Windows Powershell - but because it’s Ruby, it has a much better syntax :-)
- An article about the usage of Beanstalk, a messaging queue system, to power the Nuby on Rails blog.
- Hot off the presses, a new Capistrano preview, with some cool features such as better role definitions, and better git integration.
- Miscellaneous
- An article on generating feeds using microformats within html.
- Good post from 37signals about building a web app, and making sure you get it right - even if it means starting over.
- An article on using Ruby for scripting tasks on Mac OS X.
- Interesting article on tackling master/slave database setups with Rails.
- Great screencast on PeepCode about git, a source control tool that is all the rage at the minute. Really good introduction to the tool.
Page 1 of 1 |