
Articles tagged 'ruby'
Announcing Dotplan Feb 18 2018
I’ve re-focused how I keep track of notes and thoughts for ideas and plans, and in so doing, given an update to an old concept.
In Masters of Doom, it details how John Carmack, genius programmer at id software, used .plan files to keep track of his todos and work plans when building out classic games like Wolfenstein 3d, Doom, and Quake. He eventually started to make these public, as a way of feeding back to his community and fanbase, exactly what he was up to.
Introducing Dotplan, a very simple content system based upon the excellent Middleman framework used for Ruby content management. It’s a default Middleman blog style setup, allowing unlimited plans to be created. You can simply clone it and hit the ground running, and write all your plans in Markdown - build the site into HTML, and ship to your favourite static host or CDN. Or keep it all to yourself, and simply run it locally as a journal to keep you sane!
There are two ways of utilising Dotplan - if you like the idea of just writing, then clone the repository and do just that. All the plans content is by default excluded from the source control, meaning you can continue to pull down Dotplan updates as it changes, and you won’t have to worry about merging or conflicts. Just make sure to back up your content through some other means - perhaps using Dropbox or another similar solution. It’s a clean separation of the code to power the tool, and your content.
Alternatively, fork the repo and clone your fork, then feel free to remove the line in .gitignore which stops plans from being included. You can then check them into source control to make sure they are safe. The advantage is you can more easily track changes to your content, roll things back etc - the downside is it may make it slightly harder to pull down upstream Dotplan changes going forward.
However you do it, Dotplan is a simple way to start getting organised - or at the least, get all of those creative thoughts out of your head and down somewhere. That gives you the headspace to prioritize and focus, and makes sure you can always refer back to them in the coming weeks or months.
Check out Dotplan here.
CommentsElliott has contributed to repositories in 9 different languages. In particular, Elliott is a serious Ruby expert with a surprisingly broad knowledge of JavaScript as well. May 25 2013
Fantastic site called “The Open Source Report Card” which takes a look at your public GitHub timeline and gives you a rundown of your skills based on project contribution, as well as when you are most active and productive. Very clever stuff, and makes for some rather ego-inflating snippets that you could post on your blog, if you were so inclined.
CommentsGetting started with Ruby 2.0 and Rails 4.0.0 beta 1 Feb 26 2013
It’s an exciting time to be a Rubyist as we get lots of new versions of things to play with. Ruby 2.0 is finally out, and with it a raft of updates across the board for various Ruby related software, including the first beta of Rails 4!
To get up and running quickly with Ruby 2 and Rails 4 (using RVM), it’s pretty easy:
rvm get stable

rvm install 2.0.0-p0

rvm use 2.0.0-p0

rvm gemset use rails4 --create

gem install bundler

gem install rails --pre
If that last command doesn’t work, try:
gem install rails -v 4.0.0.beta1And then when the gems are installed, you can create a new app using Rails 4 beta 1:
rails new new_rails4_appIf you have SSL cert issues with Bundler under Ruby 2.0 (it’ll error on the Rails app creation as it runs bundle install by default), then you might find that the following helps:
brew install openssl

rvm get head

rvm reinstall 2.0.0-p0
The latest RVM builds against packages found in Homebrew by default, so it’ll use the Homebrew OpenSSL. You’ll then most likely need something like these commands to sync the Homebrew OpenSSL CA certs with the system keychain, or indeed this tool will add a crontab entry that regularly keeps those certs in sync, useful if any certs change in future.
The other alternative is to skip bundling when creating the Rails app:
rails new new_rails4_app --skip-bundleAnd then switch from HTTPS to HTTP in the Gemfile for the newly created app, although I wouldn’t recommend it and it’d be better if you can use the above instructions to get it working over SSL.
Once that’s all installed, you can get to grips with the latest changes in Ruby 2.0 and Rails 4.0.0, so have at it! I’ll be posting more about the features these new versions introduce shortly, so follow me on Twitter!
Commentsautotest Jan 13 2010
I’ve just recently started using autotest again, and it’s making development so much easier, and more enjoyable. If you do any TDD (test driven development) with Ruby, you need autotest running, as it really improves the experience massively.
With autotest, and growl, you can plod away writing failing tests, implementing code so that they pass, and then rinse and repeat - all the way getting messages flash up telling you when tests are broken, and when tests are passing again. It’s a great way to iterate through writing code to meet user requirements, and incredibly satisfying as you turn failing tests into passing ones, with working code.
So what do you need to do to get it setup? You’ll need to install ZenTest, which contains autotest amongst some other tools:
sudo gem install ZenTestYou can then install the following gems too if you don’t have them already:
sudo gem install autotest-growl
sudo gem install autotest-rails
Finally, you’ll need to setup a small config file, called .autotest in your home directory (~/.autotest):
require "autotest/growl"That’s all you need in that file, now just hop into a Rails project directory, and run autotest:
cd /path/to/project
autotest
You’ll then get output from the initial test run, and from now on while autotest is running, when you edit a file, it will re-run any tests it deems to have been impacted by a change to that file. It will pop up test failures and test successes as growl notifications too. To force it to re-run the entire test suite, press ctrl+c once. To end autotest completely, use ctrl+c twice in quick succession. Bear in mind for things like database schema changes, you’ll need to do the following to get the test database schema up to date and inline with the development database, otherwise your tests when being run under autotest will fail:
rake db:test:prepareNow get cracking with those user stories, get those tests written, and then turn them from red to green!
CommentsRuby on Rails Tutorial Jan 9 2010
Not a great start to my yearly goals - right after posting about how I want to blog every other day, I manage to go six days without a post! Time to try again, starting from today…
I was planning my next article as a follow-up to the Getting started with Rails 2.3.5 article I did in December, when I stumbled across this rather brilliant work in progress online tutorial book, Ruby on Rails Tutorial, by Michael Hartl (author of the great Railsspace book). Rather than write some more beginner articles that are probably covered by that material (or soon will be), I figured I’d point my readers in the direction of that resource, as it is certainly shaping up to be a great read for anyone just getting started with Rails.
So going forward I’m going to concentrate on some more advanced topics, and a few more interesting things perhaps for those who are already up to speed with the Rails basics. I’m going to be covering some of the alternative datastores popping up under the NoSQL umbrella - CouchDB and MongoDB on the document database side, and Redis on the key-value store side of things. I’m also going to have a play with the very latest Rails 3 code, so look for a few articles both on building a new app with Rails 3, as well as migrating existing apps.
And if anyone has any requests for intermediate or advanced topics they’d like to see me cover, then let me know. In the meantime, even if you’re an expert Rails developer, it’s still worth checking out the Ruby on Rails Tutorial book and helping Michael out with any feedback you might have.
CommentsAnnouncing Appsta 1.1.0 Dec 21 2009
Worked a bit on tidying Appsta up this evening, and made a few decisions that will hopefully make it a bit more useful, and also hopefully get a few more people interested in using and contributing to it!
Appsta is at its core a library of helper methods for use in Rails templates, to help you build useful Rails app creation scripts that can cut down the amount of time it takes for you to get a new Rails app up and running with your standard setup. Everyone makes some initial modifications every time they break out the “rails” command, and by encapsulating this in a Rails template, you can save some time. Appsta added helper methods for setting up projects on GitHub, and setting up hosting environments on Heroku, amongst other things.
Appsta 1.0.0 also included a command line tool that you could use instead of the “rails” command, and used Appsta and a standard template to do some common things, namely setup staging and production Heroku environments, push the code to GitHub, setup some common gems, and use jQuery instead of Prototype/Scriptaculous. However, I realised over time that although that was a great default script for me, the whole point of Rails templates and advanced customization means that it probably wasn’t as useful for everyone else, as we all have slightly different preferences.
I decided therefore to do away with the command line “appsta” command and default template, so that Appsta is concentrated on simply being a library of useful setup helper methods for throwing into your own custom Rails templates.
It makes sense for developers to have their own customized Rails template with their own personal preferences for Rails application configuration (or perhaps per-company templates) - however it doesn’t make much sense for us all to have mammoth scripts that duplicates basic functionality within the template itself. The idea with Appsta is that over time we can accrue quite a large library of a variety of methods, and then building a customized template is just a case of picking and choosing the bits you want.
So Appsta 1.1.0 does just that, and tonight as well as tidying it up to remove the command line app, I also added in a shortcut for doing a git push, and helpers for removing some default and often unnecessary default files (README, public/index.html, public/favicon.ico), and also for removing the default JS libraries and using jQuery instead. An example template using all of the current available helper methods is on the wiki for the project on GitHub, but in short…
To install Appsta:
sudo gem install appstaAnd to load Appsta in your Rails template, add in:
# Load Appsta
require "appsta"
Appsta.load
To remove default files:
# Remove the default README, public/index.html, and public/favicon.ico
remove_default_files
To setup jQuery:
# Remove the default JS libs and use jQuery
use_jquery("1.3.2")
And to push to Git remote(s):
# This performs a push of master to the specified remote(s)
git_push(:origin, :staging)
That covers the new bits, you can check out the Heroku and GitHub integration and the existing helper methods on the wiki page. I’m hoping that with the command line and default template clutter out of the way, Appsta can now be focused on reusable, useful chunks of helper code for your Rails templates. If you want to discuss this further with me, or have any comments or questions, please let me know. And if you want to contribute, don’t hesitate to fork the code, make your changes and send me a pull request!
CommentsGetting started with Rails 2.3.5 Dec 19 2009
This is a tutorial guided towards those who are new to Rails, or those who have not used it since v1.x and who might want a newbie-style refresher. I’ll be working my way through to some more advanced and interesting topics soon, so for those of you who know all of this already, please stay tuned!
I’ve now been using Ruby on Rails for almost four years, and have seen it progress from version to version. In doing so, I’ve kept up with the changes between each version, and the new features that updates have brought to the table.
For newcomers though, the scene is a little different. Much of the information out there pertains to older versions, from really out of date stuff related to Rails 1.2, to things that may or may not still work as expected when talking about Rails 2.0 features.
I figured that even though it will one day be outdated as well, some Rails newbies might well find it useful to have a straightforward, simple up to date getting started guide for Rails 2.3.5. I’m going to do just that, and a few other articles on the Rails basics, before getting into some more advanced stuff. This article will start specifically dealing with setting up an app, before building our first REST resource using scaffolding.
UPDATE: Jeff points out in the comments below that some users may need to install the sqlite3-ruby gem if they haven’t already (assuming this is your first time with Ruby/Rails/rubygems then that might be quite likely!). As Jeff says, to install the gem, run:
sudo gem install sqlite3-ruby
To begin with, let’s install Rails. I’m assuming you have Ruby and RubyGems installed, but if you have issues with the base setup on Mac OS X, then there is an excellent tutorial here. Once you’re all setup, install Rails as follows:
sudo gem install railsThis will install the latest version of Rails, which at the time of writing is 2.3.5. To specifically install version 2.3.5, for example if 2.3.5 is no longer the most recent version, use this instead:
sudo gem install rails -v 2.3.5If you don’t want to install local ri and RDoc documentation (i.e. you’ll be looking up API docs online, for example), then you can save a little disk space and a bit of time on installation by doing:
sudo gem install rails -v 2.3.5 --no-ri --no-rdocThat works for any gem installation.
Once it’s installed Rails 2.3.5 and it’s dependencies, it should leave you with the “rails” command available from the terminal. If you already had a previous version installed, you can make sure that you’ve got the right version at your fingertips by running:
rails -vThat should print “Rails 2.3.5” to the console.
Now on to the exciting part; to create an application, it’s as easy as running:
rails <appname>So for example:
rails my_new_test_appI’ll be going over a new feature, Rails templates, and how they can speed up your typical Rails application creation process, in a future post. For now, the default application skeleton created by that command will do.
Let’s go ahead and test our new application. Change into the directory for the new app, and fire it up.
cd my_new_test_app
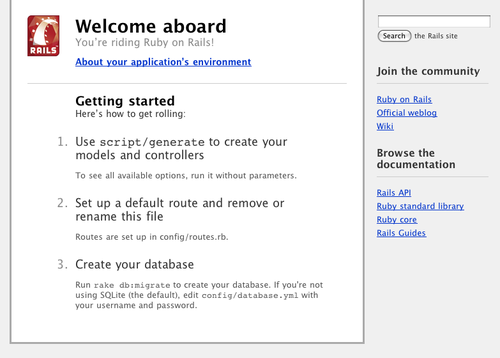
ruby script/serverThis will fire up a development server on port 3000 by default, and by visiting
http://localhost:3000in a browser, you’ll be able to see the app running. You should be greeted with the default Ruby on Rails page.
Let’s do something a little more exciting, and build something interactive. Rails uses some sensible configuration decisions out of the box, and also provides a fair few generators to get you going with some code. We’ll use one of these generators to provide what’s called a “scaffold”, an automatically built representation of an entire resource, giving you everything you need to get something going quickly. In time, the scaffolding will become less useful as you get used to building the resources yourself more quickly to suit your exact requirements - however to get up and running really quickly, it’s a great start.
We’re going to build a basic note resource, allowing the creation, retrieval, update and deletion of notes (these four actions are referred to as CRUD). To scaffold the resource, run:
ruby script/generate scaffold note body:textThis basically is creating a note model with accompanying controller and views, and we’ve also told it that it should have a single column - body, a text field. It will also be given some timestamp columns (created_at, updated_at) which are updated automatically and can be very useful.
Now let’s go ahead and run the command to bring the database up to date with our changes:
rake db:migrateThis will setup the notes table that was created as part of the scaffold. Now if we visit http://localhost:3000/notes, we can see our fully working notes resource in action!

You can play around with creating, updating and deleting notes and see that it all works straight off the bat.
If we revisit http://localhost:3000 though, we still see the landing page. Let’s set it up so that the root of the site displays the notes index page. We need to do a couple of things to make this happen. Firstly, we need to remove that placeholder landing page, so run:
rm public/index.htmlHowever this still leaves you with the following error when accessing your app now:
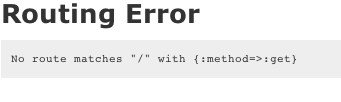
We now need to tell the application to use the notes resource for the root of the site. Rails routing can be as complex or as simple as you need it. If you open up config/routes.rb, you’ll see that at the top there is the line:
map.resources :notesThis is the line that exposes your notes resource at http://localhost:3000/notes. So how do we hook up the root of the site to hit the index page for the notes resource? We just need to add a single line to the top of our config/routes.rb file. Right below this line:
ActionController::Routing::Routes.draw do |map|add in the following line:
map.root :controller => :notes, :action => :indexThis tells the app that the root URL (/) corresponds to the index action of the notes controller, which is the one responsible for displaying the list of all notes (the same as seen at http://localhost:3000/notes). Now if you reload http://localhost:3000, you’ll see that it shows the same content as http://localhost:3000/notes.
As before, you can play with the notes to see that it all works correctly - it doesn’t look too pretty, and is almost rarely exactly what you want out of the box, but when getting started with Rails it can provide an exciting and quick way to get new things up and running quickly, and to toy around with.
Now that we’ve got a basic, working application running on Rails 2.3.5, we’ll draw this article to a close. In future articles we’ll delve into more detail on some of the configuration choices you can make when setting up your application, some further detail on building out REST resources, testing your application, and some other more advanced stuff.
For a more in depth and lengthy look at getting up and running with Rails, check out the Rails guide for Getting Started with Rails.
As usual, if you have any comments, queries, suggestions or questions about the above, please get in touch!
CommentsSetup Feather to run as a slice within a Merb app Jan 30 2009
In response to a few queries and comments on my post about the ejdraper.com blog running as a Feather slice underneath a parent Merb application, I decided to put together a sample app demonstrating just how you’d configure such a beast.
Introducing Feather Sample Slice Host… this is an up-to-date Merb application (Merb 1.0.8.1) that hosts Feather as a slice. It comes with a few common plugins installed, and an ultra basic theme override to demonstrate the themes working. It shows how you can easily integrate Feather into a Merb application, and you should be able to use it as a base for any application that you’d like to build with Feather integrated. You need to install Feather as a gem first - for now, simply “git clone” the Feather code, and then run “sudo rake install” in the root of the Feather codebase. A configured development sqlite3 database is included with the sample app so that you should then just be able to “git clone” the host app code and fire it up!
For those that are interested, integrating Feather as a slice boils down to the following steps:
- if you haven’t already, grab Feather as a gem (same as above, clone the code, and then “sudo rake install” in the project root; this will change when the first gem version of Feather, 0.5, is officially released shortly)
- create a brand new Merb app
- add Feather, and a few of it’s dependencies to “config/dependencies.rb”
- add the appropriate Feather slice commands to the host apps router, to mount Feather at /blog (or wherever you would like)
- run “rake slices:feather:install” and “rake slices:merb-auth-slice-password:install” from the root of the host app to copy static resources over
- setup the database, using the “Feather::Database.initial_setup” method from the Merb console (“merb -i”)
- implement a login form under the “app/views/exceptions/unauthenticated.html.erb” view
- install any plugins required
- setup any themes needed (if using the themes plugin)
- implement the rest of the functionality you want in your host application!
For any of the steps above that aren’t all too clear, you should be able to refer to the sample application now to see exactly what is required. It isn’t currently as straightforward as I’d like, and as a part of the aforementioned 0.5 gem release, I’d like to provide an easy command to add Feather to a Merb application, or create a new Merb host app with Feather already installed as a slice. For now though, the above checklist alongside the sample app should have most of you up and running in no time!
As always, any questions, please feel free to contact me or leave a comment.
CommentsReCover Jan 18 2009
I’ve just pushed out the second version of Cover-Up, and so it should be available via gem within a few hours.
Version 0.2 includes the following:
- fixed a couple of bugs
- added the option to provide your own logger to the code coverage run (see README)
- few improvements to try and speed the code coverage execution up a bit
The speed improvements will be fairly useful as the initial version was a bit sluggish, although I still have more work I’d like to do in this area to try and speed up the code coverage even further.
The logger is useful for those that want to run their own traces over the code during the code coverage run, or simply for tracking down a problem that isn’t obvious in the results that Cover-Up returns already. Obviously any code you add in as a logger will potentially slow the code coverage run down further though.
So if anyone is interested, please take a look, and any questions, comments, or suggestions, please let me know! It’s still a work in progress but it is getting better all the time!
CommentsCover-Up Jan 14 2009
I started writing a new tool on Monday, a flexible, dynamic code coverage gem written in Ruby, for Ruby code. rcov is useful, but I needed the ability to easily wrap any Ruby code in coverage, dynamically at runtime, and I wanted more flexibility in the results that come back. There are probably ways to achieve both of these with rcov given the right options, but I wanted something that offered this out of the box, in an easy to use manner. I also thought it’d be fun to write something that’d work out the coverage of any Ruby code you give it.
Introducing… Cover-Up! Hosted over at GitHub It’s a really straightforward code coverage tool, and once installed, you simply need to do the following:
# load the gem
gem "cover-up"
require "cover-up"

# initiate the coverage, specifying a pattern for the files to be covered
results = coverage(:include => "app/*/**.rb") do
    # execute the code to be covered
    run_my_tests
end

results # this will contain the code coverage results
In the above example, the coverage would execute the “run_my_tests” method, and would match the code executed against the files specified with the input pattern, in this case, any Ruby files within a subfolder of “app”. It would then produce the statistics to say how many of the lines within those files were hit, how many weren’t, and how many were excluded (such as comments and whitespace etc).
All of those statistics are within the results object that comes back, and can be accessed as a whole, or on a file-by-file basis. This makes it really easy not just to run coverage over tests, but over other ad-hoc Ruby code too, to see what code is being executed by a given action. It also makes it really easy to hook up to your app, and to format the results however you want.
It’s only a couple of days old at the minute, and so is unlikely to be perfect - but I think it’s a good start, and even has tests of it’s own, so feel free to grab the gem which should be available depending upon the gem server mirrors over the next few hours:
sudo gem install cover-up
Or grab it from GitHub. Feel free to fork and improve the source too, patches very much welcome! I’m going to keep improving it over the coming days, so keep an eye on the code!
CommentsWhat's up Proc? Jul 6 2008
So it’s awesome Ruby snippet time, and in particular I’m going to look at the ability to evaluate statements against a block, specifically to find out where the particular block came from.
The “eval” command not only takes in the command to be executed, but can also optionally take in a binding to run against. This means that instead of evaluating a command against the current, local binding, a specific binding can be used, and for our example, we are going to use the binding on a Proc object, to allow us to evaluate a statement as if it was running within the block itself.
Let’s setup a module that allows us simply to register a block to an array:
module TestApp
  class << self
    # Adds a block to our global array
    def add_block(&block)
      @@blocks ||= []
      @@blocks << block
    end

    # This just returns our block array so we can iterate through it
    def blocks
      @@blocks
    end
  end
end
Within this same file (let’s call it test1.rb), we can also register a test block. The execution of the block isn’t really important, so let’s just do:
TestApp::add_block { puts "test1" }
Now let’s setup a second script (called test2.rb) that’ll also register a block, and that will iterate through the blocks and use the “eval” command to show where each block originated from:
# Reference our first script
require File.join(File.dirname(__FILE__), "test1")

# Add a second block
TestApp::add_block { puts "test2" }

# For each block we have, run a statement that will return the "__FILE__"
# variable for each block, against the blocks own binding
TestApp::blocks.each do |blk|
  puts "Block from: #{eval('__FILE__', blk.binding)}"
end
If we run the test2.rb script now, we should see output similar to the following:
Block from: ./test1.rb
Block from: test2.rb
So we can now differentiate between our blocks, by investigating the blocks own binding! Something to bear in mind is that obviously the paths shown are relative – if you were executing the test2.rb script using an absolute path (for example, “ruby /path/to/test2.rb”), you’d see that the absolute paths were shown instead. Either way, the information should be useful in determining the origin of a block.
Now you may be asking, what’s the use case for something like this? Our block registration code above does nothing useful, and in fact we don’t even execute the blocks themselves! Well, within Feather we use this code to find out which plugin registered a particular block – in this way, we can check at runtime (before executing the registered block) whether the plugin is active or not. If it isn’t, it won’t be executed, if it is, it will.
This is just one of those cool things you can do when you have a reference to a specific binding – there’d be nothing to stop you from interacting with the blocks bindings in other ways too.
CommentsCall To Arms Jun 25 2008
So a quick Feather update: we’re now running against the latest stable versions of Merb (0.9.3) and DataMapper (0.9.1), which should make getting Feather up and running even easier. We’re also currently starting work on running against edge Merb, to try and implement merb-slices, so that Feather can be run as a slice within other apps, and so that Feather plugins themselves are slices in their own right. If you’d like to contribute to that effort, there is a “slices” branch for both core, and plugins. Just fork, hack away, and send me a pull request with your changes!
In other news, the official Merb blog is now running the best Merb blog in the world – that’s right, Feather! It’s great to see the blog running Feather, and we hope we can continue to improve it to make it even more useful for the Merb guys to be able to get out important Merb information and articles!
Also, I’ve been through the tickets on the Feather Lighthouse, and setup two milestones – 0.5, and 1.0. The idea is that 0.5 will aim for stability, and getting the work on slices up and running. Milestone 1.0 will be for trying to improve the distribution, setup and configuration of Feather to make it more user friendly.
There are currently a ton of feature requests and small bug fixes outstanding, that I’ve assigned to me on the LH tracker. I’m going to start to try to get through them, but if anyone out there fancies taking any of them on (a lot of them are great little ways to get into Feather development!), then just let me know, and I can re-assign the ticket to you. There’s no deadline on the 0.5 milestone just yet, but the more contributions we can get to knock off some of the outstanding items, the quicker we’ll hit the milestone! Consider this a call to arms :-)
Lastly, big shout out to some of the contributions coming in – after a mammoth merge session the other night, I rolled in great contributions from aflatter, sudothinker, jf, piclez and fujin. Apologies if I missed anyone else – ping me if I did, and I’ll give you the appropriate kudos.
CommentsPage 1 of 3 | Next page