
Capturing video and audio on Mac OS X with RubyMotion May 6 2015
In this article we're going to look at how you can use RubyMotion and the AVFoundation framework to build a Mac OS X app that lets you capture video and audio from attached input sources (like the built-in iSight), and how you can then output that combined footage to a movie file. You can see the code for the app here.
App setup and capture overview
The first thing we need to do is setup a new Mac app:
motion create --template=osx AVCapture
Then we need to edit the Rakefile to add the AVFoundation for us to use:
Motion::Project::App.setup do |app|
  # Use `rake config' to see complete project settings.
  app.name = 'AVCapture'

  app.frameworks += ['AVFoundation']
end
[code]
Now we're ready to start capturing from input sources. Whether audio or video, the setup and API calls are roughly the same, with the process being the following steps:
- create and configure a capture session
- find the device(s) you want to capture from
- create a capture input from the device(s)
- check to make sure the capture inputs can be added, and if so, add it to the capture session
- create a capture output representing how you want to save or process the captured data
- check to make sure it can be added to the session, and if so, add it
- when you want to begin capturing, start the session, and once the session is started, begin any output specific actions (such as recording to file)
- stop the session when you're done capturing
Now, that seems like a lot of steps, but each step is quite straightforward, which is the great thing about the API - it breaks down a complicated task into a series of very simple steps, and along the way allows a ton of configuration, customisation, and different input and output options.
So what are we going to be building? To keep things simple to begin with, we'll build an app that shows a window with a button on it, and when the button is pressed, we begin recording using the first video and audio device found, and when it's pressed again, we'll stop recording. It'll output the captured audio and video inputs to file. This means we don't have to focus too much on the UI of our test app, but can focus instead on the code that makes all of the above steps happen.
Setting up our capture session and device inputs
So first things first, we want to setup our capture session and device inputs, and we'll do that in applicationDidFinishLaunching.
def applicationDidFinishLaunching(notification)
  buildMenu
  buildWindow

  @session = AVCaptureSession.alloc.init
  @session.sessionPreset = AVCaptureSessionPresetHigh
Creating a session is fairly familiar of course, with a standard .alloc.init, and then we set a preset that determines the quality of the capture. There are a fair few presets to choose from, and a good description of them is available better than I could summise in the docs here. In this case we'll use a preset which represents the highest quality that the recording devices allows for. You can additionally go into much more detailed configuration for session quality, but we won't get into that right now.
Next up, we need to locate our devices. You can easily find the available devices on the system with AVCaptureDevice.devices, and the key is to inspect them and find the ones that support the type of capture you want to do - in this case, we want a video input device, and an audio input device. If you want to see the devices available with a friendly name, you can log the following or run it in the console:
AVCaptureDevice.devices.map(&:localizedName)
We'll be taking the first of each one we find, which commonly on a Mac will be the video from the built-in iSight, and the audio from the built-in mic:
devices = AVCaptureDevice.devices
video_device = devices.select { |device| device.hasMediaType(AVMediaTypeVideo) }.first
audio_device = devices.select { |device| device.hasMediaType(AVMediaTypeAudio) }.first
hasMediaType is a useful way of determining the media capabilities of each device, so we can find the devices we need for both audio and video - in this case, they are separate, but if you had a USB connected webcam that did both audio and video, you'd see that it would support both media types and thus could be used for either/both.
Next up, we need to create a capture input from these devices, before we can add them to our capture session:
video_input = AVCaptureDeviceInput.deviceInputWithDevice(video_device, error: nil)
audio_input = AVCaptureDeviceInput.deviceInputWithDevice(audio_device, error: nil)
And then lastly, we check to ensure we can add the inputs, before adding them to our session:
if @session.canAddInput(video_input) && @session.canAddInput(audio_input)
  @session.addInput(video_input)
  @session.addInput(audio_input)
end
Now our session and inputs are setup, let's configure the output!
Configuring our capture outputs
We just have to decide on the type of output we want, and then instantiate an instance of that output type. In this case, we'll be using the movie file output, which processes the data directly to a file. Again, we're checking if we can add the output before adding it to the session:
@output = AVCaptureMovieFileOutput.alloc.init
@session.addOutput(@output) if @session.canAddOutput(@output)
There are of course other types of output for performing different tasks - they are listed in full in the docs here, but in short alongside the movie file output, there are outputs for directly processing frame data for captured video and audio (for modifying it on the fly), as well as an output for capturing still images from a video device.
If you run the app now, you'll see a blank window, and not much else happening (yet).

[code]
Push to start, push to stop
So now everything is setup, but we need a way to start and stop the actual capture. Let's add a button to our basic window to allow us to do just that - at the end of applicationDidFinishLaunching, add:
@button = NSButton.alloc.initWithFrame(CGRectZero)
self.set_button_frame
@button.title = "Start"
@mainWindow.contentView.addSubview(@button)
Then below that, add these methods that we require, so we handle window resizing (similar to the article on positioning controls here), and to setup the button frame used initially and with the resizing:
def windowDidResize(notification)
  self.set_button_frame
end

def set_button_frame
  size = @mainWindow.frame.size
  button_size = [150, 30]
  @button.frame = [
    [(size.width / 2.0) - (button_size[0] / 2.0), (size.height / 2.0) - (button_size[1] / 2.0)]
    , button_size
  ]
end
We also need to make sure the app delegate is the delegate for the window, in order for our windowDidResize event handler to be called, so add this at the bottom of buildWindow:
  @mainWindow.orderFrontRegardless
  @mainWindow.delegate = self
end
Then, we need to set the target/action for the button, and point it to a method to start the session capture and recording to file, so back in applicationDidFinishLaunching, add:
@button.target = self
@button.action = 'toggle_capture:'
And the implementation for the button handler goes as follows:
def toggle_capture(sender)
  @is_running ||= false
  if @is_running
    @session.stopRunning
    @button.title = "Start"
  else
    @session.startRunning
    @button.title = "Stop"
  end
  @is_running = !@is_running
end
Here we can see that we're tracking whether we're running or not, initially defaulting to false, and then based on that we're either starting or stopping the session, and updating the button text accordingly. Finally, we're flipping the @is_running tracking var for next time.
And if we fire up the app now, we'll see we can click the button, have it toggle between Start and Stop, and you should notice that the light on your built-in iSight goes on and off as you start and stop the capture. But there is no output file, no actual saved recording. That's because we need to start the output itself, and specify a filename, and the best way to do that is to respond to when the session has started by subscribing to a notification, and firing up our output in there.


[code]
audio + video = mp4
So first of all, at the end of applicationDidFinishLaunching, let's add our notification handler code:
NSNotificationCenter.defaultCenter.addObserver(self,
  selector: 'didStartRunning',
  name: AVCaptureSessionDidStartRunningNotification,
  object: nil)
We're adding an observer for the AVCaptureSessionDidStartRunningNotification notification, and we're asking that didStartRunning is called when that event is fired. The code for our didStartRunning method looks like this:
def didStartRunning
  url = NSURL.alloc.initWithString("file:///Users/#{NSUserName()}/Desktop/temp#{Time.now.to_i}.mp4")
  @output.startRecordingToOutputFileURL(url, recordingDelegate: self)
end
Here we're constructing a URL to represent a file to save, using NSUserName() to grab the current user to use within the path. Then we call startRecordingToOutputFileURL with the URL and the app delegate as the recording delegate, which will begin to save the output from our capture session to file.
Now when we fire up the app, each time we start and stop we'll create a new file, with the output from the video of the iSight and the audio of the mic. However you might notice that if you start and stop quite quickly, no file is created. If you start and wait a few seconds, and then stop, you'll get a file, but it'll only be very short. This is because it takes a second or two to start writing the output to file, and as such some additional feedback might be useful in our app so we know when we're actually recording.
[code]
Making it more responsive
Firstly, let's change our toggle_capture method so that it is essentially moving the app into a working state on a button click, and awaiting the actions to complete before updating the UI further. This means that clicking Start will change the button text to Starting… and clicking Stop will change it to Stopping…, as well as rendering the button unusable until it's been updated further.
def toggle_capture(sender)
  return if @is_working
  @is_running ||= false
  if @is_running
    @is_working = true
    @output.stopRecording
    @session.stopRunning
    @button.title = "Stopping..."
  else
    @is_working = true
    @session.startRunning
    @button.title = "Starting..."
  end
  @button.enabled = false
end
You'll see we have an additional variable, @is_working, used to ensure that while we're in the working state, we don't action any other button presses, and we also disable the button to be sure. This is only half the story though - now we need some callbacks from the output itself to know when it starts and stops recording so that we can update the UI, the @is_working var, and re-enable the button. You may have noticed when we start recording in didStartRunning, we make this call:
@output.startRecordingToOutputFileURL(url, recordingDelegate: self)
This sets the app delegate as the delegate for receiving events related to the recording, and we're now explicitly calling stopRecording in toggle_capture too, so as such we can now implement a couple of delegate methods to handle our response to starting and stopping recording. Add the following:
def captureOutput(output, didStartRecordingToOutputFileAtURL: url, fromConnections: connections)
  @button.title = "Stop"
  @button.enabled = true
  @is_working = false
  @is_running = true
end

def captureOutput(output, didFinishRecordingToOutputFileAtURL: url, fromConnections: connections, error: err)
  @button.title = "Start"
  @button.enabled = true
  @is_working = false
  @is_running = false
end
We're re-enabling the button and marking @is_working as false in both cases, for starting and stopping, but when we've started we'll update the button text to Stop, and mark @is_running as true, and when we've finished we'll update the button to show Start and set @is_running to false. Fairly simple, and we now have a more complete feedback loop with more robust handling of the way that the recording starts and stops, which provides better feedback to the user.

[code]
Tidy up
The last thing we'll do is a quick bit of tidyup to ensure that our recording and session stay in sync, even if there is an error. Right now if the user presses Stop, both the session and recording are stopped, but if the recording is stopped independently by the system for some reason (out of disk space, for example), then our session will continue going even when the session stops. Our button will update, but the webcam will stay on. We'll just move this line from toggle_capture:
@session.stopRunning
to the top of our didFinishRecordingToOutputFileAtURL method:
def captureOutput(output, didFinishRecordingToOutputFileAtURL: url, fromConnections: connections, error: err)
  @session.stopRunning
  @button.title = "Start"
That's it! Now when the start button is hit, we start the session, and when the session is started, we start the recording. When the stop button is pressed, we stop the recording, and if that happens, or if the recording is stopped for any other reason, then the session is stopped also.
[code]
Next steps
So we've seen that it's not too tricky to use the robust AVCaptureSession API to capture video and audio, and get an output file of the total captured footage. But it'd make the app more useful if it was possible to preview what the video looked like, and the audio levels so we can be sure everything is working while recording. Tomorrow I'll have a post looking at how we can improve this app to do just that! Make sure to check back then, or follow us on Twitter so you know when that post is up. I'll also have an overdue update on my RubyMotion Mac OS X book later in the week too, so stay posted for that!
UPDATE: Here is the next post, covering the video preview and audio level display!
CommentsCustomise a Mac OS X window further with RubyMotion and MotionKit Dec 19 2014
In our last article we looked at ways to build up a basic Mac OS X app window, adding controls and some interactivity. It was an introduction to how to layout and position controls to achieve the effect you want in an application window, but there are tools to make our lives easier, especially when it comes to building things that are more complex. Enter MotionKit.
MotionKit provides a whole layer of abstraction for building up your user interface, and provides a neat DSL to do it. It makes building complex user interfaces much easier, and even better than that, it actually works on iOS as well as OS X, so it's great to get to know it, as it'll save you time!
First of all, let's build up the user interface we had in the last tutorial in MotionKit. It'll give us a good idea of how much easier things are! We'll do this by using a separate layout class to construct our UI elements, and this will not only more cleanly separate our elements, but will also make it so that we can do more with less code.
We need to add our new dependency for the motion-kit gem first, so add this to Gemfile:
gem 'motion-kit'
Then run the following:
bundle install
Then we'll create our new file at app/main_layout.rb that'll describe our UI components:
class MainLayout < MotionKit::Layout
  SIZE = [150, 30]

  view :button, :label

  def layout
    add NSButton, :button do
      title "a test button"
      size SIZE
      autoresizing_mask :pin_to_center
      frame from_center
    end
    add NSTextField, :label do
      bezeled false
      drawsBackground false
      editable false
      selectable false
      size SIZE
      autoresizing_mask :pin_to_center
      frame from_center(up: 3)
    end
  end
end
This creates the same button and label (using a text field as before), and uses provided helper methods for pinning the items to the center, and autoresizing. This means our app/app_delegate.rb gets dramatically simpler, as we can remove our didResize handler, and we can replace our control initialization now with:
@layout = MainLayout.new
@mainWindow.contentView = @layout.view

@label = @layout.get(:label)
@button = @layout.get(:button)
@button.target = self
@button.action = 'button_pressed:'
This creates the layout, sets the view of the window to be that of the layout which handles the UI now, and then grabs a reference to the two controls - we want a reference to the button to be able to attach once more our event handler for the click, and we have the reference to the label for updating the text when the button is pressed. That event handler stays the same as before and works without any other modification.
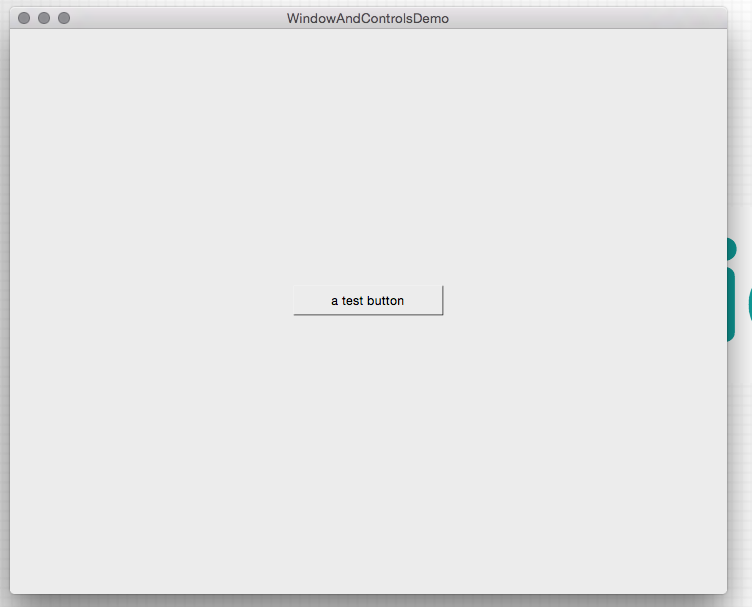
Here is how it looks now - the same as how we had it in the last tutorial:

[code]
So now we've replaced what we had before with something that is a bit tidier and easier to understand - let's build on that to add slightly more interesting functionality. Let's build a basic calculator for adding two numbers together. This will require a few more controls to be setup, and gives us chance to look at another way to organise our controls - using AutoLayout constraints.
So let's start by modifying our app/main_layout.rb file, replacing our existing UI with our desired new UI:
class MainLayout < MotionKit::Layout
  SIZE = [150, 30]

  def layout
    add NSTextField, :num1 do
      constraints do
        right.equals(:separator, :left).minus(10)
        top.equals(:separator, :top).minus(5)
        size [50, 30]
      end
    end
    add NSTextField, :separator do
      stringValue "+"
      bezeled false
      drawsBackground false
      editable false
      selectable false
      size_to_fit
      autoresizing_mask :pin_to_center
      frame from_center
    end
    add NSTextField, :num2 do
      constraints do
        left.equals(:separator, :right).plus(10)
        top.equals(:separator, :top).minus(5)
        size [50, 30]
      end
    end

    add NSButton, :calculate do
      title "Calculate"
      size_to_fit
      constraints do
        top.equals(:separator, :bottom).plus(10)
        left.equals(:separator, :left).minus(25)
      end
    end

    add NSTextField, :result do
      bezeled false
      drawsBackground false
      editable false
      selectable false
      size_to_fit
      constraints do
        top.equals(:calculate, :bottom).plus(10)
        left.equals(:separator, :left)
      end
    end
  end
end
That's a bit more code than before, but when we consider we have five controls now, it's not too much to get our heads around. Most of it is self-explanatory and similar to the previous code - we're either creating NSTextField controls or NSButton controls, for the :result and :separator controls we want them to act like labels so much as before, we're setting a few different things to make them look and behave as such. For :num1 and :num2 we want actual text field inputs, and then we have our button, :calculate. What is new are the constraints blocks, so let's dig in deeper there.
constraints blocks are the hooks into AutoLayout and its constraints API, allowing us to specify UI placement based on a set of constraints. It manages all the constraints for the UI pieces alongside each other in the parent view, and sets out the UI to match them accordingly. You can reference other elements, and thus can build the elements off of one another, and in relation to each other, which makes things a whole lot easier. In this particular case, we're setting our :separator label (the "+" sign) in the center, without any constraints, but using the frame and autoresize declarations we were using before. We're then using AutoLayout constraints to ensure the :num1 and :num2 fields sit either side correctly. We then place the :calculate button relative to the :separator in the center, but below it, and again we place the :result label below that, in the center also. This gives us a whole lot of UI elements with not a lot of code, and it's all pinned around the autoresizing central elements, which makes the whole thing scale nicely and automatically too. What's not to like?
One other thing to note is that amongst the helpers provided for creating UI with MotionKit, there is a block you can wrap commands in, called deferred, which ensures that the helpers are run when all controls are initialised, and not just in the order they are called. This is especially useful when you are referencing other controls from your helper calls, however all constraints blocks are deferred by default, and so there isn't a need to wrap our constraint code in a deferred block as well - but it could come in useful elsewhere, if you are using a lot of interdependent frame helpers.
The DSL itself for constraints is quite expressive, and allows you to match and specify on a great many things - for a full reference it's best to check out the MotionKit docs, but as you can see in our code we're making use of matching on the top, left and right sides of other controls, and using plus/minus calls to make relative adjustments.
We're left with an expressive, neat way of describing our user interface, but now it's back to app/app_delegate.rb so we can grab references to the controls we need, and hook up our calculator functionality! We can remove the existing UI setup code and instead use this:
@layout = MainLayout.new
@mainWindow.contentView = @layout.view

@num1 = @layout.get(:num1)
@num2 = @layout.get(:num2)
@calculate = @layout.get(:calculate)
@calculate.target = self
@calculate.action = 'calculate_result:'
@result = @layout.get(:result)
This sets up the view using our separate layout, as before, as well as grabbing the control references we need. It also sets up the click event handler for the button as before, only this time pointing at the calculate_result method. So all that remains is to implement that to fulfill the calculator functionality for our UI:
def calculate_result(sender)
  @result.stringValue = (@num1.stringValue.to_i + @num2.stringValue.to_i).to_s
end
And that's it! It should look like this:
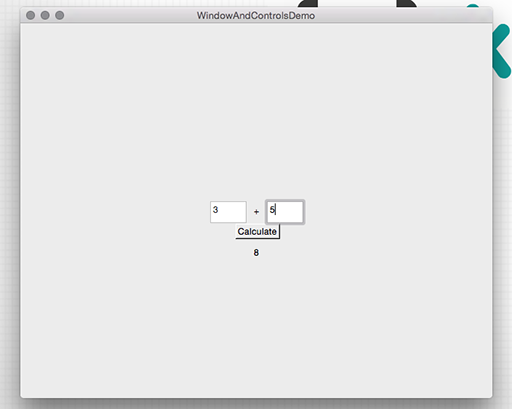
[code]
A super simple addition calculator UI implemented in a very small amount of code, all thanks to the beauty of MotionKit. In a future tutorial we'll build up a more life-like example UI to demonstrate some other control and view classes, and some more MotionKit goodness.
CommentsHow to setup and position basic controls in a Mac OS X app window using RubyMotion Dec 17 2014
We've focused a lot in past articles on menu bar apps, but of course it's quite likely that if you're building an OS X app, you'll want to have an actual application window to expose further functionality, unless you can fit what your app does neatly into a customised status bar menu.
The code for this tutorial is in this repo, which will also contain code for future windowed Mac OS X UI tutorials. The full code for this particular app is in this branch, and throughout the article there will be code links to specific tags which allow you to jump in at a specific point, or reference it as you run through building the app yourself.
So let's start with the default OS X template RubyMotion provides - it gives us the setup for a default application window, complete with a menu, which we'll leave as-is.
motion create --template=osx WindowAndControlsTest
cd WindowAndControlsTest
rake
That'll give you the basic window seen below.

[code]
Now let's look at adding a control - a button, in fact. In app/app_delegate.rb, at the bottom of the buildWindow method, add:
@button = NSButton.alloc.initWithFrame([[0, 0], [150, 30]])
@button.title = "a test button"
@mainWindow.contentView.addSubview @button
This is quite straightforward - we're setting up a button at position [0,0], 150px wide and 30px high, we're setting the title on it, and we're adding it to our window view. Running that you can see the button in the bottom-left - on OS X, the root anchor for X and Y positioning (0,0) is bottom left, not top left as it is on iOS.

[code]
Let's reposition our button so it's in the middle of the screen. If you're coming from iOS development, you may be used to fixed screen dimensions, but as you may also be finding out with each new iPhone announced, it's much better to avoid hard-coding heights and widths of windows into your app, and instead query the information needed to position things accordingly. Amend our button initialisation to look like the following:
size = @mainWindow.frame.size
@button = NSButton.alloc.initWithFrame([[size.width / 2.0, size.height / 2.0], [150, 30]])
We're taking our window size, and positioning our button based on half-width and half-height. When we run that, it's definitely getting warmer, but it's not quite right. In fact, it's fairly obvious that the bottom left edge of the button is in the center of the window, but what we really want is the center of the button to be in the center of the window. For that, we need to take half of the button height and half of the button width away from our button position, so that the bottom left of the button accounts for wanting the center in the center of the window. Tweaking our code further gives us this:
size = @mainWindow.frame.size
button_size = [150, 30]
@button = NSButton.alloc.initWithFrame([
  [(size.width / 2.0) - (button_size[0] / 2.0), (size.height / 2.0) - (button_size[1] / 2.0)],
  button_size])
Now when we run things, we can see our button is right in the center of the window.

[code]
However, try resizing the window by grabbing the grab handle in the bottom right, and you'll see that the button itself is basically still anchored relative to the bottom left, and as the window expands or contracts, it is no longer in the center of the smaller or larger window. This is because we're just setting this all up once on app launch - let's try making it so it's responsive to window changes, to keep our button in the center on resize.
We need to start by handling changes to the window size, so our first change is to set the app delegate as the delegate also for the main window, so we can implement a listener for the resize method we need. First of all, find our initialisation for @mainWindow, and add the delegate line below what's already there:
@mainWindow.delegate = self
Now, we can add a method that'll update the button position based on the window size, basically the same as we were doing on initialization but abstracted out to its own method, and we'll also add a method to handle the resize event and call our new button positioning method:
def windowDidResize(notification)
  self.set_button_frame
end

def set_button_frame
  size = @mainWindow.frame.size
  button_size = [150, 30]
  @button.frame = [
    [(size.width / 2.0) - (button_size[0] / 2.0), (size.height / 2.0) - (button_size[1] / 2.0)],
    button_size]
end
Of course, we can remove the duplicate button frame code, as we no longer need to set it specifically in the setup, we can just call set_button_frame there too!
@button = NSButton.alloc.initWithFrame(CGRectZero)
self.set_button_frame
@button.title = "a test button"
Now if you run the app, then using the grab handle resize the window, you'll see the button is stuck right in the center there. Neat!
[code]
So let's do one more thing now on our basic window tutorial, and handle some interactivity - it'd be good if our button actually did something! Let's track how many times it is clicked, and show that beneath the button.
First of all, let's add a new control, a label, above our button creation in buildWindow. This gives us chance to explore the fact that there actually is no label control in Cocoa - so instead we're going to use a text field:
@label = NSTextField.alloc.initWithFrame(CGRectZero)
@label.bezeled = false
@label.drawsBackground = false
@label.editable = false
@label.selectable = false
@mainWindow.contentView.addSubview @label
We're removing the bezeling, not drawing the background, and making sure it's not editable or selectable - and voila, we have a label. Next up, we want to make sure the label frame is set to just below the button frame anytime the button frame changes - so we'll add this to the bottom of set_button_frame:
@label.frame = [
  [(size.width / 2.0) - (button_size[0] / 2.0), (size.height / 2.0) - (button_size[1] / 2.0) - (button_size[1])],
  button_size]
This is the same as the main button, but set one button height lower, so it's beneath.
Next, we need to setup the button click handler:
@button.target = self
@button.action = 'button_pressed:'
By setting the button target to self, and setting the action, we're pointing to the method that will be triggered by a click - we now need to implement that method:
def button_pressed(sender)
  @taps ||= 0
  @taps += 1

  @label.stringValue = "#{@taps} presses"
end
Here we're initializing the taps variable if it doesn't already exist (i.e. on first click), then incrementing it, and setting the label text based on the count. Now our functionality will work like this:
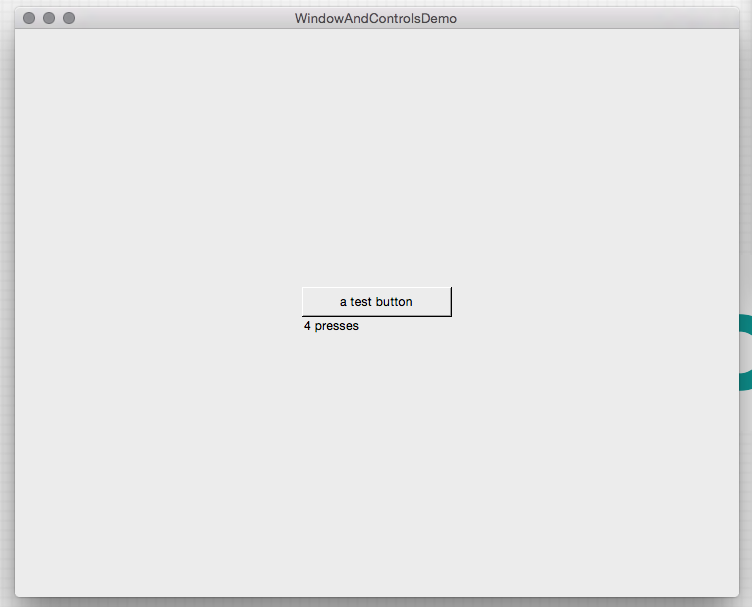
[code]
So, we've covered initializing and laying out basic controls, and establishing some very basic interactivity in our window - it's good to know how to layout simple user interface by hand, but in the next article we'll look at using motion-kit, which is an awesome lib for constructing user interfaces more quickly, and works really nicely as you start to build your app up.
CommentsWordTarget 1.2, coming soon Nov 30 2014
The next update for WordTarget has now been submitted, and it's so big, we've skipped 1.1 entirely and gone straight to 1.2! So what's on the way?
Improved user interface
That's right, the boring old menu is now gone, replaced with a customised drop down panel, with everything you need at your fingertips! There are easy-to-use controls for starting and stopping the tracker, resetting, changing whether it counts up or down, and further options for exiting the app and seeing the about panel. Underneath is the history of your words, showing you a readable list of your word tracking history.
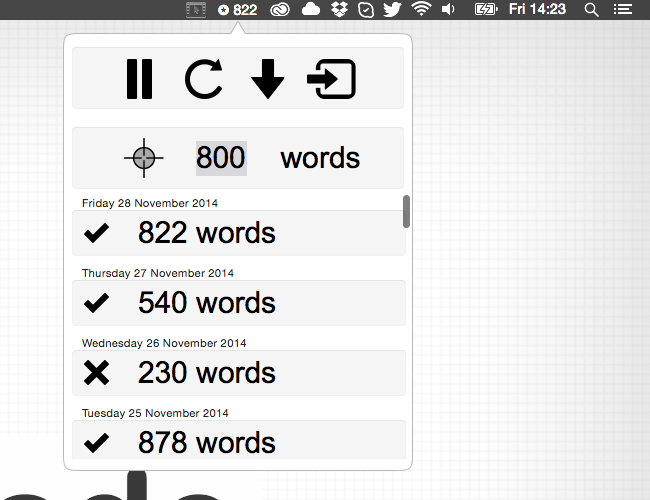
Easy at-a-glance view of whether you hit your target for a day
Each entry in the list has a tick or a cross, denoting whether you hit your target for that day, so you can quickly get a gauge on your overall progress, and whether in general you're hitting your targets or not.
Targets for each day are stored so changing your target doesn't change whether you hit your target for a day in the past
The target in use for each day is now persisted, so changing your target in the future doesn't re-evaluate past days and change successful days into failures (for example, when you've decided to raise your daily word target).
Click to view the breakdown of your words per-application
One of the most requested features was being able to see a per-application breakdown in the word count for each day, to see where all of those words were going. Now you can see just that in 1.2!

Local notification popup when you hit your target
Getting a little popup letting you know you hit your target is a good motivation that you're on track and doing well - unless of course you're only just getting started, in which case it might be a reminder to up that target a little bit for tomorrow!
When?
With any luck, this new version will be in the Mac App Store within 7-10 days! In the meantime, the app is on sale at the minute for Black Friday - through the end of Monday, you can pick it up for $3.99/£2.49! With each new version of the app that adds great new features, the price will increase - but once purchased, regardless of the price paid, you'll get all the future updates, so it's worthwhile picking up soon if you want to lock in this great functionality now, with new stuff coming down the pipe later!
On the slate for 1.3
- Hot keys for easily starting/stopping tracking
- Blacklist for excluding tracking for certain applications, even if the app is running and tracking
Other ideas for future versions (1.3 and beyond)
- Editing a past days target, for when you need to change a historical target (that will affect whether the day is marked as successful or not)
- Being able to export your data
- iCloud or other support to allow synced usage across machines
- Tracking streaks for consecutive days hitting your target
- Achievements for certain streak levels, to help keep you motivated
- More notifications to provide ongoing progress updates as you work towards your target each day, not just when it's hit
Follow @WordTargetApp or @kickcode on Twitter to keep up to date with the latest updates on the app! Any questions, let me know.
CommentsAnnouncing WordTarget - a writing productivity tool Nov 7 2014
Wow, where has the year gone? It's been a very busy Summer and now Autumn too here at KickCode HQ, with Winter just peeking around the corner. I have a bit of catching up to do here on this blog, and I've got some fresh new content and some other interesting news and announcements coming over the next few weeks (including a long overdue update about the book!), but for today I want to talk about a new Mac OS X app I've built.
WordTarget is a productivity tool (written in RubyMotion) that sits in your menubar, and helps you to hit a writing goal. If that sounds straightforward, it's because it is! But the real key to WordTarget helping you is that it will track your progress across any applications, and you can start and stop it counting right from the menu bar. So perhaps you want to write 500 words a day, but depending upon the day (or time of day!) you might be writing a blog post, working on a book, writing some documentation, getting through your emails, or writing a letter. No matter which apps you use, WordTarget will be counting so you can keep tally, and know when you've hit your target. Or if you prefer, you can switch it to count down to zero from your target instead.
It allows you to view the data for previous days so you can track your progress over time too, so it's not just for the here and now, but can really help you with a longer term goal, if you're aiming for a certain word count for a larger project like a book, a thesis or essay etc.
It's been available on the Mac App Store for a little while now, in a sort of stealth/soft launch mode, and in that time I've had a few people checking out and using the app, who have let me know it's useful for them, and provided some great feedback. I've been working on an updated version that is not too far away, and with those additional features will come a small price increase, so it seems like the perfect time now to let people in on the fun, and if you pick it up now you'll then be entitled to future updates of the app for free through the App Store, even if the price changes later!
I'll be going into details on the new features in the next version in a future post, but for now I'm announcing a competition where someone can win a copy of WordTarget every single day from now until the end of November, to celebrate National Novel Writing Month (#NaNoWriMo). All you have to do to enter is to follow @WordTargetApp, and then tweet about the app, making sure to include @WordTargetApp, and a link to the competition in the tweet - that's it! You can even use the buttons below to make it easier.
If you can't wait to see if you're a winner, you can of course buy the app on the Mac App Store right now - it's just £4.99/$6.99, which is a small price to help you keep your writing squarely on track each day! More information about the app is available here, with setup screencasts for Mac OS X 10.8, 10.9 and 10.10 available here.
If you have any questions about the app, the competition, or anything else, tweet @ejdraper, or comment below!
CommentsHow to get started building Mac OS X apps with RubyMotion fast May 7 2014
I was fortunate enough to be asked to speak at SRUG, and after having to unfortunately postpone last month due to illness, I gave my talk at last nights meeting.
Speaking
It was the first time I'd spoken and given a talk at such an event, but I really enjoyed it. SRUG has a core group of very knowledgeable Rubyists, so it was fun to talk all about RubyMotion, as so many were very keen on learning all about it. I had some great questions at the end too, and some really good discussions about RubyMotion, and some other great dev topics too. It was a really fun night, and I'm looking forward to the next meeting already (especially as I can relax a bit more as I won't be presenting!).
Slides
I've put the slides up online, and you can see them below:
For the last section, the NoteMeNot demo app, I was stepping through various pre-built code commits to demonstrate adding the additional features for the app (wasn't quite foolish/brave enough to attempt live coding in my first talk!), so you can follow along too by clicking the link on each slide which will take you to the GitHub commit pertaining to that change. Over the course of a number of slides we go from a simple app skeleton, to a functioning note taking app with local file persistence.
You can check out the source code for that application on GitHub here.
I also mention a couple of apps that aren't yet available in the presentation - WordTarget will be a paid app coming very soon, and Wonderment will be an open-source app once I tidy up a bit of the code and fix one or two remaining bugs.
Book
Lastly, the book is absolutely still coming, as I mention in the talk - it just turns out writing a book is a lot harder than it looks! I don't want to rush things and put something out I'm not totally happy with, but I'm now planning on having the first 1/3rd of so of the book available for people who want to purchase early access this month, and I'm planning on finishing it entirely by July/August time (if not before). I know a few of you are really looking forward to it, so apologies for the delay, but I'm hopeful that it'll be worth the wait!
CommentsHow to implement global hotkeys in your Mac OS X app using RubyMotion Mar 23 2014
Many apps can make use of global hotkeys, often to perform a background action (such as taking a screenshot or starting and stopping something), or to hide and show the window of an app. To implement them in your own app, the easiest way is to use the fairly old Carbon APIs for registering and responding to hotkeys being pressed - the good news is that this is quite straightforward, especially if you use a wrapper library.
DDHotKey
There is a very useful, easy to use project called DDHotKey that provides Cocoa classes that wraps the Carbon API calls to register system-wide hotkey event handlers. It's not (at the time of writing) on Cocoapods, however we can still use it in our project fairly easily, with a simple modification. Grab the code from here, and put it in vendor/DDHotKey. You'll need to remove the main.m file in the root of the folder, as RubyMotion will get confused with a vendored lib that contains an executable artifact. Alternatively, I've forked the lib and made the change, so you can grab the already working code from here. Once you have added the lib to the vendor folder, you can easily configure it to build with your app in the Rakefile:
app.frameworks += ["Carbon"]
app.vendor_project 'vendor/DDHotKey', :static, :cflags => "-fobjc-arc"
We're ensuring we include the Carbon.framework in the build, we're building DDHotKey as a static lib, and we're also explicitly enabling ARC when compiling the lib.
Listening in
Then, setting up a hotkey is quite straightforward - first of all we grab a reference to the hotkey center object exposed by DDHotKey:
center = DDHotKeyCenter.sharedHotKeyCenter
Then we just need to pick a key, pick our modifiers, and setup the event handler to point to a method of our choosing:
center.registerHotKeyWithKeyCode(KVK_ANSI_M, modifierFlags: NSCommandKeyMask | NSAlternateKeyMask,
  target: self, action: 'handleHotkey:', object: nil)
A note on keys and modifiers
In the case above, KVK_ANSI_M is a constant provided by the Carbon APIs that refers to the keycode representing the M key. You can replace this with the constant for whichever key you'd like to trigger on. Likewise, in addition to NSCommandKeyMask and NSAlternateKeyMask, there is also NSCommandKeyMask, NSShiftKeyMask, and NSFunctionKeyMask which you can factor into your key combinations for hotkeys.
Respond accordingly
And finally we just have to define our event handler to do something:
def handleHotkey(event)
  puts "hotkey pressed!"
end
And that's all there is to it! You can define multiple hotkey handlers to do different things in your app, so you're not just restricted to one.
Example app
Here is a sample app that is the default RubyMotion OS X app template, with the default window hidden by default and the app running in the background, and with Cmd+Alt+H setup to hide and show the window. Overall, global hotkeys are great for putting your app at your users fingertips at any time, and it doesn't take a very long time to implement it!
Further reading
Ideally you want to allow your users to choose the key combo for certain actions, so they can change the defaults if they have conflicts between apps, or if they just prefer different combinations - and DDHotKey provides a customised NSTextField control that allows you to capture and store a combination for use as a hotkey. I'll cover how to roll that into a settings screen for your app, persisting the results in app configuration, in my forthcoming book, Building Mac OS X apps with RubyMotion. Be sure to sign up below to be notified when it's ready for an exclusive discount!
If there are any questions on this article, please let me know in the comments below, or on Twitter!
CommentsRubyMotion on OS X - the sky is the limit (especially for Rails developers!) Mar 6 2014
Announcements
I know things have been a little quiet around here for the last month or two - a combination of client work, writing the book, and most recently welcoming our third child into the world have kept me busy! Going to make an effort to return to more regular articles here on the blog again though now, and I have some great content lined up for the next few weeks. The book is also progressing nicely, although to make sure it's as good as I want it to be, I've pushed back the pre-order and early access until April, and I'm aiming for June for the final version. I want to make sure that even with the early access, you'll be getting something immediately polished, useful and valuable right away. One other announcement - if you're local to Guildford, Surrey in the UK, and want to come along and see me talk about using RubyMotion to build Mac OS X apps, then I'll be speaking at SRUG on April 8th - you can register for free here. Now on to todays post…
Future of building OS X apps with RubyMotion
I received a great question via email recently from Ryan Jafari, who asked me where the growing trend and popularity in OS X development with RubyMotion might lead, as well as whether OS X might catch up with iOS in terms of resources for RubyMotion development. In writing an email back, I thought it was an interesting topic in general and so thought I'd put my response up here on the blog.
I definitely think that over time there will be more resources for OS X development with RubyMotion, and less of it will be concentrated solely on iOS development. I think it's mainly a case of RubyMotion having been around since mid 2012 for iOS, but only supporting OS X since the middle of last year. I think over time there may even be some cross-over with libraries that support both - Joybox for example already does this. Likewise there are others who are starting to shift to providing resources for OS X development with RubyMotion as well as iOS.
Of course perhaps the overall interest in developing apps for iOS is greater than for OS X right now - iPhones and iPads are more ubiquitous than Macs still - however with the Mac App Store now there is a better market for reaching that audience on the Mac desktop. While it perhaps still doesn't have the appeal of the iOS App Store gold-rush of the last few years, it's a good, interesting (and not exactly small!) niche to be in I think. In many respects it may even be a more easily surmountable task to stand out with a decent OS X app on the Mac App Store than it is on the iOS App Store, as things are much more densely populated on iOS.
Also, OS X desktop development with Objective-C is more entrenched and has been around for a lot longer than iOS development was by the time RubyMotion initially rolled around, and so perhaps iOS developers were more open to switching to RubyMotion than their desktop counterparts. However I think one of the biggest draws of RubyMotion is actually in bringing over Ruby developers who have mainly worked on the web (as I myself did) who want to start working on mobile apps, and now, desktop apps. I still work on the web a lot, but enjoy application development too - and the unique angle for Ruby web developers is that we can look to build client apps for web apps on desktop and mobile now in Ruby (Ruby on Rails on the web for example, RubyMotion for the clients). I think that's quite an attractive proposition for a lot of Ruby developers! So if you're a Rails developer, or have done a lot of Ruby previously with other frameworks, then there hasn't been a better time to be able to look into building mobile and desktop apps using RubyMotion!
Commentsmotion-popup: a RubyMotion gem for popup panels in your status bar app Jan 4 2014
Happy New Year to you all! Hope you all had a happy holidays and wonderful New Years.
In the last tutorial we setup a custom user interface using a popup window panel underneath our status bar menu item. I've now moved the core re-usable code to make that happen into its own little gem to make it easier for you to use in your own apps. The panel and the background custom drawing code is part of the gem, allowing you to easily instantiate and show a window underneath your own status bar item, and also allowing you to configure some of the parameters used for drawing the panel to customise it.
You can check out the code for it here, and read up on usage and customisation here.
I'd also like to thank everyone that has subscribed to be notified about my upcoming RubyMotion Mac OS X apps book, Building Mac OS X apps with RubyMotion. The support and interest has been overwhelming and has really reinforced my motivation to make the book a really useful resource for developers who want to build Mac OS X apps with RubyMotion.
If you've not yet signed up to know when the pre-order is available, you can do so here or at the bottom of this post - and if you're on the fence about whether it'd be useful, the recent tutorials I've written on using RubyMotion to create Mac OS X apps will give you a flavour of what the content will be like. Don't forget that if you subscribe now, you'll get an exclusive discount on pre-ordering the book too when the time comes!
Here are the Mac OS X RubyMotion tutorials from late last year in order - there is more to come over the next few months!
- How to quickly get started creating status bar apps for Mac OS X using RubyMotion
- How to build a RubyMotion status bar app that updates in the background
- How to integrate your RubyMotion OS X app with a JSON based web API
- Displaying user notifications in your RubyMotion OS X app
- Building a custom user interface for your Mac OS X status bar app in RubyMotion
If you have any questions about the new gem, the recent tutorials, or the forthcoming book, please get in touch in the comments below or @ejdraper on Twitter. Look out for the next tutorial article soon, and I hope 2014 is off to a great start for everyone!
CommentsBuilding a custom user interface for your Mac OS X status bar app in RubyMotion Dec 14 2013
Status bar apps are very useful, but what we've gone through so far in our series on building Mac OS X status bar apps with RubyMotion really only covers the basics, and our apps can often be much improved by implementing a more custom user interface than just a dropdown menu when you click on the item in the status bar.
The reasons you'd want to implement your own user interface are fairly varied, but generally speaking it gives you the ability to more easily show specific data, and handle interactions within the app in a way that better relates to what your app does.
In this article we're going to take the app we've built up in the previous couple of articles, and go from a fairly staid, boring menu to list the commits, to a far more vibrant and interesting custom panel that lists the commits in a much more visually pleasing manner, and includes the user avatar image. As we're building upon the existing codebase, and there is a fair bit of new code involved as well as changes to the existing code, we won't be running through every single line - instead I'll be focusing on the key implementation details, and all of the code is available as always on GitHub.
Custom panel
First things first, we need to setup a window that we can show when the status item is clicked. Instead of inheriting from NSWindow, we'll inherit from NSPanel, which is a special subclass of NSWindow that auto hides when it loses focus, and is generally perfect for a window that belongs to a background status bar app such as in this case.
The full definition of our PopupPanel custom window class is here. Essentially though, we're just setting up the window in our custom init method:
self.initWithContentRect([[0, 0], [POPUP_WIDTH, POPUP_HEIGHT]],
  styleMask: NSBorderlessWindowMask,
  backing: NSBackingStoreBuffered,
  defer: false)
self.title = NSBundle.mainBundle.infoDictionary['CFBundleName']
self.delegate = self
self.setBackgroundColor(NSColor.clearColor)
self.setOpaque(false)
The origin for the window isn't relevant (hence 0,0) as we'll be moving it to show under the status item anyway. We're using a borderless window, and then we're setting it to be transparent so it's invisible, allowing us to set a content view that'll do our custom pane shape drawing.
@background = PopupBackground.alloc.initWithFrame(self.frame)
self.setContentView(@background)
This is where we initialise that very custom popup background class - we'll look at how that works shortly.
The only other really interesting code here is the showHide method:
if self.isVisible
  self.orderOut(false)
else
  event_frame = NSApp.currentEvent.window.frame
  window_frame = self.frame
  window_top_left_position = CGPointMake(
    event_frame.origin.x + (event_frame.size.width / 2) - (window_frame.size.width / 2),
    event_frame.origin.y)

  self.setFrameTopLeftPoint(window_top_left_position)
  @background.setArrowX(window_frame.size.width / 2)

  NSApp.activateIgnoringOtherApps(true)
  self.makeKeyAndOrderFront(self)
end
This is what gets called when the status menu button is pressed. We want it to act as a toggle, so we are using isVisible to determine the current state. If we are showing the window (i.e. it's not already visible), there is a bit more work to do. The important bit is that on the X axis we use the origin from the frame of the cause of the event, in this case the status menu item, and add half its own width to it to find the center of that menu item; we then remove half the width of our custom window panel to find the origin point on the X axis for our panel to ensure it'll appear centered underneath the status item. Then we set the arrow for the custom pane that points from our panel up to the status item - we'll see how that functions in a minute too.
The rest of the class just ensures the panel functions as a key window, so we can receive notification when it loses focus, and correctly hide it so that pressing the button again shows it as expected rather than leaving it in a weird state.
The other piece of the puzzle is our custom background view that we're using as the content view for our custom window, to render the panel background by doing some custom drawing. You can see that in full here. It's based on the excellent Objective-C code written for this blog post, and basically uses a Bezier path to draw a panel with rounded edges, and an arrow on the top side in the middle that'll appear to be pointing up at the status item. I won't run through all of the code here, as it's really just stepping through the various points (top of arrow, right of arrow, top right corner, bottom right corner, bottom left corner, top left corner, left of arrow) to draw the shape, and then to both fill the shape, as well as to draw an outline stroke.
The other bit of noteworthy code in this class is how we update it so that the arrow is set in the right spot and to redraw:
def setArrowX(value)
  @arrow_x = value
  self.setNeedsDisplay(true)
end
This updates the X value used in the drawing method, and setNeedsDisplay ensures that our draw method is hit again to re-draw. setArrowX is what we called from our PopupPanel, and so the rendering cycle for the custom window then is complete.
Right place, right time
We've actually already done the work in our PopupPanel class showHide method to calculate the right place to show the window, and to set the arrow on the custom pane - all that remains is to alter our AppDelegate and status menu setup to trigger the panel instead of a menu. We need to create the window within the AppDelegate:
@window = PopupPanel.alloc.initPopup
And then we'll remove this line that set the status menu as the menu to use for the status item:
@status_item.setMenu(@status_menu)
We'll then add these two lines to trigger a call to a custom event handler instead:
@status_item.setTarget(self)
@status_item.setAction('showHide:')
That event handler looks like this:
def showHide(sender)
  @unseen = 0
  self.showUnseenCommits
  @window.showHide(sender)
end
Now, we could have set the target to the @window itself, and called our showHide method directly there rather than through a delegate event handler on our AppDelegate. However, as we see above, in addition to simply toggling the window, we also have some work to do that pertains to things handled within the AppDelegate - we want to clear the unseen commits, so that they are "marked as read", in the same way that we did before when the menu was shown. Hence the abstraction within the AppDelegate to perform the additional functionality.
Collecting commits
Right now if you fire the app up, you should see a custom panel that gets shown right beneath our status bar item when we click on the status menu entry. However, there isn't any content in here just yet. Our background call to hit the GitHub API and pull out the right data is still working - we just need to take the data we have there, and use the very versatile NSCollectionView to render it nicely into our custom pane. The file that contains the majority of our code for this is here.
There are a few moving pieces to contend with. First of all, we'll define a Struct that'll contain the data we want to take from our call to GitHub, so we can store it in a neat way to use within the collection view:
Commit = Struct.new(:name, :repo, :message, :avatar, :url)
An NSCollectionView basically works off an array, and provided with a prototype object, will know how to generate the custom view for each object it finds in the array. So we define our custom view, CommitView, with some fairly easy to follow code that simply builds the three controls we're using - an NSBox to encapsulate the item with a neat visual boundary (and show the actor and repo for a commit as a heading), an NSImageView to show the relevant user avatar, and an NSTextField configured to function as a label to show the commit message. We then provide a method that takes in our object (an instance of our Commit struct), and will use the fields to populate these controls. The last code of interest in our custom commit view is that we're handling the click on it to open the commit page on GitHub directly from the view:
def mouseDown(event)
  NSWorkspace.sharedWorkspace.openURL(NSURL.URLWithString(@object.url))
end
The nice thing about this is that we no longer have to do a lookup to correlate the item clicked with a list of URLs - we're handling this event on the view that is tied to a specific object, an object we can easily re-access from the event handler to provide the URL to open.
After that, we need to then define our prototype, as a subclass of NSCollectionViewItem - this must implement loadView, which will create a new CommitView instance, and setRepresentedObject which is passed an object from our content array, and so calls through to our setViewObject on our custom view to setup the various controls with the right data. This means that the collection view will loop through the array of content objects, instantiating a collection view item using our prototype, which in turn creates an instance of our custom view, and passes the relevant commit object all the way through to the view to render correctly.
All that remains now is to setup the NSCollectionView itself within our custom panel, which we'll do in our AppDelegate. Where we previously created the window, below that we'll go ahead and setup a scroll view first of all:
scroll_view = NSScrollView.alloc.initWithFrame(NSInsetRect(@window.contentView.frame,
  PopupBackground::LINE_THICKNESS + SCROLL_VIEW_INSET, PopupBackground::ARROW_HEIGHT + SCROLL_VIEW_INSET))
scroll_view.hasVerticalScroller = true
@window.contentView.addSubview(scroll_view)
We're using a scroll view so that we can have content a lot longer than our custom pane (given that the idea is to keep it quite small to sit beneath the status menu item, and there might be a lot of commits to show). It's fairly easy to get going - we're setting the frame to be inset slightly from the content view frame, to avoid getting too close to the rounded corners and overlapping them, and we're making sure it's a vertical scroller so we can scroll up and down our commit list.
We're then going to setup our collection view using the scroll view frame, and we're giving it an instance of the commit prototype so that it'll know how to create our custom views. We then assign that to the scroll view:
@collection_view = NSCollectionView.alloc.initWithFrame(scroll_view.frame)
@collection_view.setItemPrototype(CommitPrototype.new)

scroll_view.documentView = @collection_view
The last piece of the puzzle is getting the data into the collection view each time it changes - here we need to delve into our checkForNewEvents method that processes our GitHub events. We can remove a fair bit of code now as things are nice and simple (you can see the exact changes in this diff). However, the most important thing is creating instances of our Commit struct for each commit with the right data from the GitHub API, and appending it to an array that we setup towards the beginning of checkForNewEvents:
@data << Commit.new(actor, repo, message, avatar, url)
And after we've finished processing all of the commits, we update the collection view quite easily:
@collection_view.setContent(@data)
Running the app now and clicking the menu item will show the custom panel, complete with the custom commit views for each commit found. Clicking an item will open it as it did before (and auto hide the panel).
Additional options
This all functions really well, but we've lost a little bit of potentially vital functionality - the menu options to show the about window, and to quit the app! The nice thing is we still have our menu with those options, and we can add a button to our custom panel that when clicked will show that exact same menu but as a context sensitive popup menu instead!
We just need to setup an NSButton within our AppDelegate and add it to the content view of our custom window, which we'll do beneath the scroll view:
@options_button = NSButton.alloc.initWithFrame(NSMakeRect(PopupPanel::POPUP_WIDTH - BUTTON_WIDTH, 0,
  BUTTON_WIDTH, BUTTON_HEIGHT))
@options_button.setTitle("Options")
@options_button.setButtonType(NSMomentaryLightButton)
@options_button.setBezelStyle(NSRoundedBezelStyle)
@options_button.setTarget(self)
@options_button.setAction('showMenu:')
@window.contentView.addSubview(@options_button)
And then we'll implement the showMenu event handler:
def showMenu(sender)
  NSMenu.popUpContextMenu(@status_menu, withEvent: NSApp.currentEvent, forView: sender)
end
Now when you run the app, you'll see we have an options button at the bottom, and clicking it reveals our menu with the about and quit functionality working just the same as before! This is a great way to still tuck away the standard stuff your app might need in a normal menu, but retain all of the power and customisation that building your own custom user interface will bring you.
Here is what our end result looks like:
![]()
Phew, that was a quite a long tutorial this time! But we've seen that relatively speaking, it isn't a whole lot of code to implement a custom user interface that you can tweak to better suit your own app. You could tweak the PopupBackground drawing to do something different, and of course you don't have to use a scroll view and collection view to display the data - it depends on what you are showing. If you do use a collection view, you can customise your own item view that best suits the data you're showing. There are a number of different ways to use this approach, but end up with a result perfectly tailored to your app.
As we didn't cover every last line of code that was changed, and there were a few more general tweaks made to the app since our last article, you can view all of the changes in this diff over on GitHub.
Let me know if you enjoyed the article, or if you have any questions, comments or suggestions, either below, or @ejdraper on Twitter!
CommentsPage 2 of 31 | Next page | Previous page