
Articles tagged 'code'
Working with NSTableView Aug 18 2015
This article is a look at how to use NSTableView when building a Mac app using RubyMotion, and is taken from the Data chapter in my book, Building Mac OS X apps with RubyMotion. If you like what you read here, please take a look at my book - in the book we progress further with the following app code to look at Core Data, and then integrate with iCloud. You can also get a free 20+ page Getting Started guide.
A table view can be a good way to start with presenting data in your app, before you customize further or even replace it later if needed. It’s a no-frills, easy to use way to get something up and running. We’ll start by building a simple note taking app, that will just keep the notes in memory and display them in the table view. Create the app using the OS X template as we’ve done before:
motion create --template=osx Noteworthy
cd Noteworthy
First up, let’s add in our favorite user interface gem, motion-kit:
gem 'motion-kit'
Then run the following:
bundle install
Then we’ll create our layout file to setup our user interface - here is the code for app/main_layout.rb:
class MainLayout < MotionKit::Layout
  FORM_HEIGHT = 100
  TITLE_HEIGHT = 30
  CONTENT_HEIGHT = 70
  BUTTON_WIDTH = 70
  BUTTON_HEIGHT = 30

  def layout
    add NSView, :form do
      constraints do
        width.equals(:superview)
        height.is(FORM_HEIGHT)

        min_left.is 0
        min_top.is 0
      end

      add NSTextField, :title_text do
        placeholderString "Enter note title"

        constraints do
          width.equals(:superview)
          height.is(TITLE_HEIGHT)

          min_left.is 0
          min_top.is 0
        end
      end

      add NSTextField, :content_text do
        placeholderString "Enter note content"

        constraints do
          width.equals(:superview)
          height.is(CONTENT_HEIGHT)

          min_left.is 0
          min_top.is TITLE_HEIGHT
        end
      end

      add NSButton, :save_button do
        title "Save"

        constraints do
          width.equals(BUTTON_WIDTH)
          height.is(BUTTON_HEIGHT)

          min_right.is 0
          min_bottom.is 0
        end
      end
    end

    add NSScrollView, :scroll_view do
      has_vertical_scroller true

      constraints do
        width.equals(:superview)
        height.equals(:superview).minus(FORM_HEIGHT)

        min_top.is FORM_HEIGHT
      end

      table_view = add(NSTableView, :table_view) do
        row_height 25

        add_column "title" do
          title "Title"
          min_width 150
        end

        add_column "content" do
          title "Content"
        end
      end
      document_view table_view
    end
  end
end
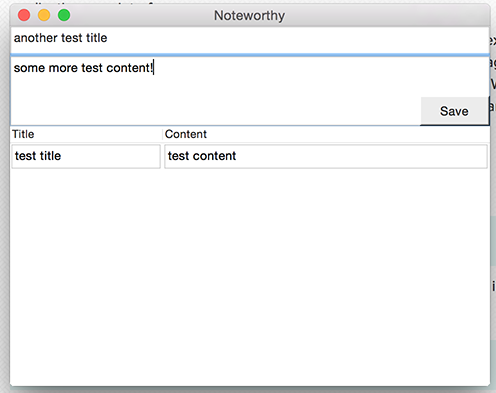
Most of this should be fairly straightforward if you’ve previously read through my previous post on motion-kit - we’re just setting up a window with the top section containing form fields for creating a new note, with a button to save it, and the bottom section is a table view inside a scroll view, so that when there is more content in the table than there is room in the window, you can scroll through it easily. We’re setting up two columns in the table view, title and content.
After that, we’ll update our AppDelegate, adding the following to the end of our applicationDidFinishLaunching:
@title_text = @layout.get(:title_text)
@content_text = @layout.get(:content_text)

@notes = []
@table_view = @layout.get(:table_view)
@table_view.delegate = self
@table_view.dataSource = self

@save_button = @layout.get(:save_button)
@save_button.target = self
@save_button.action = 'note_save:'
We’re grabbing references to the controls we need to interact with, and then we’re following that up by ensuring that the AppDelegate itself acts as both the delegate, and data source for our table view - we’ll come back to that in a minute. Then we’re setting up the save button to call a method on the AppDelegate, called note_save. That method looks like this:
def note_save(sender)
  title = @title_text.stringValue
  content = @content_text.stringValue
  return if title.nil? || title.empty? ||   content.nil? || content.empty?

  @notes << {:title => title, :content => content}
  @table_view.reloadData
  @title_text.stringValue = ""
  @content_text.stringValue = ""
end
Nothing too tricky here - we’re validating the inputs first of all, then adding a note to our @notes array as a simple hash with :title and :content keys. We’ll reload the table view so that it updates to show the new note, and then we’ll clear out the text fields ready for the next note. All that remains now is to implement a couple of methods we need to handle the table view itself - specifically, we’re going to be making sure we conform to the base necessities required for the NSTableViewDataSource and NSTableViewDelegate protocols. For the former, we need to add the following very simple method:
def numberOfRowsInTableView(table_view)
  @notes.length
end
This just ensures that we’re telling the table view how many rows we have based on our notes in our @notes array. The next method we need, and final bit of code we have to add to see all of this working, is a little bit more involved:
def tableView(table_view, viewForTableColumn: column,   row: row)
  result = table_view.makeViewWithIdentifier(column.identifier, owner: self)
  if result.nil?
    result = NSTextField.alloc.initWithFrame([[0, 0],   [column.width, 0]])
    result.identifier = column.identifier
    result.editable = false
  end
  result.stringValue =   @notes[row][column.identifier.to_sym]
  result
end
This is called for each column, in each row - i.e. for every one of our configured columns in our layout (we have two, title and content), and then for however many rows we have based on the previous method we defined that looks at the length of the @notes array. We’re calling makeViewWithIdentifier to see if we already have a view we can use in the pool, utilizing the built-in table view recycling to avoid creating too many controls. This is important, especially if you’re building an app that might ultimately have hundreds or thousands of rows perhaps, and/or a lot of columns.
If we can’t find a view to use, we’ll set one up. We don’t need to worry about any frame dimensions besides the width which we can ascertain from the configured column width, and likewise we set the identifier to match the column too. In this case we don’t want the text fields editable. Lastly, regardless of how we got our view, the final thing to do is to set the string value contents of the cell - we’re effectively indexing into our @notes array by both the row (to find the right note), and then using the column identifier to find the right key in our note hash to get the contents. We just have to return our control, and we’re done!
If you fire up the app now, you’ll see that we have the form, and an empty table. Entering a note without filling in both fields doesn’t save, and filling in both fields and hitting save then clears the fields, and adds the note to our table below. You can keep adding as many notes as you’d like!
This is a fairly simple table view implementation, and of course you can customize an awful lot about the table view to make it more useful, to make it look nicer, and to make it better suit your purposes.
If you quit the app and restart it though, you’ll see all of our precious notes have disappeared. That’s where Core Data would come in handy!
You can see the code for this section here.
CommentsDragging and dropping into your RubyMotion Mac OS X app May 20 2015
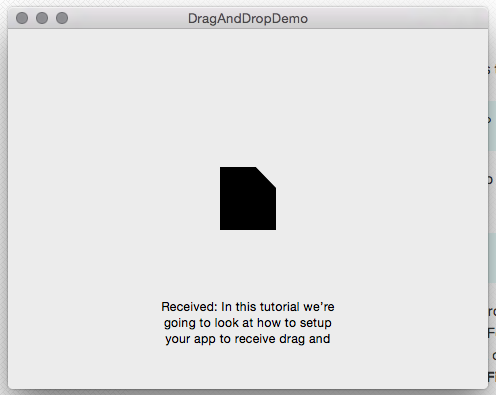
In this tutorial we’re going to look at how to setup your app to receive drag and drop events - so that you can receive data simply by the user dragging something into a predefined area of your application user interface.
This can be quite useful if your app needs a file input, requires a URL, or expects some text input, amongst other things. We’ll look at how to setup an area to accept the drag and drop, and how to receive and process data, separating files, from URLs, from plain old text. We’ll also look at how to update your user interface to feedback to the user the status of the drag and drop operation.
Setting up a space
Let’s setup a demo app that we’ll use for the rest of this tutorial:
motion create --template=osx DragAndDropDemo
cd DragAndDropDemo
Now before we do anything in AppDelegate, let’s setup a new view type, inheriting from NSImageView:
class DragAndDropView < NSImageView
end
This is what we’ll use as our area to receive drag and drops, and we’ll be building it out like a little control we can re-use and drop wherever it is needed. For our purposes, we’ll just make sure it sits in the center of our default app window created as part of the RubyMotion OS X template. Add our drag and drop view setup to the end of applicationDidFinishLaunching:
@drag_and_drop = DragAndDropView.alloc.initWithFrame(CGRectZero)
self.set_drag_and_drop_frame
@mainWindow.contentView.addSubview(@drag_and_drop)
This sets up the view, and adds it to the window. As we’ve done in previous tutorials, we’ll handle resizing by managing the view frame in a separate method (set_drag_and_drop_frame) we can call from both the initial setup, and from the window resize handler. Speaking of that, let’s go ahead and make sure the AppDelegate is acting as the delegate for our @mainWindow by adding this to the bottom of the buildWindow method:
@mainWindow.delegate = self
Then we’ll add the windowDidResize method to call the frame update too:
def windowDidResize(sender)
  self.set_drag_and_drop_frame
end
Lastly, we need our set_drag_and_drop_frame method to initialize the control frame:
def set_drag_and_drop_frame
  window_size = @mainWindow.frame.size
  drag_and_drop_size = [200, 200]
  @drag_and_drop.frame = [
    [
      (window_size.width / 2.0) - (drag_and_drop_size[0] / 2.0),
      (window_size.height / 2.0) - (drag_and_drop_size[1] / 2.0)
    ],
    drag_and_drop_size
  ]
end
So now we’ve got our view setup, we can run the app - our view doesn’t display or do anything, so it won’t look any different yet!
[code]
Setting up for user feedback
Before we implement our actual dragging functionality, we’ll add some custom code to provide better feedback to the user when something is being dragged in to the app. Our DragAndDropView is a subclass of the NSImageView, and we’ll want to keep the image rendering capability (as we’ll be using that later), but for now we can override the drawing of the control to provide a highlight stroke effect, and we’ll toggle that on and off as needed to indicate a drag in progress.
First things first, let’s keep a variable as to whether we should be rendering the highlight or not, and provide a helper method for turning the highlight on, and one for turning the highlight off:
def highlight!
  @highlight = true
  self.needsDisplay = true
end

def unhighlight!
  @highlight = false
  self.needsDisplay = true
end
After we set the variable, in each case we trigger a re-render by setting needsDisplay to true.
Then we’ll override drawRect to actually render the highlight:
def drawRect(frame)
  super(frame)

  if @highlight
    NSColor.grayColor.set
    NSBezierPath.setDefaultLineWidth(5)
    NSBezierPath.strokeRect(frame)
  end
end
As we can see here, we’re calling super to keep the existing NSImageView render functionality, but in addition to that, if the highlight functionality is enabled, we’re drawing a rectangle stroke effect in gray around the control itself.
Running the app right now won’t show anything different yet - we still need to handle drag operations!
Handling inputs
Now we need to customize our view so it indicates that it can act as a receiver for dragging, this is done with the NSDraggingDestination protocol. The nice thing about using RubyMotion is that we don’t need to explicitly declare protocols we want to implement in our classes, we just need to make sure we implement the required methods. In this case, it means adding four methods to our DragAndDropView control - draggingEntered, draggingExited, prepareForDragOperation and performDragOperation. Let’s take a look at each one in turn to figure out what they are doing, and how we can use them to implement the functionality we want, which to begin with will just be supporting the dragging of files into our app:
def draggingEntered(info)
  self.highlight!
  NSDragOperationCopy
end
draggingEntered is fairly self explanatory - this fires when we drag something over the top of our control. In this case, we do two things - firstly we highlight our control to give the user some feedback that they are dragging into the right area, and secondly we need to return an indicator of what we can do with the data being given to us. In our case, we just want to display and acknowledge that we have it, and not have any effect on the original source of the data, and so we specify NSDragOperationCopy. You can inspect the info which is an object of type NSDraggingInfo, and validate it to decide what kind of operation (if any) you want to allow for it. If you want to be able to modify the source through the dragging action, there are other options such as NSDragOperationMove and NSDragOperationDelete. If you don’t want to allow the drag, you can return NSDragOperationNone instead.
def draggingExited(info)
  self.unhighlight!
end
This too is fairly straightforward - draggingExited fires when the drag leaves our control area, so we’ll unhighlight our control. A user might be dragging the object elsewhere, or have decided against the drag before releasing it.
def prepareForDragOperation(info)
  self.unhighlight!
end
prepareForDragOperation fires when the drag is released and is going to happen, so we can perform any preparatory steps. In this case, we need to unhighlight the control as the dragging itself is over, and it hasn’t left the control area to be able to fire draggingExited, so we can do that now.
def performDragOperation(info)
  if info.draggingSource != self
    if NSImage.canInitWithPasteboard(info.draggingPasteboard)
      image = NSImage.alloc.initWithPasteboard(info.draggingPasteboard)
    else
      image = NSImage.imageNamed("file_icon")
    end
    self.setImage(image)
  end
end
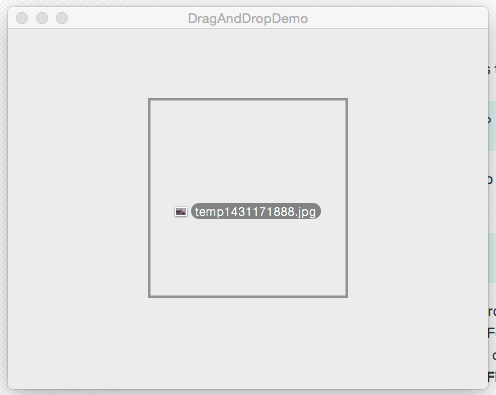
This is the meat of the actual drag operation - performDragOperation is where we can action and process the data. It’s worth noting that setting the image like this isn’t strictly necessary - if you implement the first three methods, but not performDragOperation, and test by dragging an image file over to the control, you’ll see it still works. It’s basically setting the image of the control to the incoming file by default. However, we want to ensure that other files are received, and that in those cases we display a file icon to let the user know we’ve received them, even if we can’t display them. If you try that without this method, you’ll see that it really only works for images. We also want to extend the functionality later on to do a whole lot more!
So we’re ensuring first of all that the source of the dragging operation isn’t ourselves (i.e. dragging the current image from the control), and then we see if it’s an image or not. If it is, we’ll display it, and if not, we’ll display the file icon instead.
Make sure to copy the file_icon.png from the code below into your resources folder for your app.
Fire it up and try dragging across files - images, and other types, and see how it reacts!
[code]
Processing files
Now, you may have noticed that in the above, besides setting the image on the imageview if the dragged in file is an image, we’re not actually doing anything with the incoming data. So we’ll add a mechanism to our DragDropView that’ll bubble up some events we can hook into from our AppDelegate to handle the incoming data. But before we do, let’s setup some additional UI that we’ll use when handling those events, to feed back to the user.
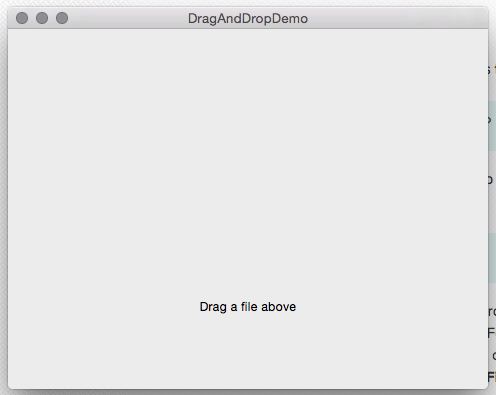
We’ll add a label below our drag and drop field, which will serve two purposes - initially, to guide the user to dragging a file to the area above the label, and also to update with information about the data dragged in.
At the end of our applicationDidFinishLaunching, add the following:
@label = NSTextField.alloc.initWithFrame(CGRectZero)
@label.bezeled = false
@label.drawsBackground = false
@label.editable = false
@label.selectable = false
@label.alignment = NSCenterTextAlignment
@label.stringValue = "Drag a file above"
self.set_label_frame
@mainWindow.contentView.addSubview @label
As we’ve seen before, this uses the NSTextField control, and tweaks a few settings to provide a read-only label for us to use.
We then need to add our set_label_frame method to setup the frame itself:
def set_label_frame
  window_size = @mainWindow.frame.size
  label_size = [200, 50]
  @label.frame = [
    [(window_size.width / 2.0) - (label_size[0] / 2.0), @drag_and_drop.frame.origin.y - label_size[1]],
    label_size
  ]
end
Then, we’ll add a call to set_label_frame to our resize handler windowDidResize:
def windowDidResize(sender)
  self.set_drag_and_drop_frame
  self.set_label_frame
end
Now if you fire up the app, you’ll see the label sat underneath our drag and drop control.
[code]
Let’s extend our DragDropView to allow a delegate to be specified, and to raise an event on the delegate when we receive data. First of all, we need to add an attribute accessor to be able to specify the delegate class on the control:
class DragAndDropView < NSImageView
  attr_accessor :delegate
Next up, we’ll add a method that’ll be used to call methods on our delegate, that’ll provide the necessary checks that we need. Add the following to our DragDropView as well:
def send_delegate_event(name, arg)
  return if self.delegate.nil?
  return unless self.delegate.respond_to?(name.to_sym)

  self.delegate.send(name.to_sym, arg)
end
This only sends the call to the specified delegate method if the delegate itself is set, and if an appropriate method is defined on the delegate to handle our event. We’re defining things like this because later on we’re going to add additional events for different types of data that we can receive, and ultimately we might want our AppDelegate to only respond to certain events, and not to error if we don’t answer the call for other events. This is similar to how delegates work for built-in controls and events - we can set AppDelegate as the delegate for a text field for example, and define methods to handle events such as text field editing ending - but if we don’t set the delegate, or don’t define the method to handle the event, we don’t end up with an error or a crash.
Now all that remains on the control side of things is to hook into the performDragOperation, extract the useful information and bubble that up as a delegate method call. In that method, and below our call to setImage, we’ll add the following:
if info.draggingPasteboard.types.include?('NSFilenamesPboardType')
  files = info.draggingPasteboard.propertyListForType('NSFilenamesPboardType')
  self.send_delegate_event(:drag_received_for_file_paths, files)
end
So here we’re validating what type of data we have and making sure we’ve received a drag that contains one or more filenames specified. As we’ll see later on, we’ll be adding to this to check for differing types of data, and thus extracting the data and raising events differently for each, allowing us to respond to different data sources in separate ways. In this case, if it is a pasteboard containing NSFilenamesPboardType, we can then load up the property list supplied for that pasteboard type, which then contains an array of the files dragged in, which is what we expose in our event call, named drag_received_for_file_paths.
Back in our AppDelegate, we now just need to set ourselves as the delegate for our drag and drop control, so where we define the @drag_and_drop instance, add:
@drag_and_drop.delegate = self
Then, we’ll implement a method called drag_received_for_file_paths:
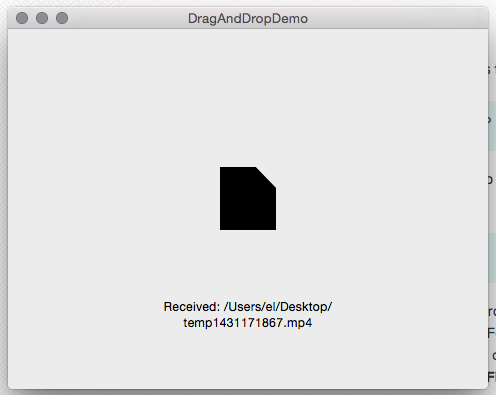
def drag_received_for_file_paths(paths)
  @label.stringValue = "Received: #{paths.join(',')}"
end
This just updates the label to list the file(s) that we’ve received in the drag operation. Try it out - drag one file, or a few files, and see it in action!
[code]
Handling text
Let’s extend our DragAndDropView now to handle text dragged in too. If you fire it up and try dragging across some text from a text editor, or selected text from a browser, you’ll see that it doesn’t respond to the drag. None of our handling fires, and the data sort of “pings back”, indicating it’s not being received. This is because by default, the NSImageView we’re inheriting from for our control responds to certain drag types (i.e. files), but we have to tell it we want it to respond to additional types. Add the following method to our DragAndDropView class:
def initWithFrame(frame)
  super(frame)

  self.registerForDraggedTypes([NSStringPboardType])

  self
end
Here we’re overriding the initialization method, calling the original one first, and then taking the opportunity to register an additional dragged type - NSStringPboardType. This will allow us to receive text. Fire up the app now, and you’ll see dragging across some text works, in as much as the control is highlighted when we drag it across (as it is when we’re dragging files), and also if we drop it, we don’t see any errors in our console log. The data itself though isn’t processed in any way, so let’s do that by raising a new delegate event we can handle. In our performDragOperation, add the following to the end (but inside the outermost if statement):
text = info.draggingPasteboard.stringForType(NSPasteboardTypeString)
self.send_delegate_event(:drag_received_for_text, text) unless text.nil?
We’re using stringForType and passing in NSPasteboardTypeString to represent our request to see if there is any text in the dragging pasteboard. If there is, we publish that up to the delegate with a new event, drag_received_for_text.
Finally, as before, we just need to add our delegate event handler to AppDelegate:
def drag_received_for_text(text)
  @label.stringValue = "Received: #{text}"
end
Now if we fire up the app, and drag across some text, we’ll see it listed in the label. File dragging still works also, and any new drag just replaces the contents of the old one.
[code]
Handling URLs
The last data type we’ll add in for this demo is dragging in URLs, for example dragging in a URL from a browser address bar. Again, as with the text, we need to register a new dragged type for this to work - NSURLPboardType. So we’ll update our call to registerForDraggedTypes to look like this:
self.registerForDraggedTypes([NSStringPboardType, NSURLPboardType])
Next up, in performDragOperation, below the text handling code we just added, add the following:
url = NSURL.URLFromPasteboard(info.draggingPasteboard)
self.send_delegate_event(:drag_received_for_url, url.absoluteString) unless url.nil?
As with the text, this is fairly straightforward - we instantiate a URL from the pasteboard, and assuming we got one, we bubble that up to a new event drag_received_for_url.
And then the final step is to implement that event handler in AppDelegate:
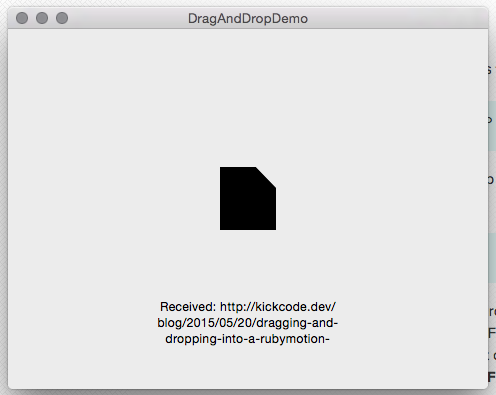
def drag_received_for_url(url)
  @label.stringValue = "Received: #{url}"
end
Really simple again, we’re just responding to it and displaying the URL in the label. This means that by and large, our three event handlers are roughly the same, but in a real application you’d most likely go on to perform something slightly different for each data type, which is why we’ve structured it so that they are handled, raised and trapped as separate events.
[code]
If you run the app now, you’ll see URL drags from the browser address bar work into our app now. Interestingly though, if you test file drags, you’ll see the URLs that are being displayed aren’t the original URLs, it’s an odd looking file:///.file/id=? URL. This is because the code we added for the URL handling will also work on the file drag operations too - effectively, both event types, drag_received_for_file_paths and drag_received_for_url will be raised, with drag_received_for_url handled last, and thus overwriting the label display with the funky looking URL.
Let’s switch out our URL handling for the following instead:
url = info.draggingPasteboard.propertyListForType('public.url')
self.send_delegate_event(:drag_received_for_url, url) unless url.nil?
[code]
Now if you run and test it, you’ll see that files display the proper path, while the URL dragging also works. It seems therefore that consulting the ‘public.url’ property on the pasteboard is a more accurate way to go and differentiate between those two types of dragging. When looking at the data for a specific type of drag operation, it’s worth either assigning the info var passed to us in performDragOperation to a variable that you can access and play with on the console while testing, or to log out the available types at least with a statement like this:
NSLog("TYPES: #{info.draggingPasteboard.types.join(', ')}")
That will show you what types are available, and inspecting those further with propertyListForType will let you see what data is provided. It also seems that the text handling can read the URL as the string contents of the pasteboard, so you might be seeing both drag_received_for_url and drag_received_for_text fire with the URL passed as an argument - we can tidy up our handling still further to ensure we’re only ever raising one event. Below our setImage call in performDragOperation, replace what we have with the following:
if info.draggingPasteboard.types.include?('NSFilenamesPboardType')
  files = info.draggingPasteboard.propertyListForType('NSFilenamesPboardType')
  self.send_delegate_event(:drag_received_for_file_paths, files)
elsif info.draggingPasteboard.types.include?('public.url')
  url = info.draggingPasteboard.propertyListForType('public.url')
  self.send_delegate_event(:drag_received_for_url, url) unless url.nil?
else
  text = info.draggingPasteboard.stringForType(NSPasteboardTypeString)
  self.send_delegate_event(:drag_received_for_text, text) unless text.nil?
end
This now just means we’re matching in a sort of priority order - first filenames, then the URL, then finally falling back on the string contents of the pasteboard. As a result of daisy chaining the conditional statements though, once we have a match, no other processing happens, which results in a more reliable result for the consumer of these events, in this case, our AppDelegate.
[code]
More detailed URL handling
One thing that I spotted only when investigating the available types for a URL was that there was an additional type that included not just the URL, but the title of the webpage from the browser too! Let’s add that in as an additional event, as that could be quite useful. First of all, as this would be an event with two arguments (URL and title), let’s update our send_delegate_event helper method to support that:
def send_delegate_event(name, *args)
  return if self.delegate.nil?
  return unless self.delegate.respond_to?(name.to_sym)

  self.delegate.send(name, *args)
end
We’ve changed the arg to instead be *args, which acts as an argument list, that we’re then passing straight through when we call the delegate method. We can now have methods that have 1 argument, 2 arguments, or 10 arguments!
Now let’s add our extended URL handling - we’re going to add this to our daisy chained conditionals, above the existing URL support which we’ll leave in place in case there are any URL dragging operations that don’t provide this additional data (it will most likely depend on which browser or app you’re dragging the URL from):
elsif info.draggingPasteboard.types.include?('WebURLsWithTitlesPboardType')
  url, title = info.draggingPasteboard.propertyListForType('WebURLsWithTitlesPboardType').flatten
  self.send_delegate_event(:drag_received_for_url_and_title, url, title)
As you can see here, we’re checking for a specific new type, WebURLsWithTitlesPboardType, and if that’s available, it’ll come back as an array in this format:
[["url", "title"]]
Therefore we flatten it to get just a single array, and extract our URL and title, which we bubble up with a new delegate event, drag_received_for_url_and_title, and pass both arguments. To handle this now, we just need to implement the handler on our AppDelegate:
def drag_received_for_url_and_title(url, title)
  @label.stringValue = "Received: #{url}"
  @mainWindow.title = title
end
Here we’re once again putting the URL in the label to feed back to the user, but to make things a bit more interesting, we’re setting our actual app window title to the title we receive from the URL web page drag. If you test that now, you’ll see that in fact the window title changes to reflect the page that was dragged in!
[code]
Improving the visual feedback
The last thing we’ll look at in our demo app here is to improve the user visual feedback, so that the icon shown on the image view changes for different types of drag operation - right now, an image is displayed if it’s an image file, and anything else results in the file icon. Let’s add a text icon and a URL icon to differentiate between those drag operations also. It’ll take a bit of tweaking of our performDragOperation method, so here is how it should look in full to make this happen:
def performDragOperation(info)
  if info.draggingSource != self
    image = NSImage.alloc.initWithPasteboard(info.draggingPasteboard)
      if NSImage.canInitWithPasteboard(info.draggingPasteboard)

    if info.draggingPasteboard.types.include?('NSFilenamesPboardType')
      files = info.draggingPasteboard.propertyListForType('NSFilenamesPboardType')
      self.send_delegate_event(:drag_received_for_file_paths, files)
    elsif info.draggingPasteboard.types.include?('WebURLsWithTitlesPboardType')
      url, title = info.draggingPasteboard.propertyListForType('WebURLsWithTitlesPboardType').flatten
      self.send_delegate_event(:drag_received_for_url_and_title, url, title)
      image = NSImage.imageNamed("url_icon")
    elsif info.draggingPasteboard.types.include?('public.url')
      url = info.draggingPasteboard.propertyListForType('public.url')
      self.send_delegate_event(:drag_received_for_url, url) unless url.nil?
      image = NSImage.imageNamed("url_icon")
    else
      text = info.draggingPasteboard.stringForType(NSPasteboardTypeString)
      self.send_delegate_event(:drag_received_for_text, text) unless text.nil?
      image = NSImage.imageNamed("text_icon")
    end

    image ||= NSImage.imageNamed("file_icon")
    self.setImage(image)
  end
end
Breaking it down, we’re setting our image to be the image itself if the pasteboard is an image file. Otherwise, inside of our daisy chained conditionals for matching different drag types, we’re setting the appropriate image. For the files, we’re not setting an image - it’ll either already be set if it’s an image file, or we’ll be using the file icon as a default anyway, which we’ll come back to in a second.
For the two URL handling conditionals, and the string/text handling, we’re setting either the url_icon or text_icon image. Lastly, as we just mentioned, if no other image is set already, we’ll use the file_icon as a default so we show something, before setting the image as our final action now in performDragOperation.
As before, copy the additional icons (url_icon.png and text_icon.png) from the code below into the resources directory in your app before running it.
If you run the app now and try dragging in various different data sources, you’ll see that as well as the label (and for URLs with titles, the window title) changing, the icon will update to reflect the source too, which provides additional user feedback.
![]()
![]()
[code]
Wrapping up
So now we have a demo app that can receive multiple data types dragged over to it, providing feedback to the user that it can receive that drag, and then updating further when it’s received and processed the data. Additionally, we’ve done this with a re-usable drag and drop image view control, that handles the processing of the drag operations, provides visual feedback by changing the icon shown (or showing an image file), and bubbles up various events so that a consumer app can receive more data about drag events and act accordingly. From here you could build an app that took files and uploaded them, scanned text to provide useful analysis, or altered images in a common way for repeatable tasks!
If you’ve enjoyed the content here, remember that early access orders for my forthcoming book, Building Mac OS X apps with RubyMotion, open up on June 8th - make sure you’re subscribed to the mailing list so you can get a launch discount! Any comments or questions, please drop them below, or tweet me @ejdraper.
CommentsUser specified custom key combination for a global hotkey May 13 2015
Over a year ago, I covered global hotkeys in a tutorial on this very blog. However, handling a global hotkey combo is only half of the story - I’m sure in most apps you’ve seen that provide that kind of functionality, the app also allows the user to override the default, and specify their own key combination to use instead. How do they do it? We’re going to build on the app we already created in that tutorial (the code is here) to find out.
DDHotKey, revisited
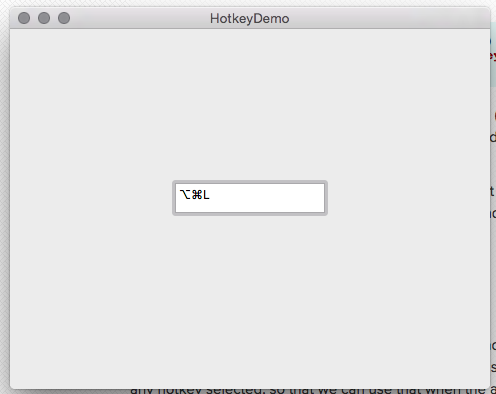
The library we used in the last tutorial on global hotkeys, that provided a nice and neat wrapper around the old Carbon APIs for hotkeys, also provides a ready-to-use UI component for user input of hotkeys! The only thing we need to figure out is how we integrate with it, and how we store the users chosen key combination for use between app sessions. Let’s start with the UI.
We’re going to add the DDHotKeyTextField to the window, so at the end of our buildWindow method, we’ll set it up like this:
size = @mainWindow.frame.size
field_size = [150, 30]
@hot_key_field = DDHotKeyTextField.alloc.initWithFrame(
  [
    [(size.width / 2.0) - (field_size[0] / 2.0), (size.height / 2.0) - (field_size[1] / 2.0)],
    field_size
  ])
@hot_key_field.delegate = self

@mainWindow.contentView.addSubview(@hot_key_field)
Nothing too complex there - we’re centering the field in our window, setting the AppDelegate to be the delegate for the field, and adding it to our window.
Next up, we need a method to register our hotkeys. This will serve two purposes - it’s what we’ll call when we detect a new hotkey set using our DDHotKeyTextField, and we’ll also switch the initial hotkey registration for the app to use it too, for consistency:
def registerHotKey(keyCode, modifierFlags) center = DDHotKeyCenter.sharedHotKeyCenter center.unregisterAllHotKeys center.registerHotKeyWithKeyCode( keyCode, modifierFlags: modifierFlags, target: self, action: ‘handleHotkey:’, object: nil) end
This should be fairly simple to follow based on how we were registering hotkeys before - basically we’re passing in the key code and modifier flags that describes the hotkey combo; we’re grabbing the hotkey center, this time firstly unregistering all existing hotkeys (remember this will be called when changing the hotkey so we need to remove any existing combo), and then registering the hotkey pointing to our handle hotkey method, handleHotKey, for when it is triggered.
Let’s change the initial app setup to use this method to make sure it’s working. In applicationDidFinishLaunching, we’ll replace our registerHotKeyWithKeyCode call to the DDHotKeyCenter with a call to our new registerHotKey method:
@hot_key_field.hotKey = self.registerHotKey(KVK_ANSI_H, (NSCommandKeyMask | NSAlternateKeyMask))
Then we need to hook into when the DDHotKeyTextField is done being edited, so we can re-register the hotkey. We’ve already set the delegate for the field to the AppDelegate, so now all we need to do is define the following method:
def controlTextDidEndEditing(notification)
  self.registerHotKey(@hot_key_field.hotKey.keyCode, @hot_key_field.hotKey.modifierFlags) if @hot_key_field.hotKey
end
This will get called when editing is finished on that field (i.e. when enter is pressed), and it simply calls registerHotKey with the current key code and modifier flags for the field hotkey, so long as it exists.
If you fire up the app now, you should see that a default hotkey combo is set, the field allows that to be changed, and when it is changed, the app responds as expected on that new hotkey, instead of the old one.
[code]
Persistence
You’ll also notice though that shutting down the app and firing it back up restores the default combo, and any user customization is lost. We need to save the key code and modifier flags for any hotkey selected, so that we can use that when the app is restarted, and so if the user has changed it, it stays changed. We’re going to use NSUserDefaults to store the key code and modifier flags. First things first then, when a hotkey is registered, let’s store the values. Amend the top of registerHotKey to the following:
def registerHotKey(keyCode, modifierFlags)
  NSUserDefaults.standardUserDefaults['keyCode'] = keyCode
  NSUserDefaults.standardUserDefaults['modifierFlags'] = modifierFlags
The key code and modifier flags is all we need to describe the hotkey combo, so we’ll stash those. Next up, let’s add some helper methods for retrieving those values - and we’ll move our defaults into those methods too, for the first run of the app where no values will be set:
def userKeyCode
  NSUserDefaults.standardUserDefaults['keyCode'] || KVK_ANSI_H
end

def userModifierFlags
  NSUserDefaults.standardUserDefaults['modifierFlags'] || (NSCommandKeyMask | NSAlternateKeyMask)
end
So we’re looking up our persisted values, falling back to the same defaults for the key code and modifier flags that we were using before. Now, in applicationDidFinishLaunching, we can put into place the final piece of the puzzle. Instead of using our default combo there on every app startup, we’ll refer to these helper methods:
@hot_key_field.hotKey = self.registerHotKey(self.userKeyCode, self.userModifierFlags)
This means that when the app is run for the first time, it’ll fall back on the defaults provided within those helper methods still, but once values are persisted and saved, it’ll use those instead.
Try it out now, fire up the app, change the key combo from cmd+alt+h to something else, press enter, restart the app, and then test out your new custom key combo for hiding and showing the app, persisted between app sessions. Power to the users!
[code]
CommentsPreviewing video and audio when capturing on Mac OS X with RubyMotion May 7 2015
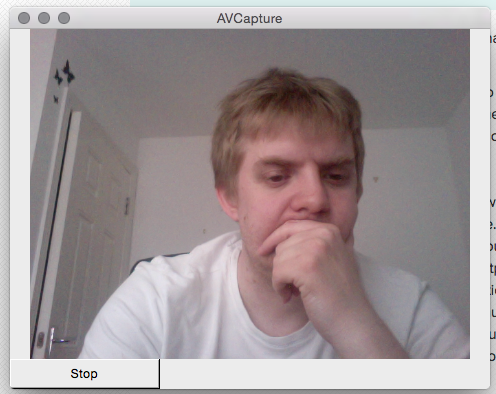
In the last article we covered how to capture video and audio from attached devices on Mac OS X using RubyMotion. In this article we’re going to extend our basic AVCapture app to display a preview of the video being captured, and audio levels, so that capturing is more responsive and you can be sure you’re recording what you want to record.
Previewing video
First thing first, we’ll need to make room for our preview. Let’s move our button to start and stop recording to the bottom left of the window - we’ll put the video preview above it, and it’ll leave room for our audio levels meter to the right of the button. We’ll add a constant for the button size now so we can refer to it elsewhere, so add this just inside the AppDelegate class declaration:
class AppDelegate
  BUTTON_SIZE = [150, 30]
Then change set_button_frame to the following:
def set_button_frame
  @button.frame = [[0, 0], BUTTON_SIZE]
end
With the button out of the way, we can then setup the video preview. First of all, we need a view to display it in, so in our buildWindow setup method, at the bottom we’ll add the following:
bounds = @mainWindow.contentView.bounds
bounds.size.height -= BUTTON_SIZE.last
bounds.origin.y += BUTTON_SIZE.last
@view = NSView.alloc.initWithFrame(bounds)
layer = CALayer.layer
@view.setLayer(layer)
@view.setWantsLayer(true)
@mainWindow.contentView.addSubview(@view)   end
We’re using the BUTTON_SIZE constant to work out the rest of the window area available after the button, and then we’re creating a blank view with that space. We need to setup a default blank layer using CALayer.layer, and we need to set setWantsLayer to true to be able to be able to add a sublayer which we’ll be doing next from within didStartRunning:
def didStartRunning
  @video_preview = AVCaptureVideoPreviewLayer.alloc.initWithSession(@session)
  @video_preview.frame = @view.bounds
  @view.layer.addSublayer(@video_preview)

  url = NSURL.alloc.initWithString("file:///Users/#{NSUserName()}/Desktop/temp#{Time.now.to_i}.mp4")
  @output.startRecordingToOutputFileURL(url, recordingDelegate: self)
end
Before we start our recording, we’re using the AVCaptureVideoPreviewLayer class, configured against our @session, to be able to create a layer; then we’re setting the bounds to match the view, and then we’re adding it as a sublayer. That’s it!
Run the app now, and when you start recording the captured output appears in the window above our button, and it disappears when we stop our capture session. Pretty cool huh?
[code]
Coping with window resizes
We already handled window resizes for our centered button in the code, based upon our centered button code example here - however now our button is in the bottom left (and stays there), that is no longer the problem. Instead, our video preview doesn’t properly size up or down on resize when already active. So let’s handle the resize event in the same way, and re-initialize the view holding our video preview layer any time a resize happens to properly update the preview. First things first, let’s add a method to handle the setup and updating of our video preview frame, which we can now call both on initial capture start, as well as on resize, to keep the preview size in sync with the window:
def update_video_preview
  if @view
    @video_preview.removeFromSuperlayer if @video_preview
    @view.removeFromSuperview
  end

  bounds = @mainWindow.contentView.bounds
  bounds.size.height -= BUTTON_SIZE.last
  bounds.origin.y += BUTTON_SIZE.last
  @view = NSView.alloc.initWithFrame(bounds)
  layer = CALayer.layer
  @view.setLayer(layer)
  @view.setWantsLayer(true)
  @mainWindow.contentView.addSubview(@view)

  @video_preview.frame = @view.bounds
  @view.layer.addSublayer(@video_preview)
end
As you can see, we’re coping with an existing @view and @video_preview layer, removing them from their parent view/layer as appropriate, before using the window bounds (minus the button size) to calculate the room left for the preview - the same as we were doing before. We then add the view, set the video preview layer bounds based on the view we’ve setup, and add the video preview layer as a sublayer. The only thing we’re not doing here is creating the actual video preview layer - this we will do only when the capture session starts, because if we did it in update_video_preview, getting called on each resize, we’d find that recreating new video preview layers against the session would actually trigger it to stop recording output for some reason. Seeing as we don’t need to reinitialize that anyway, we just need to remove it from the old view and add it to the new one, then it doesn’t matter too much.
So now we need to reference this when the capture session starts, so that our code works as it did before - the first part of didStartRunning should now look like this:
def didStartRunning
  @video_preview = AVCaptureVideoPreviewLayer.alloc.initWithSession(@session)
  self.update_video_preview
We’ll create the video preview layer as before, and then we’ll call our new method for updating the video preview, in this case initialising the view and adding the sublayer to get the output showing. Lastly, we just need to hook things in on resize, as so within windowDidResize:
def windowDidResize(notification)
  self.set_button_frame
  self.update_video_preview if @is_running
end
We check to make sure @is_running is equal to true, to be sure that it’s worth bothering with a video preview.
Now if you run the app, you’ll see that resizing the window resizes the video output preview in real-time - pretty neat!
One thing we now need to fix though is that with the way this is setup, you’ll notice trying to record more than one video during one run of the app doesn’t work. The first one records fine, and from then on, it doesn’t begin recording. This is because re-initializing the video preview layer in this way each session (while all of the rest of the session and recording setup is unchanged) causes an error (AVErrorSessionConfigurationChanged specifically), somewhat similar to how we didn’t want it re-initialised on each window resize or else it’d stop recording. So we’ll change didStartRunning so it only sets up @video_preview when it doesn’t already exist:
def didStartRunning
  @video_preview ||= AVCaptureVideoPreviewLayer.alloc.initWithSession(@session)
Now when we start multiple recordings in one run of the app, none of the AV related configuration or setup changes, and so we’re free to just start and stop the session and create as many recordings as we want.
When you do get an error that seems to prevent recording (in our app it’ll just keep going back to Start and shutting the webcam back off a few seconds after pressing Start), you can usually get to the bottom of it from within didFinishRecordingToOutputFileAtURL. That will still get called, but you can now use the error parameter to see what’s going on. The message isn’t always very useful, but the code property will provide a value you can check against the error codes here, which along with the description of each error further down that document, should give you enough to go on. Those are also very useful of course because in a production ready app, you’d want to cope with a lot of those errors and feed them back to the user, for things such as being out of disk space etc.
[code]
Tapping into audio levels
Next up, let’s use the space to the right of the start/stop button to show an audio level meter. Before we get in to the user interface though, first we’ll look at how to tap into the necessary audio output to poll for audio peak and average levels.
We need to add an audio output, so in applicationDidFinishLaunching, below where we setup our movie file output, let’s add this:
@audio_output = AVCaptureAudioDataOutput.alloc.init
@session.addOutput(@audio_output) if @session.canAddOutput(@audio_output)
This creates an audio data output and adds it to the session, ready for us to use. The rate of change for the average power and peak hold levels on audio channels though is so quick that there aren’t any delegate methods or notifications we can hook into to watch for changes, so instead we just need to poll for it - the resolution is up to you and the app you’re building, but in our example we’ll be polling 10 times a second. We’ll do that with a scheduled interval, so add this to the bottom of applicationDidFinishLaunching:
NSTimer.scheduledTimerWithTimeInterval(0.1,
  target: self,
  selector: 'checkAudioLevels',
  userInfo: nil,
  repeats: true)
This repeats endlessly while the app is running, and runs every 0.1s. Now we just need to implement checkAudioLevels and inspect the audio output:
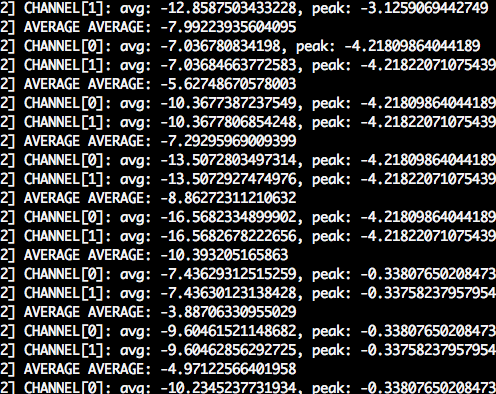
def checkAudioLevels
  return unless @is_running
  sum = 0
  @audio_output.connections.first.audioChannels.each_with_index do |channel, index|
    NSLog "CHANNEL[#{index}]: avg: #{channel.averagePowerLevel}, peak: #{channel.peakHoldLevel}"
    sum += (channel.averagePowerLevel + channel.peakHoldLevel) / 2.0
  end
  avg = sum / @audio_output.connections.first.audioChannels.count
  NSLog "AVERAGE AVERAGE: #{avg}"
end
Let’s run through what this is doing - firstly we make sure we’re running a capture before we do anything, and if it is, we loop through the channels on the audio outputs connection (it can have only one connection), and we’re logging out the average power and peak hold level. We’re also adding the average of those two values for each channel to a running total, and then creating an average single value based on both average power and peak hold, for all available audio channels, and logging that out too. If you run the app now, then start the session, you’ll notice that any noises make a significant change to the numbers being shown on the console.
[code]
Displaying audio levels visually
So we have the data, but we need a way of displaying that to the user so that they can see that audio levels are as expected. We’re going to use a simple custom meter control that I created to display the levels - the idea being that it’s a bar, with color thresholds such that normal volume shows green, louder shows yellow, and extremely noisy shows as red. The code for the control itself is available here, and you’ll be able to see a bit more about how it works in a chapter in my forthcoming book.
First things first then, let’s add the gem we need to our Gemfile:
source 'https://rubygems.org'

gem 'rake'
# Add your dependencies here:

gem 'motion-meter'
Then in our applicationDidFinishLaunching, above the NSNotificationCenter and NSTimer code, we’ll add our new control as follows:
@audio_level = Motion::Meter::ThresholdMeter.alloc.initWithFrame(CGRectZero)
@audio_level.add_threshold(-20, -5, NSColor.greenColor)
@audio_level.add_threshold(-5, 3, NSColor.yellowColor)
@audio_level.add_threshold(3, 10, NSColor.redColor)
@audio_level.min_value = -20
@audio_level.max_value = 10
self.set_audio_level_frame
@mainWindow.contentView.addSubview(@audio_level)
The meter control allows thresholds to be set, and for that we just need to define a lower and upper limit for the threshold, along with a color to use for rendering the meter if the current value is within that threshold. We also set a min and max value to prepare the control for the range of values to expect - typically our calculated average works out at around somewhere between -20 and 10 it seems from the logging, so we’ll set it up accordingly.
We’ll also need to add this method that is called to setup the frame too:
def set_audio_level_frame
  @audio_level.frame = [
    [BUTTON_SIZE.first, 0],
    [@mainWindow.contentView.bounds.size.width - BUTTON_SIZE.first, BUTTON_SIZE.last]
  ]
end
And the reason that’s in its own method, as with the set_button_frame, is so that we can also call it from the resize handler when the window is resized. Therefore, windowDidResize becomes:
def windowDidResize(notification)
  self.set_button_frame
  self.set_audio_level_frame
  self.update_video_preview if @is_running
end
Lastly, we need to be setting the value from within our checkAudioLevels method, so the control can use the latest value each time we check the levels - here we’re using our calculated average value:
def checkAudioLevels
  return unless @is_running
  sum = 0
  @audio_output.connections.first.audioChannels.each_with_index do |channel, index|
    sum += (channel.averagePowerLevel + channel.peakHoldLevel) / 2.0
  end
  avg = sum / @audio_output.connections.first.audioChannels.count
  @audio_level.value = avg
end
You’ll notice we’ve also lost our logging statements - now that we’re representing those values visually through our meter control, they are no longer needed.
If we fire up our app, and click Start, we’ll see our video preview appear, and below it, alongside our button, a meter that reacts to the input audio volume of our recording - try clapping and see it react accordingly, jumping into the yellow or red thresholds.

[code]
Next steps
There is obviously a whole lot more that you could do with the AVFoundation framework, we’ve really just scratched the surface of what’s possible here. Capturing still images, altering the configuration and presets to change the quality of the output, processing data to modify it on the fly, as well as doing more interesting things with the output such as streaming or uploading - there is a lot of potential. In my book, you’ll be able to read this content and more to cover capturing audio and video in more detail, as well as a whole bunch of other OS X app building topics using RubyMotion. If you’re interested in being able to build apps and utilities for OS X quickly and easily, you’ll want this book! So sign up now below to be notified when early access starts very soon (subscribers will get an exclusive discount!).
Other than that, feel free to tweet me @ejdraper, or comment below with any questions or comments.
CommentsCapturing video and audio on Mac OS X with RubyMotion May 6 2015
In this article we’re going to look at how you can use RubyMotion and the AVFoundation framework to build a Mac OS X app that lets you capture video and audio from attached input sources (like the built-in iSight), and how you can then output that combined footage to a movie file. You can see the code for the app here.
App setup and capture overview
The first thing we need to do is setup a new Mac app:
motion create --template=osx AVCapture
Then we need to edit the Rakefile to add the AVFoundation for us to use:
Motion::Project::App.setup do |app|
  # Use `rake config' to see complete project settings.
  app.name = 'AVCapture'

  app.frameworks += ['AVFoundation']
end
[code]
Now we’re ready to start capturing from input sources. Whether audio or video, the setup and API calls are roughly the same, with the process being the following steps:
- create and configure a capture session
- find the device(s) you want to capture from
- create a capture input from the device(s)
- check to make sure the capture inputs can be added, and if so, add it to the capture session
- create a capture output representing how you want to save or process the captured data
- check to make sure it can be added to the session, and if so, add it
- when you want to begin capturing, start the session, and once the session is started, begin any output specific actions (such as recording to file)
- stop the session when you’re done capturing
Now, that seems like a lot of steps, but each step is quite straightforward, which is the great thing about the API - it breaks down a complicated task into a series of very simple steps, and along the way allows a ton of configuration, customisation, and different input and output options.
So what are we going to be building? To keep things simple to begin with, we’ll build an app that shows a window with a button on it, and when the button is pressed, we begin recording using the first video and audio device found, and when it’s pressed again, we’ll stop recording. It’ll output the captured audio and video inputs to file. This means we don’t have to focus too much on the UI of our test app, but can focus instead on the code that makes all of the above steps happen.
Setting up our capture session and device inputs
So first things first, we want to setup our capture session and device inputs, and we’ll do that in applicationDidFinishLaunching.
def applicationDidFinishLaunching(notification)
  buildMenu
  buildWindow

  @session = AVCaptureSession.alloc.init
  @session.sessionPreset = AVCaptureSessionPresetHigh
Creating a session is fairly familiar of course, with a standard .alloc.init, and then we set a preset that determines the quality of the capture. There are a fair few presets to choose from, and a good description of them is available better than I could summise in the docs here. In this case we’ll use a preset which represents the highest quality that the recording devices allows for. You can additionally go into much more detailed configuration for session quality, but we won’t get into that right now.
Next up, we need to locate our devices. You can easily find the available devices on the system with AVCaptureDevice.devices, and the key is to inspect them and find the ones that support the type of capture you want to do - in this case, we want a video input device, and an audio input device. If you want to see the devices available with a friendly name, you can log the following or run it in the console:
AVCaptureDevice.devices.map(&:localizedName)
We’ll be taking the first of each one we find, which commonly on a Mac will be the video from the built-in iSight, and the audio from the built-in mic:
devices = AVCaptureDevice.devices
video_device = devices.select { |device| device.hasMediaType(AVMediaTypeVideo) }.first
audio_device = devices.select { |device| device.hasMediaType(AVMediaTypeAudio) }.first
hasMediaType is a useful way of determining the media capabilities of each device, so we can find the devices we need for both audio and video - in this case, they are separate, but if you had a USB connected webcam that did both audio and video, you’d see that it would support both media types and thus could be used for either/both.
Next up, we need to create a capture input from these devices, before we can add them to our capture session:
video_input = AVCaptureDeviceInput.deviceInputWithDevice(video_device, error: nil)
audio_input = AVCaptureDeviceInput.deviceInputWithDevice(audio_device, error: nil)
And then lastly, we check to ensure we can add the inputs, before adding them to our session:
if @session.canAddInput(video_input) && @session.canAddInput(audio_input)
  @session.addInput(video_input)
  @session.addInput(audio_input)
end
Now our session and inputs are setup, let’s configure the output!
Configuring our capture outputs
We just have to decide on the type of output we want, and then instantiate an instance of that output type. In this case, we’ll be using the movie file output, which processes the data directly to a file. Again, we’re checking if we can add the output before adding it to the session:
@output = AVCaptureMovieFileOutput.alloc.init
@session.addOutput(@output) if @session.canAddOutput(@output)
There are of course other types of output for performing different tasks - they are listed in full in the docs here, but in short alongside the movie file output, there are outputs for directly processing frame data for captured video and audio (for modifying it on the fly), as well as an output for capturing still images from a video device.
If you run the app now, you’ll see a blank window, and not much else happening (yet).

[code]
Push to start, push to stop
So now everything is setup, but we need a way to start and stop the actual capture. Let’s add a button to our basic window to allow us to do just that - at the end of applicationDidFinishLaunching, add:
@button = NSButton.alloc.initWithFrame(CGRectZero)
self.set_button_frame
@button.title = "Start"
@mainWindow.contentView.addSubview(@button)
Then below that, add these methods that we require, so we handle window resizing (similar to the article on positioning controls here), and to setup the button frame used initially and with the resizing:
def windowDidResize(notification)
  self.set_button_frame
end

def set_button_frame
  size = @mainWindow.frame.size
  button_size = [150, 30]
  @button.frame = [
    [(size.width / 2.0) - (button_size[0] / 2.0), (size.height / 2.0) - (button_size[1] / 2.0)]
    , button_size
  ]
end
We also need to make sure the app delegate is the delegate for the window, in order for our windowDidResize event handler to be called, so add this at the bottom of buildWindow:
  @mainWindow.orderFrontRegardless
  @mainWindow.delegate = self
end
Then, we need to set the target/action for the button, and point it to a method to start the session capture and recording to file, so back in applicationDidFinishLaunching, add:
@button.target = self
@button.action = 'toggle_capture:'
And the implementation for the button handler goes as follows:
def toggle_capture(sender)
  @is_running ||= false
  if @is_running
    @session.stopRunning
    @button.title = "Start"
  else
    @session.startRunning
    @button.title = "Stop"
  end
  @is_running = !@is_running
end
Here we can see that we’re tracking whether we’re running or not, initially defaulting to false, and then based on that we’re either starting or stopping the session, and updating the button text accordingly. Finally, we’re flipping the @is_running tracking var for next time.
And if we fire up the app now, we’ll see we can click the button, have it toggle between Start and Stop, and you should notice that the light on your built-in iSight goes on and off as you start and stop the capture. But there is no output file, no actual saved recording. That’s because we need to start the output itself, and specify a filename, and the best way to do that is to respond to when the session has started by subscribing to a notification, and firing up our output in there.


[code]
audio + video = mp4
So first of all, at the end of applicationDidFinishLaunching, let’s add our notification handler code:
NSNotificationCenter.defaultCenter.addObserver(self,
  selector: 'didStartRunning',
  name: AVCaptureSessionDidStartRunningNotification,
  object: nil)
We’re adding an observer for the AVCaptureSessionDidStartRunningNotification notification, and we’re asking that didStartRunning is called when that event is fired. The code for our didStartRunning method looks like this:
def didStartRunning
  url = NSURL.alloc.initWithString("file:///Users/#{NSUserName()}/Desktop/temp#{Time.now.to_i}.mp4")
  @output.startRecordingToOutputFileURL(url, recordingDelegate: self)
end
Here we’re constructing a URL to represent a file to save, using NSUserName() to grab the current user to use within the path. Then we call startRecordingToOutputFileURL with the URL and the app delegate as the recording delegate, which will begin to save the output from our capture session to file.
Now when we fire up the app, each time we start and stop we’ll create a new file, with the output from the video of the iSight and the audio of the mic. However you might notice that if you start and stop quite quickly, no file is created. If you start and wait a few seconds, and then stop, you’ll get a file, but it’ll only be very short. This is because it takes a second or two to start writing the output to file, and as such some additional feedback might be useful in our app so we know when we’re actually recording.
[code]
Making it more responsive
Firstly, let’s change our toggle_capture method so that it is essentially moving the app into a working state on a button click, and awaiting the actions to complete before updating the UI further. This means that clicking Start will change the button text to Starting… and clicking Stop will change it to Stopping…, as well as rendering the button unusable until it’s been updated further.
def toggle_capture(sender)
  return if @is_working
  @is_running ||= false
  if @is_running
    @is_working = true
    @output.stopRecording
    @session.stopRunning
    @button.title = "Stopping..."
  else
    @is_working = true
    @session.startRunning
    @button.title = "Starting..."
  end
  @button.enabled = false
end
You’ll see we have an additional variable, @is_working, used to ensure that while we’re in the working state, we don’t action any other button presses, and we also disable the button to be sure. This is only half the story though - now we need some callbacks from the output itself to know when it starts and stops recording so that we can update the UI, the @is_working var, and re-enable the button. You may have noticed when we start recording in didStartRunning, we make this call:
@output.startRecordingToOutputFileURL(url, recordingDelegate: self)
This sets the app delegate as the delegate for receiving events related to the recording, and we’re now explicitly calling stopRecording in toggle_capture too, so as such we can now implement a couple of delegate methods to handle our response to starting and stopping recording. Add the following:
def captureOutput(output, didStartRecordingToOutputFileAtURL: url, fromConnections: connections)
  @button.title = "Stop"
  @button.enabled = true
  @is_working = false
  @is_running = true
end

def captureOutput(output, didFinishRecordingToOutputFileAtURL: url, fromConnections: connections, error: err)
  @button.title = "Start"
  @button.enabled = true
  @is_working = false
  @is_running = false
end
We’re re-enabling the button and marking @is_working as false in both cases, for starting and stopping, but when we’ve started we’ll update the button text to Stop, and mark @is_running as true, and when we’ve finished we’ll update the button to show Start and set @is_running to false. Fairly simple, and we now have a more complete feedback loop with more robust handling of the way that the recording starts and stops, which provides better feedback to the user.

[code]
Tidy up
The last thing we’ll do is a quick bit of tidyup to ensure that our recording and session stay in sync, even if there is an error. Right now if the user presses Stop, both the session and recording are stopped, but if the recording is stopped independently by the system for some reason (out of disk space, for example), then our session will continue going even when the session stops. Our button will update, but the webcam will stay on. We’ll just move this line from toggle_capture:
@session.stopRunning
to the top of our didFinishRecordingToOutputFileAtURL method:
def captureOutput(output, didFinishRecordingToOutputFileAtURL: url, fromConnections: connections, error: err)
  @session.stopRunning
  @button.title = "Start"
That’s it! Now when the start button is hit, we start the session, and when the session is started, we start the recording. When the stop button is pressed, we stop the recording, and if that happens, or if the recording is stopped for any other reason, then the session is stopped also.
[code]
Next steps
So we’ve seen that it’s not too tricky to use the robust AVCaptureSession API to capture video and audio, and get an output file of the total captured footage. But it’d make the app more useful if it was possible to preview what the video looked like, and the audio levels so we can be sure everything is working while recording. Tomorrow I’ll have a post looking at how we can improve this app to do just that! Make sure to check back then, or follow us on Twitter so you know when that post is up. I’ll also have an overdue update on my RubyMotion Mac OS X book later in the week too, so stay posted for that!
UPDATE: Here is the next post, covering the video preview and audio level display!
CommentsCustomise a Mac OS X window further with RubyMotion and MotionKit Dec 19 2014
MotionKit provides a whole layer of abstraction for building up your user interface, and provides a neat DSL to do it. It makes building complex user interfaces much easier, and even better than that, it actually works on iOS as well as OS X, so it’s great to get to know it, as it’ll save you time!
First of all, let’s build up the user interface we had in the last tutorial in MotionKit. It’ll give us a good idea of how much easier things are! We’ll do this by using a separate layout class to construct our UI elements, and this will not only more cleanly separate our elements, but will also make it so that we can do more with less code.
We need to add our new dependency for the motion-kit gem first, so add this to Gemfile:
gem 'motion-kit'
Then run the following:
bundle install
Then we’ll create our new file at app/main_layout.rb that’ll describe our UI components:
class MainLayout < MotionKit::Layout
  SIZE = [150, 30]

  view :button, :label

  def layout
    add NSButton, :button do
      title "a test button"
      size SIZE
      autoresizing_mask :pin_to_center
      frame from_center
    end
    add NSTextField, :label do
      bezeled false
      drawsBackground false
      editable false
      selectable false
      size SIZE
      autoresizing_mask :pin_to_center
      frame from_center(up: 3)
    end
  end
end
This creates the same button and label (using a text field as before), and uses provided helper methods for pinning the items to the center, and autoresizing. This means our app/app_delegate.rb gets dramatically simpler, as we can remove our didResize handler, and we can replace our control initialization now with:
@layout = MainLayout.new
@mainWindow.contentView = @layout.view

@label = @layout.get(:label)
@button = @layout.get(:button)
@button.target = self
@button.action = 'button_pressed:'
This creates the layout, sets the view of the window to be that of the layout which handles the UI now, and then grabs a reference to the two controls - we want a reference to the button to be able to attach once more our event handler for the click, and we have the reference to the label for updating the text when the button is pressed. That event handler stays the same as before and works without any other modification.
Here is how it looks now - the same as how we had it in the last tutorial:

[code]
So now we’ve replaced what we had before with something that is a bit tidier and easier to understand - let’s build on that to add slightly more interesting functionality. Let’s build a basic calculator for adding two numbers together. This will require a few more controls to be setup, and gives us chance to look at another way to organise our controls - using AutoLayout constraints.
So let’s start by modifying our app/main_layout.rb file, replacing our existing UI with our desired new UI:
class MainLayout < MotionKit::Layout
  SIZE = [150, 30]

  def layout
    add NSTextField, :num1 do
      constraints do
        right.equals(:separator, :left).minus(10)
        top.equals(:separator, :top).minus(5)
        size [50, 30]
      end
    end
    add NSTextField, :separator do
      stringValue "+"
      bezeled false
      drawsBackground false
      editable false
      selectable false
      size_to_fit
      autoresizing_mask :pin_to_center
      frame from_center
    end
    add NSTextField, :num2 do
      constraints do
        left.equals(:separator, :right).plus(10)
        top.equals(:separator, :top).minus(5)
        size [50, 30]
      end
    end

    add NSButton, :calculate do
      title "Calculate"
      size_to_fit
      constraints do
        top.equals(:separator, :bottom).plus(10)
        left.equals(:separator, :left).minus(25)
      end
    end

    add NSTextField, :result do
      bezeled false
      drawsBackground false
      editable false
      selectable false
      size_to_fit
      constraints do
        top.equals(:calculate, :bottom).plus(10)
        left.equals(:separator, :left)
      end
    end
  end
end
That’s a bit more code than before, but when we consider we have five controls now, it’s not too much to get our heads around. Most of it is self-explanatory and similar to the previous code - we’re either creating NSTextField controls or NSButton controls, for the :result and :separator controls we want them to act like labels so much as before, we’re setting a few different things to make them look and behave as such. For :num1 and :num2 we want actual text field inputs, and then we have our button, :calculate. What is new are the constraints blocks, so let’s dig in deeper there.
constraints blocks are the hooks into AutoLayout and its constraints API, allowing us to specify UI placement based on a set of constraints. It manages all the constraints for the UI pieces alongside each other in the parent view, and sets out the UI to match them accordingly. You can reference other elements, and thus can build the elements off of one another, and in relation to each other, which makes things a whole lot easier. In this particular case, we’re setting our :separator label (the “+” sign) in the center, without any constraints, but using the frame and autoresize declarations we were using before. We’re then using AutoLayout constraints to ensure the :num1 and :num2 fields sit either side correctly. We then place the :calculate button relative to the :separator in the center, but below it, and again we place the :result label below that, in the center also. This gives us a whole lot of UI elements with not a lot of code, and it’s all pinned around the autoresizing central elements, which makes the whole thing scale nicely and automatically too. What’s not to like?
One other thing to note is that amongst the helpers provided for creating UI with MotionKit, there is a block you can wrap commands in, called deferred, which ensures that the helpers are run when all controls are initialised, and not just in the order they are called. This is especially useful when you are referencing other controls from your helper calls, however all constraints blocks are deferred by default, and so there isn’t a need to wrap our constraint code in a deferred block as well - but it could come in useful elsewhere, if you are using a lot of interdependent frame helpers.
The DSL itself for constraints is quite expressive, and allows you to match and specify on a great many things - for a full reference it’s best to check out the MotionKit docs, but as you can see in our code we’re making use of matching on the top, left and right sides of other controls, and using plus/minus calls to make relative adjustments.
We’re left with an expressive, neat way of describing our user interface, but now it’s back to app/app_delegate.rb so we can grab references to the controls we need, and hook up our calculator functionality! We can remove the existing UI setup code and instead use this:
@layout = MainLayout.new
@mainWindow.contentView = @layout.view

@num1 = @layout.get(:num1)
@num2 = @layout.get(:num2)
@calculate = @layout.get(:calculate)
@calculate.target = self
@calculate.action = 'calculate_result:'
@result = @layout.get(:result)
This sets up the view using our separate layout, as before, as well as grabbing the control references we need. It also sets up the click event handler for the button as before, only this time pointing at the calculate_result method. So all that remains is to implement that to fulfill the calculator functionality for our UI:
def calculate_result(sender)
  @result.stringValue = (@num1.stringValue.to_i + @num2.stringValue.to_i).to_s
end
And that’s it! It should look like this:
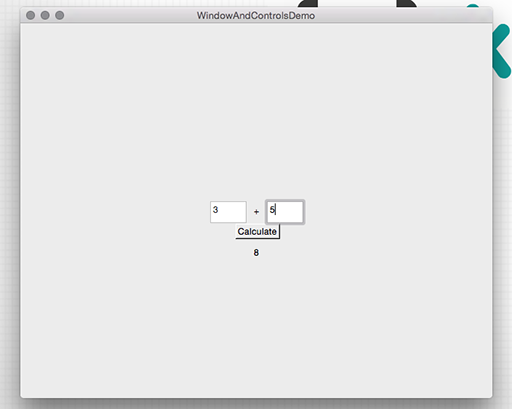
[code]
A super simple addition calculator UI implemented in a very small amount of code, all thanks to the beauty of MotionKit. In a future tutorial we’ll build up a more life-like example UI to demonstrate some other control and view classes, and some more MotionKit goodness.
CommentsHow to setup and position basic controls in a Mac OS X app window using RubyMotion Dec 17 2014
We’ve focused a lot in past articles on menu bar apps, but of course it’s quite likely that if you’re building an OS X app, you’ll want to have an actual application window to expose further functionality, unless you can fit what your app does neatly into a customised status bar menu.
The code for this tutorial is in this repo, which will also contain code for future windowed Mac OS X UI tutorials. The full code for this particular app is in this branch, and throughout the article there will be code links to specific tags which allow you to jump in at a specific point, or reference it as you run through building the app yourself.
So let’s start with the default OS X template RubyMotion provides - it gives us the setup for a default application window, complete with a menu, which we’ll leave as-is.
motion create --template=osx WindowAndControlsTest
cd WindowAndControlsTest
rake
That’ll give you the basic window seen below.

[code]
Now let’s look at adding a control - a button, in fact. In app/app_delegate.rb, at the bottom of the buildWindow method, add:
@button = NSButton.alloc.initWithFrame([[0, 0], [150, 30]])
@button.title = "a test button"
@mainWindow.contentView.addSubview @button
This is quite straightforward - we’re setting up a button at position [0,0], 150px wide and 30px high, we’re setting the title on it, and we’re adding it to our window view. Running that you can see the button in the bottom-left - on OS X, the root anchor for X and Y positioning (0,0) is bottom left, not top left as it is on iOS.

[code]
Let’s reposition our button so it’s in the middle of the screen. If you’re coming from iOS development, you may be used to fixed screen dimensions, but as you may also be finding out with each new iPhone announced, it’s much better to avoid hard-coding heights and widths of windows into your app, and instead query the information needed to position things accordingly. Amend our button initialisation to look like the following:
size = @mainWindow.frame.size
@button = NSButton.alloc.initWithFrame([[size.width / 2.0, size.height / 2.0], [150, 30]])
We’re taking our window size, and positioning our button based on half-width and half-height. When we run that, it’s definitely getting warmer, but it’s not quite right. In fact, it’s fairly obvious that the bottom left edge of the button is in the center of the window, but what we really want is the center of the button to be in the center of the window. For that, we need to take half of the button height and half of the button width away from our button position, so that the bottom left of the button accounts for wanting the center in the center of the window. Tweaking our code further gives us this:
size = @mainWindow.frame.size
button_size = [150, 30]
@button = NSButton.alloc.initWithFrame([
  [(size.width / 2.0) - (button_size[0] / 2.0), (size.height / 2.0) - (button_size[1] / 2.0)],
  button_size])
Now when we run things, we can see our button is right in the center of the window.

[code]
However, try resizing the window by grabbing the grab handle in the bottom right, and you’ll see that the button itself is basically still anchored relative to the bottom left, and as the window expands or contracts, it is no longer in the center of the smaller or larger window. This is because we’re just setting this all up once on app launch - let’s try making it so it’s responsive to window changes, to keep our button in the center on resize.
We need to start by handling changes to the window size, so our first change is to set the app delegate as the delegate also for the main window, so we can implement a listener for the resize method we need. First of all, find our initialisation for @mainWindow, and add the delegate line below what’s already there:
@mainWindow.delegate = self
Now, we can add a method that’ll update the button position based on the window size, basically the same as we were doing on initialization but abstracted out to its own method, and we’ll also add a method to handle the resize event and call our new button positioning method:
def windowDidResize(notification)
  self.set_button_frame
end

def set_button_frame
  size = @mainWindow.frame.size
  button_size = [150, 30]
  @button.frame = [
    [(size.width / 2.0) - (button_size[0] / 2.0), (size.height / 2.0) - (button_size[1] / 2.0)],
    button_size]
end
Of course, we can remove the duplicate button frame code, as we no longer need to set it specifically in the setup, we can just call set_button_frame there too!
@button = NSButton.alloc.initWithFrame(CGRectZero)
self.set_button_frame
@button.title = "a test button"
Now if you run the app, then using the grab handle resize the window, you’ll see the button is stuck right in the center there. Neat!
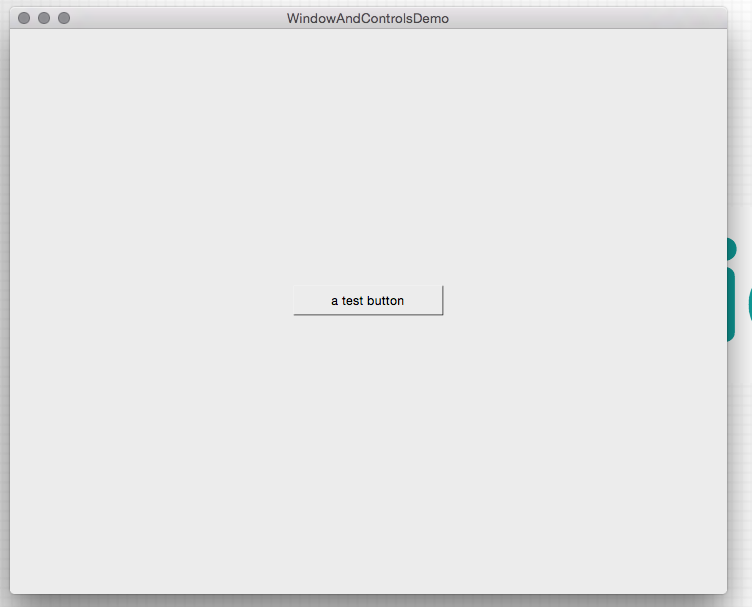
[code]
So let’s do one more thing now on our basic window tutorial, and handle some interactivity - it’d be good if our button actually did something! Let’s track how many times it is clicked, and show that beneath the button.
First of all, let’s add a new control, a label, above our button creation in buildWindow. This gives us chance to explore the fact that there actually is no label control in Cocoa - so instead we’re going to use a text field:
@label = NSTextField.alloc.initWithFrame(CGRectZero)
@label.bezeled = false
@label.drawsBackground = false
@label.editable = false
@label.selectable = false
@mainWindow.contentView.addSubview @label
We’re removing the bezeling, not drawing the background, and making sure it’s not editable or selectable - and voila, we have a label. Next up, we want to make sure the label frame is set to just below the button frame anytime the button frame changes - so we’ll add this to the bottom of set_button_frame:
@label.frame = [
  [(size.width / 2.0) - (button_size[0] / 2.0), (size.height / 2.0) - (button_size[1] / 2.0) - (button_size[1])],
  button_size]
This is the same as the main button, but set one button height lower, so it’s beneath.
Next, we need to setup the button click handler:
@button.target = self
@button.action = 'button_pressed:'
By setting the button target to self, and setting the action, we’re pointing to the method that will be triggered by a click - we now need to implement that method:
def button_pressed(sender)
  @taps ||= 0
  @taps += 1

  @label.stringValue = "#{@taps} presses"
end
Here we’re initializing the taps variable if it doesn’t already exist (i.e. on first click), then incrementing it, and setting the label text based on the count. Now our functionality will work like this:
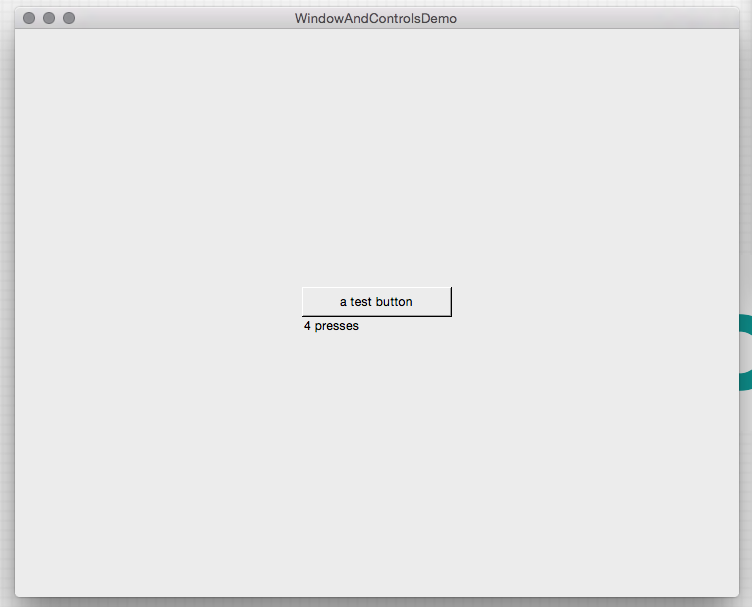
[code]
So, we’ve covered initializing and laying out basic controls, and establishing some very basic interactivity in our window - it’s good to know how to layout simple user interface by hand, but in the next article we’ll look at using motion-kit, which is an awesome lib for constructing user interfaces more quickly, and works really nicely as you start to build your app up.
CommentsHow to implement global hotkeys in your Mac OS X app using RubyMotion Mar 23 2014
Many apps can make use of global hotkeys, often to perform a background action (such as taking a screenshot or starting and stopping something), or to hide and show the window of an app. To implement them in your own app, the easiest way is to use the fairly old Carbon APIs for registering and responding to hotkeys being pressed - the good news is that this is quite straightforward, especially if you use a wrapper library.
DDHotKey
There is a very useful, easy to use project called DDHotKey that provides Cocoa classes that wraps the Carbon API calls to register system-wide hotkey event handlers. It’s not (at the time of writing) on Cocoapods, however we can still use it in our project fairly easily, with a simple modification. Grab the code from here, and put it in vendor/DDHotKey. You’ll need to remove the main.m file in the root of the folder, as RubyMotion will get confused with a vendored lib that contains an executable artifact. Alternatively, I’ve forked the lib and made the change, so you can grab the already working code from here. Once you have added the lib to the vendor folder, you can easily configure it to build with your app in the Rakefile:
app.frameworks += ["Carbon"]
app.vendor_project 'vendor/DDHotKey', :static, :cflags => "-fobjc-arc"
We’re ensuring we include the Carbon.framework in the build, we’re building DDHotKey as a static lib, and we’re also explicitly enabling ARC when compiling the lib.
Listening in
Then, setting up a hotkey is quite straightforward - first of all we grab a reference to the hotkey center object exposed by DDHotKey:
center = DDHotKeyCenter.sharedHotKeyCenter
Then we just need to pick a key, pick our modifiers, and setup the event handler to point to a method of our choosing:
center.registerHotKeyWithKeyCode(KVK_ANSI_M, modifierFlags: NSCommandKeyMask | NSAlternateKeyMask,
  target: self, action: 'handleHotkey:', object: nil)
A note on keys and modifiers
In the case above, KVK_ANSI_M is a constant provided by the Carbon APIs that refers to the keycode representing the M key. You can replace this with the constant for whichever key you’d like to trigger on. Likewise, in addition to NSCommandKeyMask and NSAlternateKeyMask, there is also NSCommandKeyMask, NSShiftKeyMask, and NSFunctionKeyMask which you can factor into your key combinations for hotkeys.
Respond accordingly
And finally we just have to define our event handler to do something:
def handleHotkey(event)
  puts "hotkey pressed!"
end
And that’s all there is to it! You can define multiple hotkey handlers to do different things in your app, so you’re not just restricted to one.
Example app
Here is a sample app that is the default RubyMotion OS X app template, with the default window hidden by default and the app running in the background, and with Cmd+Alt+H setup to hide and show the window. Overall, global hotkeys are great for putting your app at your users fingertips at any time, and it doesn’t take a very long time to implement it!
Further reading
Ideally you want to allow your users to choose the key combo for certain actions, so they can change the defaults if they have conflicts between apps, or if they just prefer different combinations - and DDHotKey provides a customised NSTextField control that allows you to capture and store a combination for use as a hotkey. I’ll cover how to roll that into a settings screen for your app, persisting the results in app configuration, in my forthcoming book, Building Mac OS X apps with RubyMotion. Be sure to sign up below to be notified when it’s ready for an exclusive discount!
If there are any questions on this article, please let me know in the comments below, or on Twitter!
Commentsmotion-popup: a RubyMotion gem for popup panels in your status bar app Jan 4 2014
Happy New Year to you all! Hope you all had a happy holidays and wonderful New Years.
In the last tutorial we setup a custom user interface using a popup window panel underneath our status bar menu item. I’ve now moved the core re-usable code to make that happen into its own little gem to make it easier for you to use in your own apps. The panel and the background custom drawing code is part of the gem, allowing you to easily instantiate and show a window underneath your own status bar item, and also allowing you to configure some of the parameters used for drawing the panel to customise it.
You can check out the code for it here, and read up on usage and customisation here.
I’d also like to thank everyone that has subscribed to be notified about my upcoming RubyMotion Mac OS X apps book, Building Mac OS X apps with RubyMotion. The support and interest has been overwhelming and has really reinforced my motivation to make the book a really useful resource for developers who want to build Mac OS X apps with RubyMotion.
If you’ve not yet signed up to know when the pre-order is available, you can do so here or at the bottom of this post - and if you’re on the fence about whether it’d be useful, the recent tutorials I’ve written on using RubyMotion to create Mac OS X apps will give you a flavour of what the content will be like. Don’t forget that if you subscribe now, you’ll get an exclusive discount on pre-ordering the book too when the time comes!
Here are the Mac OS X RubyMotion tutorials from late last year in order - there is more to come over the next few months!
- How to quickly get started creating status bar apps for Mac OS X using RubyMotion
- How to build a RubyMotion status bar app that updates in the background
- How to integrate your RubyMotion OS X app with a JSON based web API
- Displaying user notifications in your RubyMotion OS X app
- Building a custom user interface for your Mac OS X status bar app in RubyMotion
If you have any questions about the new gem, the recent tutorials, or the forthcoming book, please get in touch in the comments below or @ejdraper on Twitter. Look out for the next tutorial article soon, and I hope 2014 is off to a great start for everyone!
CommentsBuilding a custom user interface for your Mac OS X status bar app in RubyMotion Dec 14 2013
Status bar apps are very useful, but what we’ve gone through so far in our series on building Mac OS X status bar apps with RubyMotion really only covers the basics, and our apps can often be much improved by implementing a more custom user interface than just a dropdown menu when you click on the item in the status bar.
The reasons you’d want to implement your own user interface are fairly varied, but generally speaking it gives you the ability to more easily show specific data, and handle interactions within the app in a way that better relates to what your app does.
In this article we’re going to take the app we’ve built up in the previous couple of articles, and go from a fairly staid, boring menu to list the commits, to a far more vibrant and interesting custom panel that lists the commits in a much more visually pleasing manner, and includes the user avatar image. As we’re building upon the existing codebase, and there is a fair bit of new code involved as well as changes to the existing code, we won’t be running through every single line - instead I’ll be focusing on the key implementation details, and all of the code is available as always on GitHub.
Custom panel
First things first, we need to setup a window that we can show when the status item is clicked. Instead of inheriting from NSWindow, we’ll inherit from NSPanel, which is a special subclass of NSWindow that auto hides when it loses focus, and is generally perfect for a window that belongs to a background status bar app such as in this case.
The full definition of our PopupPanel custom window class is here. Essentially though, we’re just setting up the window in our custom init method:
self.initWithContentRect([[0, 0], [POPUP_WIDTH, POPUP_HEIGHT]],
  styleMask: NSBorderlessWindowMask,
  backing: NSBackingStoreBuffered,
  defer: false)
self.title = NSBundle.mainBundle.infoDictionary['CFBundleName']
self.delegate = self
self.setBackgroundColor(NSColor.clearColor)
self.setOpaque(false)
The origin for the window isn’t relevant (hence 0,0) as we’ll be moving it to show under the status item anyway. We’re using a borderless window, and then we’re setting it to be transparent so it’s invisible, allowing us to set a content view that’ll do our custom pane shape drawing.
@background = PopupBackground.alloc.initWithFrame(self.frame)
self.setContentView(@background)
This is where we initialise that very custom popup background class - we’ll look at how that works shortly.
The only other really interesting code here is the showHide method:
if self.isVisible
  self.orderOut(false)
else
  event_frame = NSApp.currentEvent.window.frame
  window_frame = self.frame
  window_top_left_position = CGPointMake(
    event_frame.origin.x + (event_frame.size.width / 2) - (window_frame.size.width / 2),
    event_frame.origin.y)

  self.setFrameTopLeftPoint(window_top_left_position)
  @background.setArrowX(window_frame.size.width / 2)

  NSApp.activateIgnoringOtherApps(true)
  self.makeKeyAndOrderFront(self)
end
This is what gets called when the status menu button is pressed. We want it to act as a toggle, so we are using isVisible to determine the current state. If we are showing the window (i.e. it’s not already visible), there is a bit more work to do. The important bit is that on the X axis we use the origin from the frame of the cause of the event, in this case the status menu item, and add half its own width to it to find the center of that menu item; we then remove half the width of our custom window panel to find the origin point on the X axis for our panel to ensure it’ll appear centered underneath the status item. Then we set the arrow for the custom pane that points from our panel up to the status item - we’ll see how that functions in a minute too.
The rest of the class just ensures the panel functions as a key window, so we can receive notification when it loses focus, and correctly hide it so that pressing the button again shows it as expected rather than leaving it in a weird state.
The other piece of the puzzle is our custom background view that we’re using as the content view for our custom window, to render the panel background by doing some custom drawing. You can see that in full here. It’s based on the excellent Objective-C code written for this blog post, and basically uses a Bezier path to draw a panel with rounded edges, and an arrow on the top side in the middle that’ll appear to be pointing up at the status item. I won’t run through all of the code here, as it’s really just stepping through the various points (top of arrow, right of arrow, top right corner, bottom right corner, bottom left corner, top left corner, left of arrow) to draw the shape, and then to both fill the shape, as well as to draw an outline stroke.
The other bit of noteworthy code in this class is how we update it so that the arrow is set in the right spot and to redraw:
def setArrowX(value)
  @arrow_x = value
  self.setNeedsDisplay(true)
end
This updates the X value used in the drawing method, and setNeedsDisplay ensures that our draw method is hit again to re-draw. setArrowX is what we called from our PopupPanel, and so the rendering cycle for the custom window then is complete.
Right place, right time
We’ve actually already done the work in our PopupPanel class showHide method to calculate the right place to show the window, and to set the arrow on the custom pane - all that remains is to alter our AppDelegate and status menu setup to trigger the panel instead of a menu. We need to create the window within the AppDelegate:
@window = PopupPanel.alloc.initPopup
And then we’ll remove this line that set the status menu as the menu to use for the status item:
@status_item.setMenu(@status_menu)
We’ll then add these two lines to trigger a call to a custom event handler instead:
@status_item.setTarget(self)
@status_item.setAction('showHide:')
That event handler looks like this:
def showHide(sender)
  @unseen = 0
  self.showUnseenCommits
  @window.showHide(sender)
end
Now, we could have set the target to the @window itself, and called our showHide method directly there rather than through a delegate event handler on our AppDelegate. However, as we see above, in addition to simply toggling the window, we also have some work to do that pertains to things handled within the AppDelegate - we want to clear the unseen commits, so that they are “marked as read”, in the same way that we did before when the menu was shown. Hence the abstraction within the AppDelegate to perform the additional functionality.
Collecting commits
Right now if you fire the app up, you should see a custom panel that gets shown right beneath our status bar item when we click on the status menu entry. However, there isn’t any content in here just yet. Our background call to hit the GitHub API and pull out the right data is still working - we just need to take the data we have there, and use the very versatile NSCollectionView to render it nicely into our custom pane. The file that contains the majority of our code for this is here.
There are a few moving pieces to contend with. First of all, we’ll define a Struct that’ll contain the data we want to take from our call to GitHub, so we can store it in a neat way to use within the collection view:
Commit = Struct.new(:name, :repo, :message, :avatar, :url)
An NSCollectionView basically works off an array, and provided with a prototype object, will know how to generate the custom view for each object it finds in the array. So we define our custom view, CommitView, with some fairly easy to follow code that simply builds the three controls we’re using - an NSBox to encapsulate the item with a neat visual boundary (and show the actor and repo for a commit as a heading), an NSImageView to show the relevant user avatar, and an NSTextField configured to function as a label to show the commit message. We then provide a method that takes in our object (an instance of our Commit struct), and will use the fields to populate these controls. The last code of interest in our custom commit view is that we’re handling the click on it to open the commit page on GitHub directly from the view:
def mouseDown(event)
  NSWorkspace.sharedWorkspace.openURL(NSURL.URLWithString(@object.url))
end
The nice thing about this is that we no longer have to do a lookup to correlate the item clicked with a list of URLs - we’re handling this event on the view that is tied to a specific object, an object we can easily re-access from the event handler to provide the URL to open.
After that, we need to then define our prototype, as a subclass of NSCollectionViewItem - this must implement loadView, which will create a new CommitView instance, and setRepresentedObject which is passed an object from our content array, and so calls through to our setViewObject on our custom view to setup the various controls with the right data. This means that the collection view will loop through the array of content objects, instantiating a collection view item using our prototype, which in turn creates an instance of our custom view, and passes the relevant commit object all the way through to the view to render correctly.
All that remains now is to setup the NSCollectionView itself within our custom panel, which we’ll do in our AppDelegate. Where we previously created the window, below that we’ll go ahead and setup a scroll view first of all:
scroll_view = NSScrollView.alloc.initWithFrame(NSInsetRect(@window.contentView.frame,
  PopupBackground::LINE_THICKNESS + SCROLL_VIEW_INSET, PopupBackground::ARROW_HEIGHT + SCROLL_VIEW_INSET))
scroll_view.hasVerticalScroller = true
@window.contentView.addSubview(scroll_view)
We’re using a scroll view so that we can have content a lot longer than our custom pane (given that the idea is to keep it quite small to sit beneath the status menu item, and there might be a lot of commits to show). It’s fairly easy to get going - we’re setting the frame to be inset slightly from the content view frame, to avoid getting too close to the rounded corners and overlapping them, and we’re making sure it’s a vertical scroller so we can scroll up and down our commit list.
We’re then going to setup our collection view using the scroll view frame, and we’re giving it an instance of the commit prototype so that it’ll know how to create our custom views. We then assign that to the scroll view:
@collection_view = NSCollectionView.alloc.initWithFrame(scroll_view.frame)
@collection_view.setItemPrototype(CommitPrototype.new)

scroll_view.documentView = @collection_view
The last piece of the puzzle is getting the data into the collection view each time it changes - here we need to delve into our checkForNewEvents method that processes our GitHub events. We can remove a fair bit of code now as things are nice and simple (you can see the exact changes in this diff). However, the most important thing is creating instances of our Commit struct for each commit with the right data from the GitHub API, and appending it to an array that we setup towards the beginning of checkForNewEvents:
@data << Commit.new(actor, repo, message, avatar, url)
And after we’ve finished processing all of the commits, we update the collection view quite easily:
@collection_view.setContent(@data)
Running the app now and clicking the menu item will show the custom panel, complete with the custom commit views for each commit found. Clicking an item will open it as it did before (and auto hide the panel).
Additional options
This all functions really well, but we’ve lost a little bit of potentially vital functionality - the menu options to show the about window, and to quit the app! The nice thing is we still have our menu with those options, and we can add a button to our custom panel that when clicked will show that exact same menu but as a context sensitive popup menu instead!
We just need to setup an NSButton within our AppDelegate and add it to the content view of our custom window, which we’ll do beneath the scroll view:
@options_button = NSButton.alloc.initWithFrame(NSMakeRect(PopupPanel::POPUP_WIDTH - BUTTON_WIDTH, 0,
  BUTTON_WIDTH, BUTTON_HEIGHT))
@options_button.setTitle("Options")
@options_button.setButtonType(NSMomentaryLightButton)
@options_button.setBezelStyle(NSRoundedBezelStyle)
@options_button.setTarget(self)
@options_button.setAction('showMenu:')
@window.contentView.addSubview(@options_button)
And then we’ll implement the showMenu event handler:
def showMenu(sender)
  NSMenu.popUpContextMenu(@status_menu, withEvent: NSApp.currentEvent, forView: sender)
end
Now when you run the app, you’ll see we have an options button at the bottom, and clicking it reveals our menu with the about and quit functionality working just the same as before! This is a great way to still tuck away the standard stuff your app might need in a normal menu, but retain all of the power and customisation that building your own custom user interface will bring you.
Here is what our end result looks like:
![]()
Phew, that was a quite a long tutorial this time! But we’ve seen that relatively speaking, it isn’t a whole lot of code to implement a custom user interface that you can tweak to better suit your own app. You could tweak the PopupBackground drawing to do something different, and of course you don’t have to use a scroll view and collection view to display the data - it depends on what you are showing. If you do use a collection view, you can customise your own item view that best suits the data you’re showing. There are a number of different ways to use this approach, but end up with a result perfectly tailored to your app.
As we didn’t cover every last line of code that was changed, and there were a few more general tweaks made to the app since our last article, you can view all of the changes in this diff over on GitHub.
Let me know if you enjoyed the article, or if you have any questions, comments or suggestions, either below, or @ejdraper on Twitter!
CommentsDisplaying user notifications in your RubyMotion OS X app Nov 27 2013
Notification Center was first announced for Mac OS X 10.8 Mountain Lion, and then it saw some improvements for Mac OS X 10.9 Mavericks. Similar to the notifications on iOS, it provides a convenient way for applications to show information to the user, and is especially useful for applications that run in the background, or that have a background processing component that needs to display and highlight information to the user.
Notify
Using them is fairly straightfward - we’ll run through how to add them to an application, and we’re going to build upon the small status bar app we created in the last tutorial to demo this. If you weren’t following along with that article, it ran through creating a status bar application which talked to a JSON API (the GitHub API) to retrieve commit data and show the latest commits from repositories you have access too. We can now extend that to popup a notification whenever new commits are found. We can also respond to a click on the notification by showing the menu containing the list of commits. All of the changes we’ll be making are to the app_delegate.rb file.
First things first, we need to add something to the end of our applicationDidFinishLaunching method:
NSUserNotificationCenter.defaultUserNotificationCenter.setDelegate(self)
This will allow us to intercept events regarding our notifications, and handle the clicks on them, which we’ll cover shortly.
Next up, we’ll add a method to show new commits as a notification:
def showNotification(new_commits)
  return unless new_commits > 0
  notification = NSUserNotification.alloc.init
  notification.title = "New commits"
  notification.informativeText = "There are #{new_commits} new commits."
  notification.soundName = NSUserNotificationDefaultSoundName
  NSUserNotificationCenter.defaultUserNotificationCenter.scheduleNotification(notification)
end
Here we’re making sure we only trigger a new notification when there are new commits, we’re setting the title and text, and we’re using a default sound (the very familiar tri-tone noise). You can also specify a path to a .caf audio file in the resources bundle of the app, if you so wish. Lastly, we schedule the notification with the user notification center, and as we set no particular scheduled date for the notification, it shows immediately. You could schedule a notification for a specific time by setting the deliveryDate on the notification before adding to the user notification center - this one is scheduled for 10 minutes from now:
notification.deliveryDate = Time.now + (10 * 60)
NSUserNotificationCenter.defaultUserNotificationCenter.scheduleNotification(notification)
Now we need to trigger our notifications method, so we’re going to dip into our checkForNewEvents method, which is where our commit processing happened, and towards the end where we used to have the following:
@unseen += (@commits - @last_commits).length
self.showUnseenCommits
We’ll modify that to this:
new_commits = (@commits - @last_commits).length
@unseen += new_commits
self.showUnseenCommits
self.showNotification(new_commits)
What we’re doing here is taking the amount of new commits we found (the difference between our @commits and @last_commits arrays), and we’re adding it to the unseen counter to display the total number of unseen commits on the menu, as before. We’re then however using just the amount of new commits for this particular call, to display the notification in the user notification center. Essentially the menu bar item itself tracks a running tally of unseen commits, but the notifications should only ever let you know of new ones it has found since the last time it showed a notification.
If you run the app now, you’ll see that as soon as it starts up and pulls back the initial list of commits, it triggers a notification! However if we click on it in the user notification center, nothing happens. Ideally, we want it to trigger something to show in our app, and also to remove the notification as it has now been seen and processed by the user.
As we’ve already setup our AppDelegate as a delegate for the user notification center in applicationDidFinishLaunching, all that remains is to handle the approriate event by creating a method as follows:
def userNotificationCenter(center, didActivateNotification: notification)
  @status_item.popUpStatusItemMenu(@status_menu)
  center.removeDeliveredNotification(notification)
end
The didActivateNotification method is what handles the click on a notification created by our app, and so we perform two functions here - the first is to trigger the status bar menu to popup, showing the latest commits, and the second is to remove the delivered notification from the notification center, thereby clearing it out of the users way.
Notified
That’s it, a fairly short tutorial this time around, mainly because the NSUserNotification and NSUserNotificationCenter APIs are very clean, tidy and easy to work with. They provide some great additional interaction with your users, making apps more interesting, informative and accessible - and all in just a few lines of code! You can see the above changes in a commit to our existing codebase here, and you can of course grab the entire code for the app here.
If you have any comments, questions or suggestions, please let me know below. Remember to follow @ejdraper on Twitter to hear about the latest articles as we put them up!
CommentsHow to integrate your RubyMotion OS X app with a JSON based web API Nov 22 2013
In our last article on RubyMotion OS X apps, we built a status bar app that fetched data in the background to keep the menu item continually updated and showing the latest information. Our data source was from the local system, fetching the CPU usage statistics. In this article we’ll look at how to integrate with a JSON web API, making HTTP calls from your RubyMotion app, processing the response, and showing that in the menu.
You have to commit
The little utility app we’ll build will be a very basic and straightforward one to show the latest commits from projects you have access to on GitHub. GitHub has a wonderful JSON API, complete with very good documentation, and for developers, utility apps integrating with GitHub can be very useful indeed. You can follow along with the code in the article, and the app is open source and available in full here too.
Familiar start
By now if you’ve been following along with the RubyMotion on OS X series of articles, you’ll know our starting point. We’ll use the template gem from our first article to spin up a new app. Let’s fire up a blank status bar app now:
motion create --template=osx-status-bar-app CommitTrackerMenu
Dependencies
First thing we’ll do is add the gems we’ll need, BubbleWrap, and motion-yaml. Your Gemfile should look something like this:
source 'https://rubygems.org'

gem 'rake'
gem 'bubble-wrap'
gem 'motion-yaml'
Remember to run this when you’re done too:
bundle install
Configuration
We’ll come to BubbleWrap in a minute, but we’re using motion-yaml for the configuration for the app - to load our config file and ready it for use in our code, add the following to your AppDelegate:
class AppDelegate
  CONFIG = YAML::load(NSMutableData.dataWithContentsOfURL(
    NSBundle.mainBundle.URLForResource("config", withExtension: "yml")).to_s)
This finds the config in the root of the resource bundle, and loads the YAML contents into the constant. You’ll see an example config file in the GitHub repo for the code, you just need to rename config.yml.example to config.yml and fill in your GitHub personal access token - you can get one by visiting here. You can also amend the timer config to specify how often to check for new updates. It should end up looking something like this:
timer: 30
github_token: TOKEN
GitHub integration
Now, let’s work on integration with the API itself - this is where BubbleWrap comes in handy. This gem is a fantastic collection of all sorts of great functionality, nice Ruby wrappers around more complicated Cocoa APIs, shortcuts for often used features, and helpers that take advantage of Ruby language features to provide nicer ways of doing things. It’s a veritable Swiss Army Knife for iOS and OS X development.
We’ll be using BW::HTTP and BW::JSON to grab the data we need and to parse it. We’ve separated out our GitHub integration into a separate class to make it easier to read, so here it is in full:
class GitHub
  attr_accessor :token, :user

  def initialize(token, &block)
    @token = token
    self.user do |json|
      @user = json
      block.call
    end
  end

  def user(&block)
    self.get("https://api.github.com/user", &block)
  end

  def events(&block)
    self.get(@user['received_events_url'], &block)
  end

  def get(url, &block)
    BW::HTTP.get(url, {:credentials => {:username => @token, :password => ""}}) do |response|
      block.call(BW::JSON.parse(response.body))
    end
  end
end
There isn’t a lot to this, essentially we initialize the client with our personal access token. It immediately uses the token to do a quick check, and load the authenticated user JSON - this way we don’t need further user details such as username to make additional calls. It’ll call any block passed into that initialization method when that process is complete, allowing you to wait until the client is ready before doing anything else.
We have a method to retrieve events for the user which we’ll be using as our data source in the status bar itself in a minute, but you’ll see both that and the authenticated user call are wrappers themselves around the get method, which uses the BubbleWrap HTTP methods to easily call to the URL, passing the provided credentials (using the token over basic auth for GitHub means providing the token as the username, and leaving the password blank), and then processing the response body. In this case, we use the BubbleWrap JSON support to parse the body and return an array or hash parsed from the API.
Lastly, you’ll notice too that in the events method, we’re using something provided by the response from the authenticated user check as the URL (received_events_url returned within @user). The GitHub API helpfully returns other API call URLs within the authenticated user response, which we can then parse and use for further calls. This way, if their API changes and they move or update URLs, our code won’t break as it’s using the pointer to the right method provided by GitHub themselves, rather than a hard-coded URL!
Menu setup
With that out of the way, we can now focus back on our status bar app. First, we need to setup our menu items, so our applicationDidFinishLaunching method should look like this:
def applicationDidFinishLaunching(notification)
  @app_name = NSBundle.mainBundle.infoDictionary['CFBundleDisplayName']

  @status_menu = NSMenu.new
  @status_menu.delegate = self

  @status_item = NSStatusBar.systemStatusBar.statusItemWithLength(NSVariableStatusItemLength).init
  @status_item.setMenu(@status_menu)
  @status_item.setHighlightMode(true)
  @status_item.setTitle(@app_name)

  @http_state = createMenuItem("Loading...", '')
  @http_state.enabled = false
  @status_menu.addItem @http_state

  @status_menu.addItem createMenuItem("About #{@app_name}", 'orderFrontStandardAboutPanel:')
  @status_menu.addItem createMenuItem("Quit", 'terminate:')

  @unseen = 0
  @github = GitHub.new(CONFIG[:github_token]) do
    self.checkForNewEvents
  end
end
This should be fairly familiar if you’ve been following along with the previous articles. A few key differences, we’re setting the delegate on the status menu to the app delegate itself - we’re doing that so we can look out for a specific event, but we’ll come back to that a little later.
We’re creating a disabled menu item, @http_state, used just to display information on the state of the app, so we can update it to show when we’re doing different things. We instantiate it and set it to show “Loading…” to start with.
We then instantiate the GitHub client, and pass in a block that will get called when the initial authenticated user JSON is returned - we need to wait for this, as any subsequent calls won’t work until that has completed. We can then kick off our check for new events. This is where we check with our data source, in this case the GitHub API, and it’s where the meat of the app lies.
Events
The method that checks for and processes events from the GitHub API does quite a lot, so we’ll step through it and explain how it works - if you want to see the entire thing, you can do so here.
def checkForNewEvents
  begin
    @http_state.title = "Working..."
    @github.events do |events|
      @http_state.title = "Processing..."
We start by setting our @http_state menu item to show us as working, and then as soon as we get the response from GitHub, we switch that to processing.
unless events.empty?
  @events.each { |item| @status_menu.removeItem(item) } unless @events.nil?
  @events = []
  @urls = {}
  @last_commits = @commits || []
  @commits = []
Here we make sure that we have something to process, and then we are removing any menu items that we had previously pertaining to events. Each time this runs it’ll clear out the event menu items, and recreate them based on the data found. In addition to the variable to track those menu items (@events), we also have a hash to track URLs (@urls), which comes into play when we’re handling menu item clicks for these events, as well as a couple of variables to help us track what’s new between calls (@commits and @last_commits).
counter = 0
events.reverse.each do |event|
  next unless event["type"] == "PushEvent"
  next if event["payload"].nil? || event["payload"]["commits"].nil?

  commits = event["payload"]["commits"].select { |c| c["distinct"] }

  next if commits.length == 0
We’re now going to loop through all the events returned - we do so in reverse order, as we’ll be adding each menu item in at a specific index, which will in turn push all of those before it further down. So that we end up with date descending (newest first) order in the end, we reverse things to begin with.
We’re skipping over any event that isn’t a push event (code being pushed up to a repository), and that doesn’t have a payload or commits.
Lastly, we also ignore any commits that aren’t distinct - this is a very handy flag provided by GitHub from their API, and by distinct they mean if a commit has been seen in the repo before, i.e. if something was pushed as part of a branch, it’d be distinct, but then merging it into master, it’s the same commit, and it is no longer distinct. We only want to be notified of entirely new commits, so we filter out anything that isn’t distinct.
actor = event['actor']['login']
repo = event['repo']['name']

commits.each do |commit|
  message = commit['message'].split("\n").first
  message = "#{message[0...30]}..." if message.length > 35
  @urls[counter] = commit['url'].gsub("api.", "").gsub("/repos", "").gsub("/commits", "/commit")
  item = self.createMenuItem("[#{actor}]: #{repo} - #{message}", 'pressEvent:')
Now we loop through the commits we have left to look at, and we’ll do a bit of processing on the message and URL. We want to truncate the message to a reasonable uniform length, and we need to mess with the URL a bit as the URL returned from GitHub points to the commit within the API, and we want a URL we can open in a browser to show the commit - the always useful String gsub method comes in handy there as we stash the URL in our @urls hash for looking up later.
We then setup the menu item, similarly to how we’ve done before. Each item will use the same event handler, which we’ll look at shortly. One thing to note is that by specifying pressEvent:, instead of just pressEvent (note the trailing colon), then our event handler will be sent an argument, the sender of the event, in this case the item itself. As we’re handling all of the item events with the same event handler method, and using the tag on the item to lookup the URL to show, it’ll be quite handy to be sent the clicked item!
    item.tag = counter
    @events << item
    @status_menu.insertItem(item, atIndex: 1)
    counter += 1
    @commits << commit['sha']
  end
end
Here we set a tag on the item, and this is where our counter comes in - we can only use an integer for the tag, but we need a reference to our URL for use in the event handler. So we’ve used the counter as a numeric pointer to the URL in our URLs hash (@urls), and we set it on the item so we can match the two together. We are then keeping track of our event menu item (so we can remove it from the menu next time we re-process), and then insert the item into the menu at the same index for each item. We’re doing it at index 1 instead of index 0 so as to always leave the @http_state menu item at the top of the menu as the others get pushed down with each new item added.
We then increment our counter for the next commit, and stash the unique SHA reference for the commit in @commits so we can compare which commits we’ve seen this time with last time for working out which commits are new.
  @unseen += (@commits - @last_commits).length
  self.showUnseenCommits
end
Here we use our arrays of the commit references (@commits for this time, @last_commits for the last time around) to deduce how many new commits there are in this run, and add that to our unseen total tracking variable, @unseen. The method to show those we’ll get into below.
    @http_state.title = "Ready"
  end
rescue
  @http_state.title = "Error, retrying again shortly"
If everything finishes as expected, we set the @http_state menu item to show things as ready for the next call - and if we experienced an error, we make that clear too.
  ensure
    NSTimer.scheduledTimerWithTimeInterval(CONFIG[:timer],
      target: self,
      selector: 'checkForNewEvents',
      userInfo: nil,
      repeats: false)
  end
end
Whatever happens though, the ensure part of the begin/rescue/ensure block will always end by triggering the next call. We’re using our timer configuration to schedule the same method to be called again. We do this rather than simply call it once at the beginning but with repeats set to true, because the call itself and subsequent processing will take a variable amount of time. For the most part it’s very quick, but network slowdowns, poor connections, or timeouts could cause it to take a bit longer. We want our delay between calls to be just that - between calls, not between the time each call is kicked off, regardless of result. From the time our processing ends, to the time it runs again, will be the value we’ve configured.
Mark all as read
We have a couple of steps left to flesh out. Above we called showUnseenCommits after incrementing how many unseen commits there were - it’s a fairly simple update to the title of the main system menu item for our app:
def showUnseenCommits
  @status_item.setTitle("#{@unseen.zero? ? 'No' : @unseen} new #{@unseen == 1 ? 'commit' : 'commits'}")
end
When we click on the menu, it’d be good to clear the message, sort of a mark all as read. This is the reason we set the delegate for the status menu to be the app delegate itself - luckily we can easily handle the event of the menu opening (in response to the click) by implementing menuWillOpen, and in there we can clear the message by setting @unseen to zero and updating the status menu text:
def menuWillOpen(menu)
  @unseen = 0
  self.showUnseenCommits
end
Click to view
Lastly, when we click on an item, it’d be great to go to that commit on GitHub for viewing. We’ve already stashed the URLs when processing the events above, and so we now just need to lookup the particular URL, which we can do with the numeric tag property on the item. That’s our pointer into the URLs hash, @urls, and so our event handler looks like this:
def pressEvent(item)
  NSWorkspace.sharedWorkspace.openURL(NSURL.URLWithString(@urls[item.tag]))
end
NSWorkspace.sharedWorkspace.openURL is a nice way to use your system default way of opening a URL, i.e. your default browser. Easy!
You can now fire up the app to see it all working together.
Wrapping up - questions?
And that’s about it - much like last time, we’ve built a status bar app that runs in the background, updating from a data source. This time though we used HTTP calls and JSON processing to interact with a 3rd party API to make the data a bit more interesting, we used YAML for file configuration, we used a timer instead of a background thread to periodically check for new data, and we dynamically updated our menu list based on the data we brought back, bringing even greater interactivity into our fairly basic app. Remember you can check out all the code here.
In our next few articles we’ll look at integrating notifications within our apps to make notifying the user of a change more prominent and useful, and we’ll also start to explore custom user interfaces, to improve the experience for users of your Mac OS X apps, both for status bar apps as we’ve been focusing on thus far, but also for window based apps.
Hopefully you’re enjoying my articles on RubyMotion development - as always, let me know your thoughts, comments and questions below, or contact me on Twitter @ejdraper!
CommentsPage 1 of 2 | Next page