
Working with NSTableView Aug 18 2015
This article is a look at how to use NSTableView when building a Mac app using RubyMotion, and is taken from the Data chapter in my book, Building Mac OS X apps with RubyMotion. If you like what you read here, please take a look at my book - in the book we progress further with the following app code to look at Core Data, and then integrate with iCloud. You can also get a free 20+ page Getting Started guide.
A table view can be a good way to start with presenting data in your app, before you customize further or even replace it later if needed. It's a no-frills, easy to use way to get something up and running. We'll start by building a simple note taking app, that will just keep the notes in memory and display them in the table view. Create the app using the OS X template as we've done before:
motion create --template=osx Noteworthy
cd Noteworthy
First up, let's add in our favorite user interface gem, motion-kit:
gem 'motion-kit'
Then run the following:
bundle install
Then we'll create our layout file to setup our user interface - here is the code for app/main_layout.rb:
class MainLayout < MotionKit::Layout
  FORM_HEIGHT = 100
  TITLE_HEIGHT = 30
  CONTENT_HEIGHT = 70
  BUTTON_WIDTH = 70
  BUTTON_HEIGHT = 30

  def layout
    add NSView, :form do
      constraints do
        width.equals(:superview)
        height.is(FORM_HEIGHT)

        min_left.is 0
        min_top.is 0
      end

      add NSTextField, :title_text do
        placeholderString "Enter note title"

        constraints do
          width.equals(:superview)
          height.is(TITLE_HEIGHT)

          min_left.is 0
          min_top.is 0
        end
      end

      add NSTextField, :content_text do
        placeholderString "Enter note content"

        constraints do
          width.equals(:superview)
          height.is(CONTENT_HEIGHT)

          min_left.is 0
          min_top.is TITLE_HEIGHT
        end
      end

      add NSButton, :save_button do
        title "Save"

        constraints do
          width.equals(BUTTON_WIDTH)
          height.is(BUTTON_HEIGHT)

          min_right.is 0
          min_bottom.is 0
        end
      end
    end

    add NSScrollView, :scroll_view do
      has_vertical_scroller true

      constraints do
        width.equals(:superview)
        height.equals(:superview).minus(FORM_HEIGHT)

        min_top.is FORM_HEIGHT
      end

      table_view = add(NSTableView, :table_view) do
        row_height 25

        add_column "title" do
          title "Title"
          min_width 150
        end

        add_column "content" do
          title "Content"
        end
      end
      document_view table_view
    end
  end
end
Most of this should be fairly straightforward if you've previously read through my previous post on motion-kit - we're just setting up a window with the top section containing form fields for creating a new note, with a button to save it, and the bottom section is a table view inside a scroll view, so that when there is more content in the table than there is room in the window, you can scroll through it easily. We're setting up two columns in the table view, title and content.
After that, we'll update our AppDelegate, adding the following to the end of our applicationDidFinishLaunching:
@title_text = @layout.get(:title_text)
@content_text = @layout.get(:content_text)

@notes = []
@table_view = @layout.get(:table_view)
@table_view.delegate = self
@table_view.dataSource = self

@save_button = @layout.get(:save_button)
@save_button.target = self
@save_button.action = 'note_save:'
We're grabbing references to the controls we need to interact with, and then we're following that up by ensuring that the AppDelegate itself acts as both the delegate, and data source for our table view - we'll come back to that in a minute. Then we're setting up the save button to call a method on the AppDelegate, called note_save. That method looks like this:
def note_save(sender)
  title = @title_text.stringValue
  content = @content_text.stringValue
  return if title.nil? || title.empty? ||   content.nil? || content.empty?

  @notes << {:title => title, :content => content}
  @table_view.reloadData
  @title_text.stringValue = ""
  @content_text.stringValue = ""
end
Nothing too tricky here - we're validating the inputs first of all, then adding a note to our @notes array as a simple hash with :title and :content keys. We'll reload the table view so that it updates to show the new note, and then we'll clear out the text fields ready for the next note. All that remains now is to implement a couple of methods we need to handle the table view itself - specifically, we're going to be making sure we conform to the base necessities required for the NSTableViewDataSource and NSTableViewDelegate protocols. For the former, we need to add the following very simple method:
def numberOfRowsInTableView(table_view)
  @notes.length
end
This just ensures that we're telling the table view how many rows we have based on our notes in our @notes array. The next method we need, and final bit of code we have to add to see all of this working, is a little bit more involved:
def tableView(table_view, viewForTableColumn: column,   row: row)
  result = table_view.makeViewWithIdentifier(column.identifier, owner: self)
  if result.nil?
    result = NSTextField.alloc.initWithFrame([[0, 0],   [column.width, 0]])
    result.identifier = column.identifier
    result.editable = false
  end
  result.stringValue =   @notes[row][column.identifier.to_sym]
  result
end
This is called for each column, in each row - i.e. for every one of our configured columns in our layout (we have two, title and content), and then for however many rows we have based on the previous method we defined that looks at the length of the @notes array. We're calling makeViewWithIdentifier to see if we already have a view we can use in the pool, utilizing the built-in table view recycling to avoid creating too many controls. This is important, especially if you're building an app that might ultimately have hundreds or thousands of rows perhaps, and/or a lot of columns.
If we can't find a view to use, we'll set one up. We don't need to worry about any frame dimensions besides the width which we can ascertain from the configured column width, and likewise we set the identifier to match the column too. In this case we don't want the text fields editable. Lastly, regardless of how we got our view, the final thing to do is to set the string value contents of the cell - we're effectively indexing into our @notes array by both the row (to find the right note), and then using the column identifier to find the right key in our note hash to get the contents. We just have to return our control, and we're done!
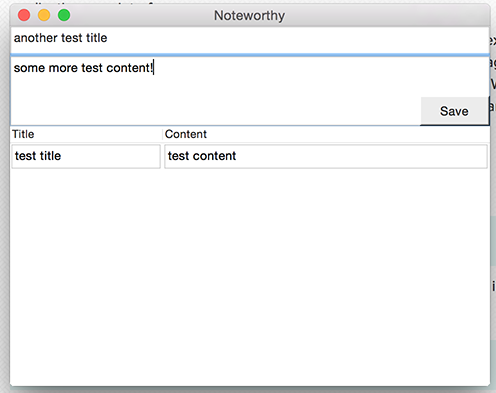
If you fire up the app now, you'll see that we have the form, and an empty table. Entering a note without filling in both fields doesn't save, and filling in both fields and hitting save then clears the fields, and adds the note to our table below. You can keep adding as many notes as you'd like!
This is a fairly simple table view implementation, and of course you can customize an awful lot about the table view to make it more useful, to make it look nicer, and to make it better suit your purposes.
If you quit the app and restart it though, you'll see all of our precious notes have disappeared. That's where Core Data would come in handy!
You can see the code for this section here.
technical • rubymotion • code • kickcode